How to set up a Selenium Virtual User Script
Introduction
This is a quick-start guide to setting up a Java Selenium Virtual User. It is assumed that you are already familiar with the basics of Eggplant Performance Studio and how to set up a workspace and project. If not, please read through the Getting Started with Eggplant Performance Studio page. This guide will also provide links to relevant sections regarding script creation, tests, building workspaces and projects, etc.
Create a custom Selenium Java Virtual User Type
In the Workspace tree, right-click the built-in Selenium Java Virtual User and select New Virtual User. Enter the name of the new Virtual User and click OK.
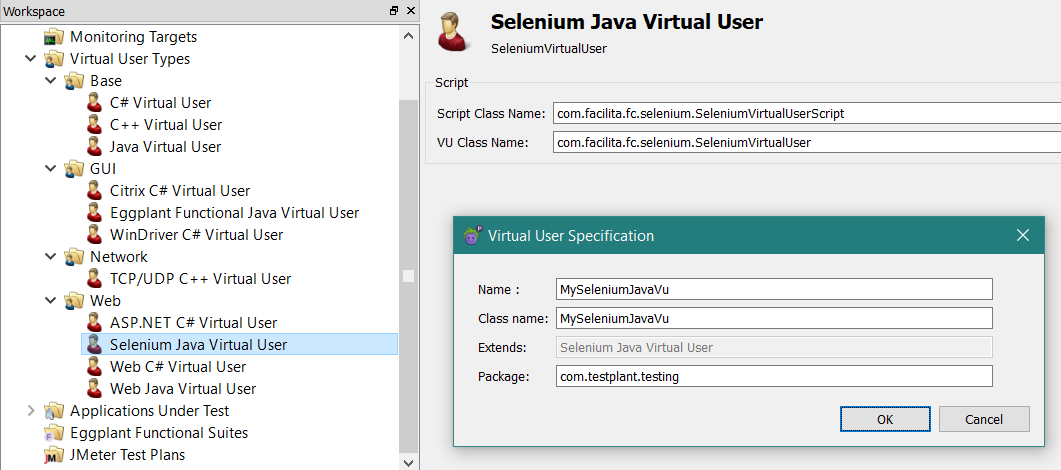
(See Creating a Custom Virtual User type for more details.)
Create an empty script
Create an empty script based on the new Virtual User Type. In the Project tree, right-click the Scripts folder and select New empty script. Select the new custom Selenium Virtual User Type, enter a name for the script and click Next to enter the package details.
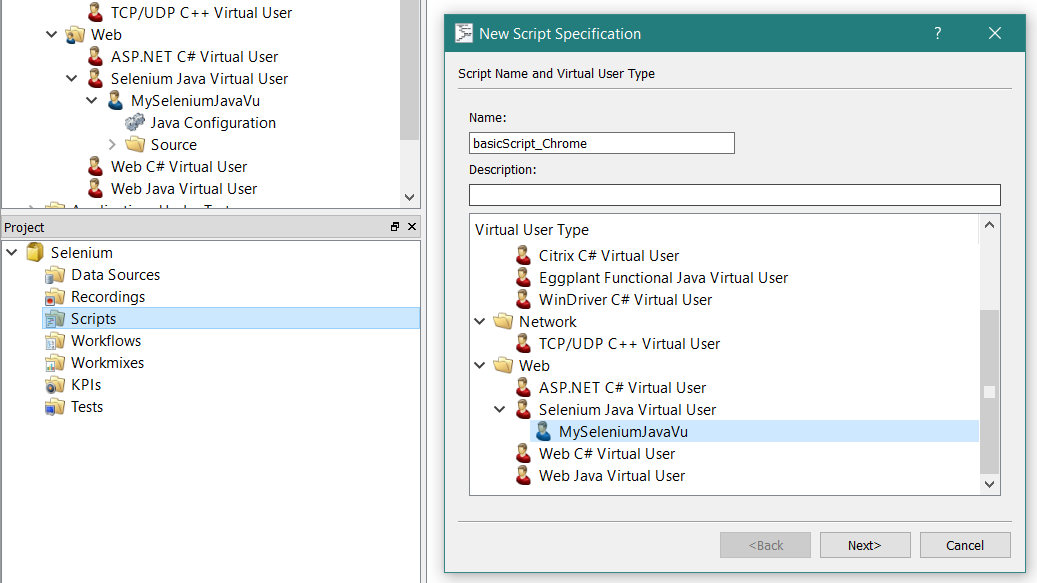
(See Creating a Virtual User Script from a Template for more details.)
Create a test
Create a new test from the empty script. In the Project tree, right-click the new script and select Create test. Enter a name for the test and a name for the Deployment Item (VU Group) and click OK.
When the new test is created you can double-click on the new VU Group (or right-click and choose Edit) to update the number of Virtual Users, the Virtual User distribution across Injectors, and Runtime Settings.
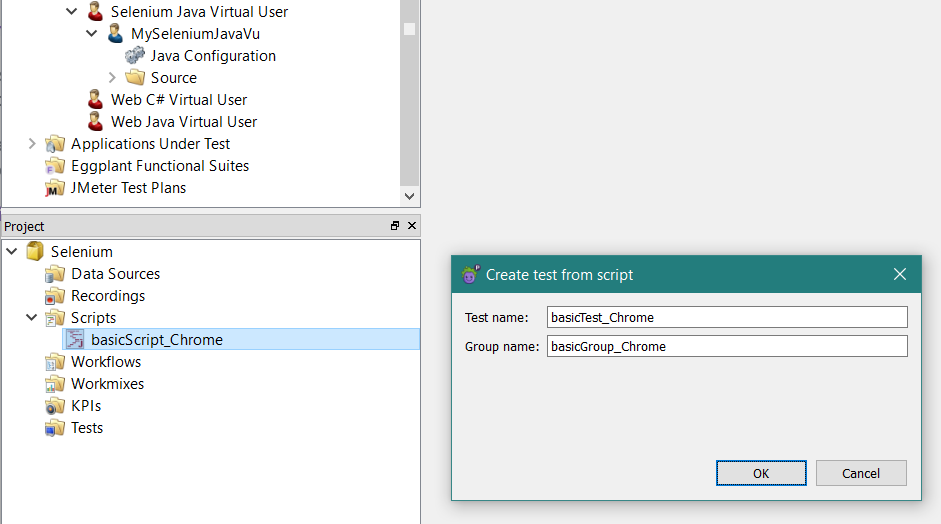
(See Create a Test from a Virtual User Script and Managing Tests in Eggplant Performance for more details on these settings.)
Edit and debug the script
Set up Eclipse
The next step is to edit the script and develop some code to test your web application using the Selenium VU and your chosen Web Driver.
Selenium Virtual User scripts are written in Java. You can edit them using the Eclipse IDE. Right-click the VU Group in the Test view and select the Debug option. This will enable you to use Eclipse to edit and debug your new Selenium VU script. If you need to set up Eclipse for the first time, see Editing Java Scripts using Eclipse for more details.
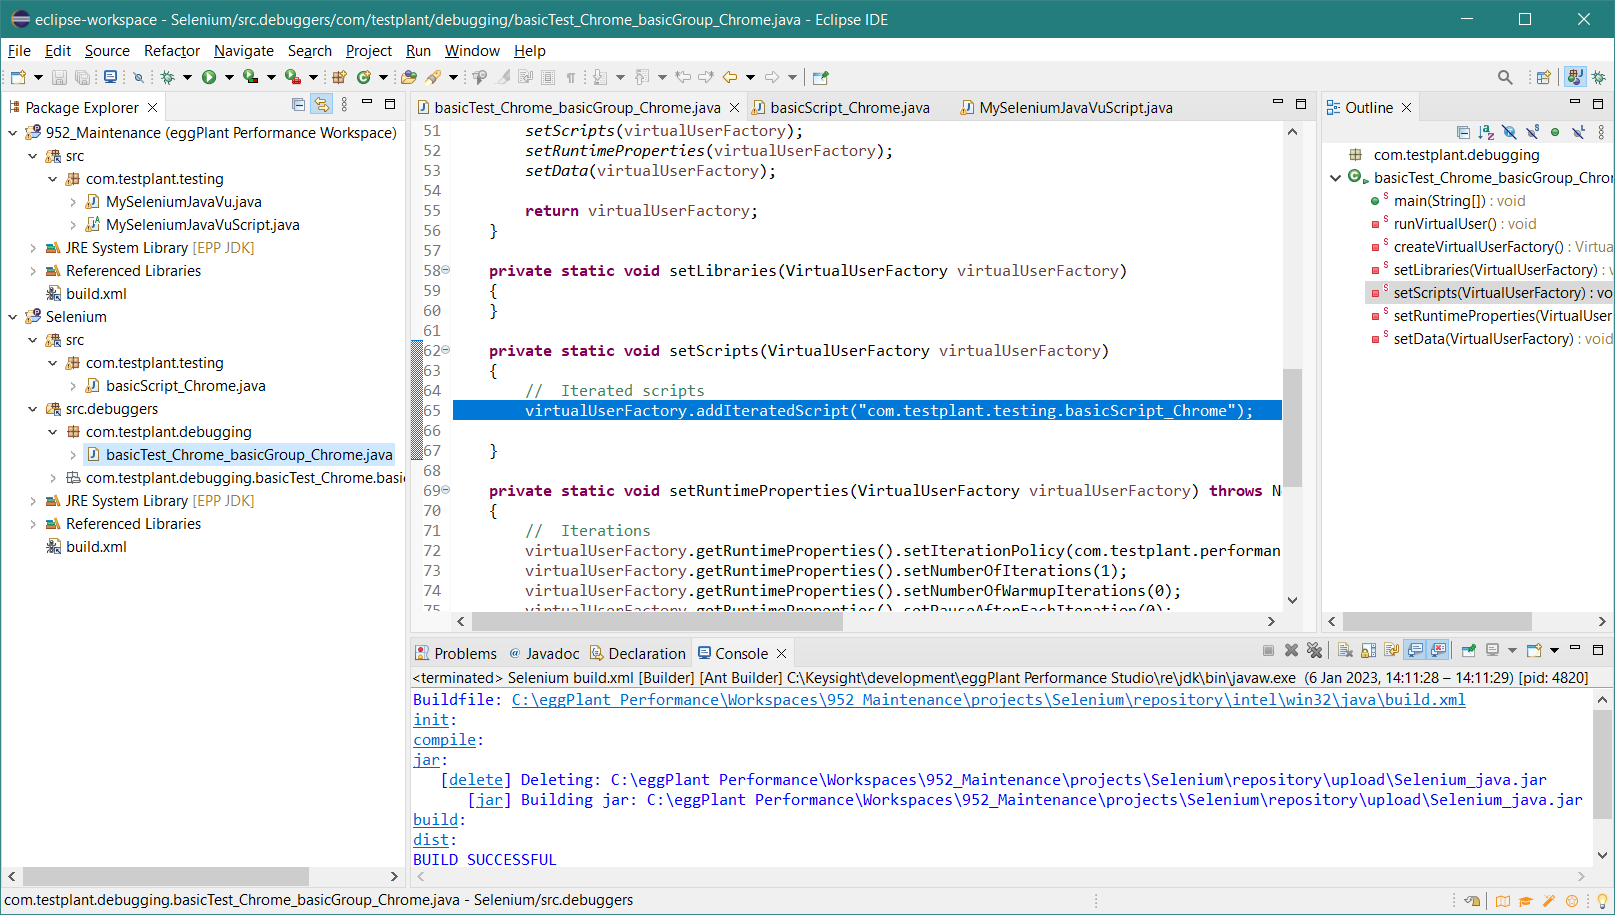
You should see two Eclipse projects in the Package Explorer pane: one that represents the Eggplant Performance Workspace and one that represents the Eggplant Performance Project. Both of these Eclipse projects contain code files to be edited:
-
The "EPP workspace" Eclipse project contains the base source code for your custom Selenium VU and the VU script in the
com.testplant.testingpackage of thesrcfolder (e.g.MySeleniumJavaVu.java). -
The "EPP Project" Eclipse project contains the source code for the test and VU Group starting script in the
com.testplant.debuggingpackage of thesrc.debuggersfolder. It also contains the iterated script(s) in thecom.testplant.testingpackage of thesrcfolder. These iterated scripts inherit from (extend) the VU script in the "EPP workspace" Eclipse project.
In the example screenshot above, the basicTest_Chrome_basicGroup_Chrome.java script is the test and VU Group starting script. Its name is derived from the test name and the VU Group name. You can right-click this script and choose Run As or Debug As to start running/debugging your scripts.
The names of the iterated script(s) are referenced in the setScripts() method. These scripts contain the main logic which the Virtual Users will use to interact with browsers via Selenium. In the example screenshot above, basicScript_Chrome.java is the iterated script.
Choose the web driver
By default, Eggplant Performance creates an HtmlUnitDriver instance for each Virtual User. If you wish to use a different type of Web Driver then you can do so by calling the initialiseWebDriver() method. The following example discards the current Web Driver instance and replaces it with an instance of FirefoxDriver that can be used to drive a Firefox browser:
// Create a FirefoxDriver for this virtual user
initialiseWebDriver(WebDriverType.FireFox);
It is recommended that you call initialiseWebDriver() within the pre() method of your custom Selenium VU (e.g. in MySeleniumJavaVu.java), so that each VU in your test creates the correct type of Web Driver at the beginning of the test.
Alternatively, the source code for your custom Selenium VU also provides convenient initialisation wrapper methods for the most popular browser drivers. The default Web Driver used is HtmlUnitDriver but you can comment this out and uncomment one of the other browser methods. For example, if you wanted to use Chrome Driver:
- comment out the
initialiseHtmlUnitDriver()method call - uncomment the
initialiseChromeDriver()method call, making sure that it points to the correct location of thechromedriver.exefile.
Eggplant Performance comes with HtmlUnitDriver, but for any other Web Driver type (including Chrome), you should download the appropriate version from the Selenium website
Alternatively, copy and paste the relevant lines of code to the top of the pre() method:
public class MySeleniumJavaVu extends com.facilita.fc.selenium.SeleniumVirtualUser
{
    @Override
    public void pre() throws Exception
    {
        //do not remove following line
        super.pre();

        initialiseChromeDriver("C:/tools/SeleniumDrivers/chromedriver.exe");

        // Initialise an HtmlUnitDriver. HtmlUnit is a lightweight GUI-less browser and hence is the most scalable implementation of WebDriver.
        // initialiseHtmlUnitDriver();

        /*
         * If you would like to use a different implementation of WebDriver, then remove the above call to initialiseHtmlUnitDriver() and replace
         * it with a call to one of the following methods:
         *
         * FirefoxDriver
         * -------------
         * Controls the Firefox browser using a Firefox plugin, e.g:
         * initialiseFirefoxDriver();
         *
         * InternetExplorerDriver
         * ----------------------
         * Controls the Internet Explorer browser through the IE Driver Server. You must install the IE Driver Server on each injector in your test,
         * and pass the path to the initialisation method, e.g.:
         * initialiseInternetExplorerDriver("C:/tools/SeleniumDrivers/IEDriverServer.exe");
         *
         * ChromeDriver
         * ------------
         * Controls the Chrome browser through the chrome driver server. You must install the chrome driver server on each injector in your test,
         * and pass the path to the initialisation method, e.g:
         * initialiseChromeDriver("C:/tools/SeleniumDrivers/chromedriver.exe");
         *
         * PhantomJSDriver
         * ---------------
         * Controls the PhantomJS GUI-less browser. You must install PhantomJS on each injector in your test and pass the path to the initialisation
         * method, e.g:
         * initialisePhantomJSDriver("C:/tools/phantomjs-1.9.7-windows/phantomjs.exe");
         *
         * Customised WebDriver
         * ---------------------
         * It is possible to use any other implementation of WebDriver. You simply create the WebDriver instance yourself, and then call the general
         * initialisation method, e.g:
         * WebDriver customDriver = new MyCustomWebDriver();
         * initialiseWebDriver(customDriver);
         */

        // Put any code that needs to execute at the start of the test here
}
Create the code to drive the browser
If you have not used Selenium before, it is recommended you try out some tutorials. Visit the official page Write your first Selenium script to familiarise yourself with the Java code required for some basic browser commands.
The code to drive a web browser via Selenium should be written in the iterated script(s) referenced in the test and VU Group starting script (for example, the basicTest_Chrome_basicGroup_Chrome.java script in the screenshot in the Set up Eclipse section references the iterated script basicScript_Chrome.java). Initially, this script will be a blank template, and you will write most of the code in the script() method and optionally the pre() method.
The Developing Web Java Virtual User Scripts in Eclipse section provides some guidance on this topic.
Here is an example script that visits the Google website and performs a basic search. Look out for:
- The
script()method, which calls two otherAction*()methods to perform the script actions - The useful
find()helper method, which keeps trying to find an element on the page, pausing for longer each time
// Script Generator Version - NOT generated (script specification)

package com.testplant.testing;

import java.util.*;

import org.openqa.selenium.By;
import org.openqa.selenium.Keys;

import com.facilita.fc.runtime.*;
import com.facilita.util.*;
import com.facilita.exception.*;
import com.facilita.fc.selenium.*;

public class basicTest_Chrome extends com.testplant.testing.MySeleniumJavaVuScript
{
    private com.facilita.fc.selenium.WebDriver webDriver;

    @Override
    public void pre() throws Exception
    {
        //do not remove following line
        super.pre();

        // Get the Web Driver.
        this.webDriver = getWebDriver();
    }

    @Override
    public void script() throws Exception
    {
        this.Action1_GotoWebsite("https://www.google.co.uk");
        this.Action2_SubmitSearch("news");
    }

    private void Action1_GotoWebsite(String url) throws Exception
    {
        writeMessage(String.format("Navigating to: '%s'", url));

        this.webDriver.get(url);
        WebElement acceptAllButton = this.find(By.id("L2AGLb"));
        if (acceptAllButton != null)
        {
            acceptAllButton.click();
        }
    }

    private void Action2_SubmitSearch(String searchTerm) throws Exception
    {
        // Find the Search text box. If found, send it the search terms text.
        WebElement searchBox = this.find(By.name("q"));
        if (searchBox != null)
        {
            searchBox.clear();
            searchBox.sendKeys(searchTerm);

            writeMessage(String.format("Searching for: '%s'", searchTerm));
            searchBox.sendKeys(Keys.RETURN);

            // Give search results page time to load.
            Thread.sleep(2000);

            // Look for the Result Stats text.
            WebElement resultStatsDiv = this.find(By.id("result-stats"));
            if (resultStatsDiv != null)
            {
                writeMessage(String.format("Results: %s", resultStatsDiv.getText()));
            }
        }
    }

    private WebElement foundElement;

    public WebElement find(By by) throws Exception
        {
        for (int milliseconds=0; milliseconds<10000; milliseconds+=200)
        {
            try
            {
                foundElement = this.webDriver.findElement(by);
                break;
            }
           catch(Exception e)
            {
                Thread.sleep(milliseconds);
            }

        }
        return foundElement;
    }
}
Debug the script
As this is usually a script created from scratch, it is recommended that you periodically run the script in the Eclipse debugger to make sure that it works. This way, you can step through the code to fix any problems that you might encounter.
As stated in the Set up Eclipse section, you have to right-click the test and VU Group starting script in the com.testplant.debugging package of the src.debuggers folder and choose the Run As or Debug As menu options. You can then step through the script(s), setting breakpoints and evaluating code expressions where necessary.
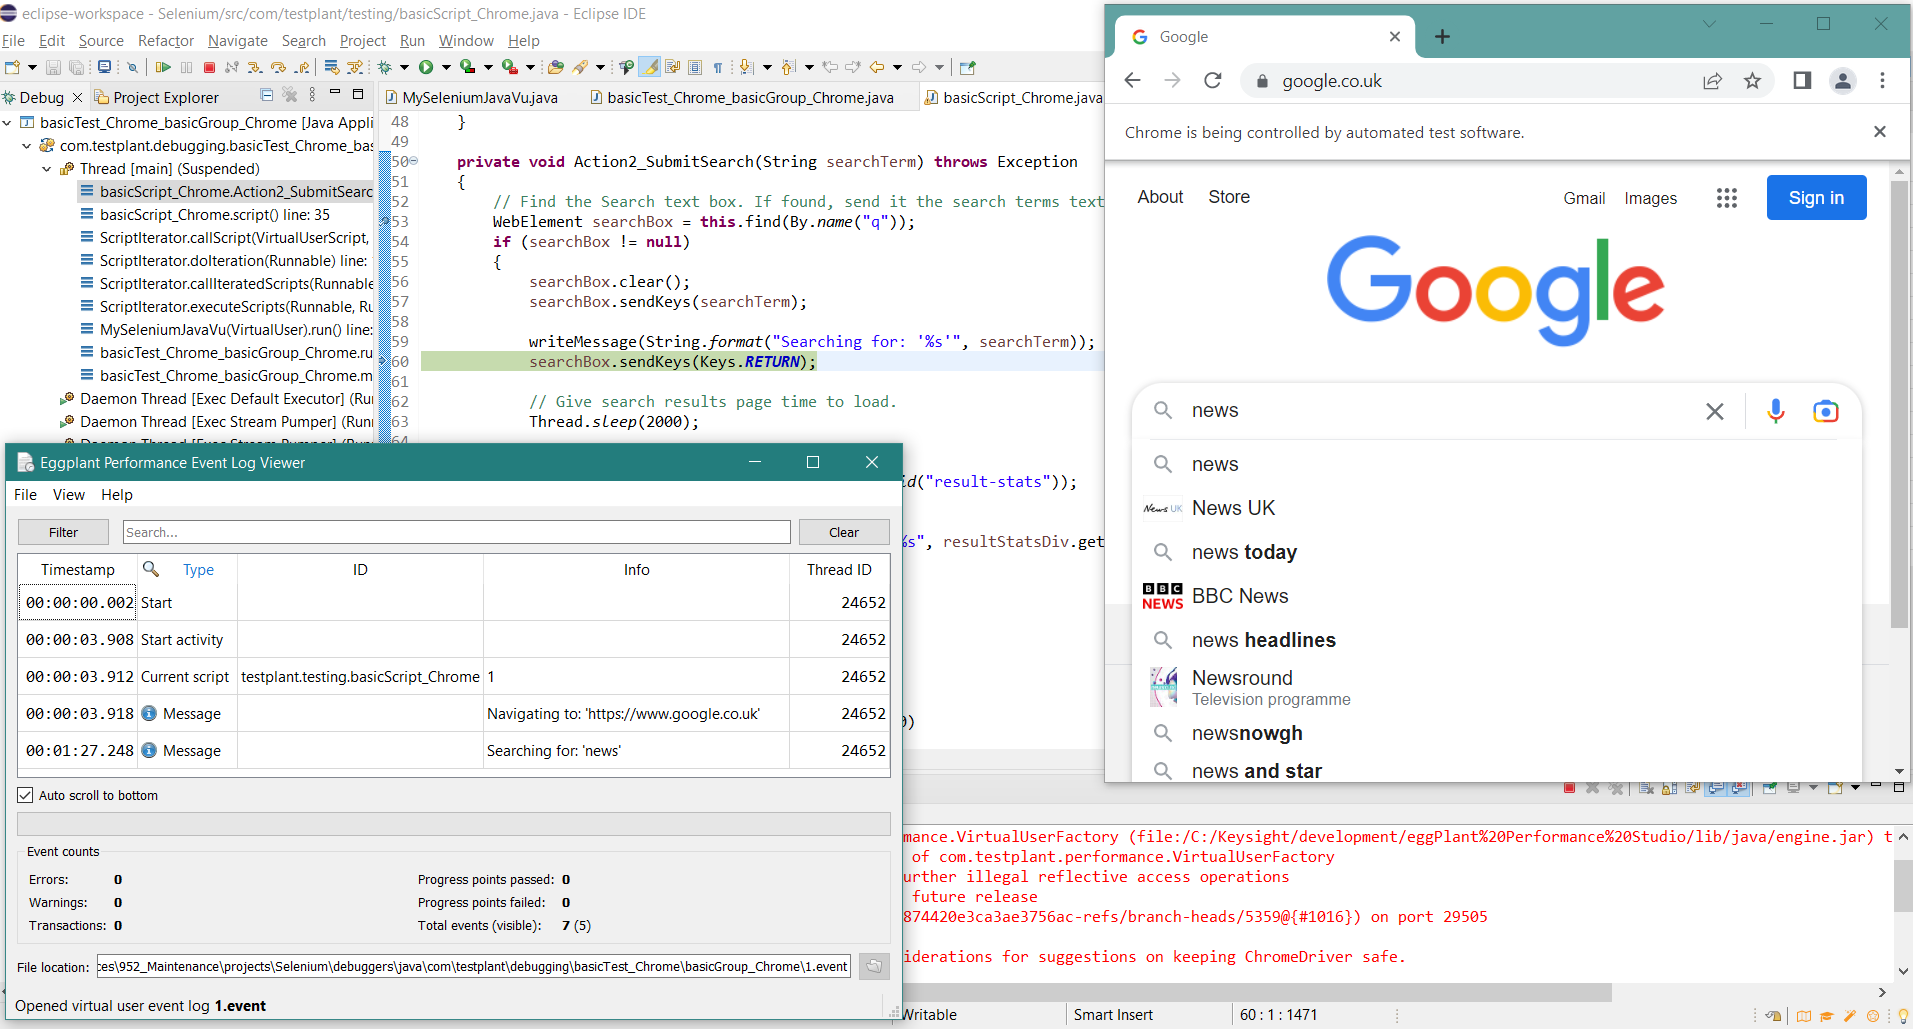
When debugging your Selenium script, you should see an Event Log Viewer window appear for the Virtual User. Also, if you have chosen a Web Driver other than the default "GUI-less" HtmlUnitDriver, you should see the relevant browser window which is being driven by your Selenium code's browser commands.
In the example below, a Chrome browser window is being driven by a script where the Selenium Virtual User source code has been set to use Chrome Driver (see the previous section on Web Drivers). The Event Log Viewer window is displaying the output of the writeMessage() method calls in the script code.
Run the test
When you are satisfied that your script is working the way you want, the next step is to run the test in Test Controller.
Build the workspace and project
Make sure the EPP Studio workspace and project have been built. Eclipse will automatically build your scripts whenever you edit and save them, but see the Building Your Project page for details about building manually.
Run the test in Test Controller
In Eggplant Performance Studio, in the Project tree, right-click the test and select Open test in Test Controller.
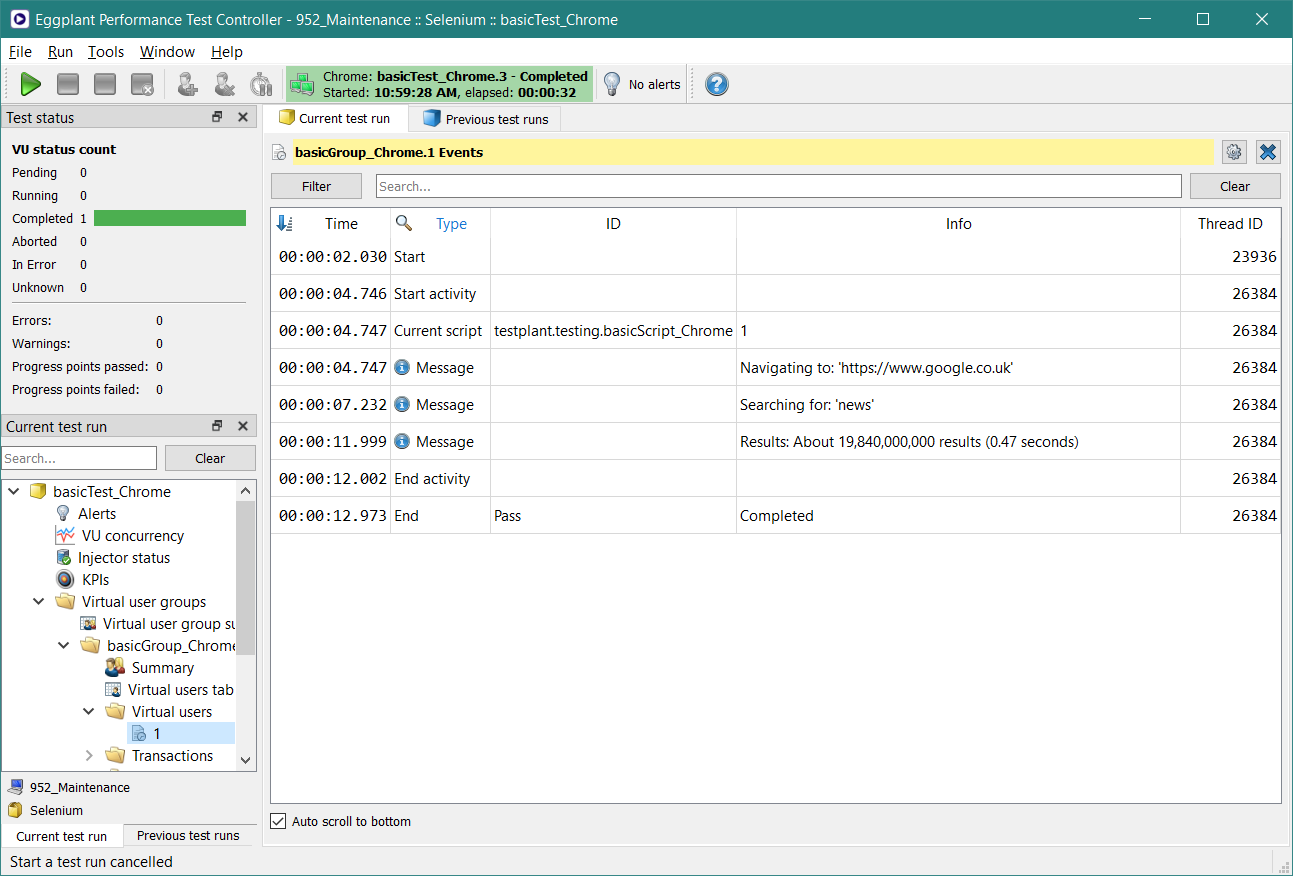
When Test Controller has started and opened the selected test, press the Start test toolbar button (or press F5, or from the menu bar click Run > Start test). The Start test dialog opens and runs the pre-test checks. If the checks are OK, press the Start button to begin the test.
The test should start running and show the same results in the Virtual User event log view(s) as those shown when debugging the Virtual User Group in Eclipse in the Debug section above.
(See Getting Started with Eggplant Performance Test Controller for more details on running tests in Test Controller.)