The OCR Update Panel
The OCR Update panel allows you to adjust Optical Character Recognition (OCR) text search settings at runtime when a text search has failed to find a match. This panel presents you with diagnostics for the search on your system under test (SUT). Then it lets you change properties for the OCR search to something that might succeed, re-runs the search, and displays results with the different search settings. Changes made with this panel are applied to the current test run only.
Enabling the OCR Update Panel
The OCR Update panel lets you work with text search diagnostics and fix them at runtime when a match is not found during a script run. Depending on the way it is enabled, this panel also appears when multiple instances of the text are found that were not anticipated by the script, and can also trigger the Auto Update functionality. Auto Update works with both text and images without user input in order to adjust settings and find a match when a search is not successful using the original search settings. These settings can be applied to images through the Auto Update panel. For more on this functionality, see Using the Auto Update Panel.
You can enable the OCR Update panel and related Auto Update panel functionality on the main menu by adjusting the options shown in the Run > Image Update menu. The Image Update panel, OCR Update panel, and Auto Update panel are all controlled through this menu. These menu options can also be adjusted from the OCR Update panel itself when it is opened during the script run.
This functionality is the same as for the Image Update panel. Both panels are enabled or disabled using this menu option.
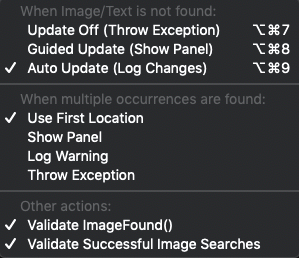 The Image Update panel menu, found under Run>Image Update
Your choices when using the Image Update menu to adjust the OCR Update panel functionality are as follows.
The OCR Update panel will not display if you set the Throw Exception (Update Off) option. The panel appears at runtime when you choose the manual setting using the Guided Update (Show Panel) option. If Auto Update (Log Changes) is selected, then the Auto Update panel is displayed following the script run.
When Image/Text is not found
-
Update Off (Throw Exception): Eggplant Functional throws an exception and the script fails when an image or OCR search does not return a match. The OCR Update functionality is not used.
-
Guided Update (Show Panel): Choose this option to work with the OCR Update panel manually during runtime when a text search fails, so that you can adjust settings to find an appropriate match. This method is best for attended test runs because it requires direct human interaction. However, because of this, it also gives you the most control over matches applied. This menu option was formerly called "Show Panel (Manual Update)".
-
Auto Update (Log Changes): This engages the Auto Update functionality, which automatically adjusts search settings at the time of search failure to see if it can find a match.
The Auto Update option is a good choice for unattended script runs, as it does not open the OCR Update panel during the script run. Frequently, it can find a match and continues the script run when otherwise the search would throw an exception and fail. Be aware that if your parameters are too broad when using Auto Update, you could end up matching the wrong text with unintended results. These settings are not saved permanently when they are made at runtime. To review changes made, see the Auto Update panel, which appears following the script run. To make any suggested changes permanent, you must manually edit your script.
For more on using the Auto Update panel, see Using the Auto Update Panel.
Using the OCR Update Panel
When you are using the manual option, the OCR Update panel opens automatically when a script fails on an OCR text search. The panel consists of several tabs, each described below.
At the bottom of each tab, you'll find the same three buttons:
- Abort: Use this button to abort the script run.
- Proceed: Use this button to cause the script to proceed to its next step. Note that unless the script is written in a way to handle the failed search exception, using this option causes the script to fail.
- Try Again: Use this option to return to the script by retrying the search that caused the exception. If the new search is successful, the script continues to run.
On the bottom left side of each tab you can choose one of the following if you want to change the criteria for when the OCR Update panel appears:
Update Off: The OCR Update panel is not used.
Manual Update: This option opens the OCR Update panel when an OCR search fails during runtime so that you can interactively work with settings to find an appropriate match.
Auto Update: This setting engages the OCR Update panel internally by trying additional search parameters to create a match and continue the script without user interaction.
When you use the Auto Update option, changes made during the script run are applied in memory only. The settings changed are visible from the Results panel in the Remedy column, but you must edit your script manually to make the search setting changes permanent.
It is good to track how often your scripts are engaging the Auto Update option. To see how often this is happening, do the following:
-
Click the script in question in the Results pane in the Suite window. This action displays a Results pane that shows records of the tests you have run in the current suite.
-
Click a row in the top of the Results pane.
-
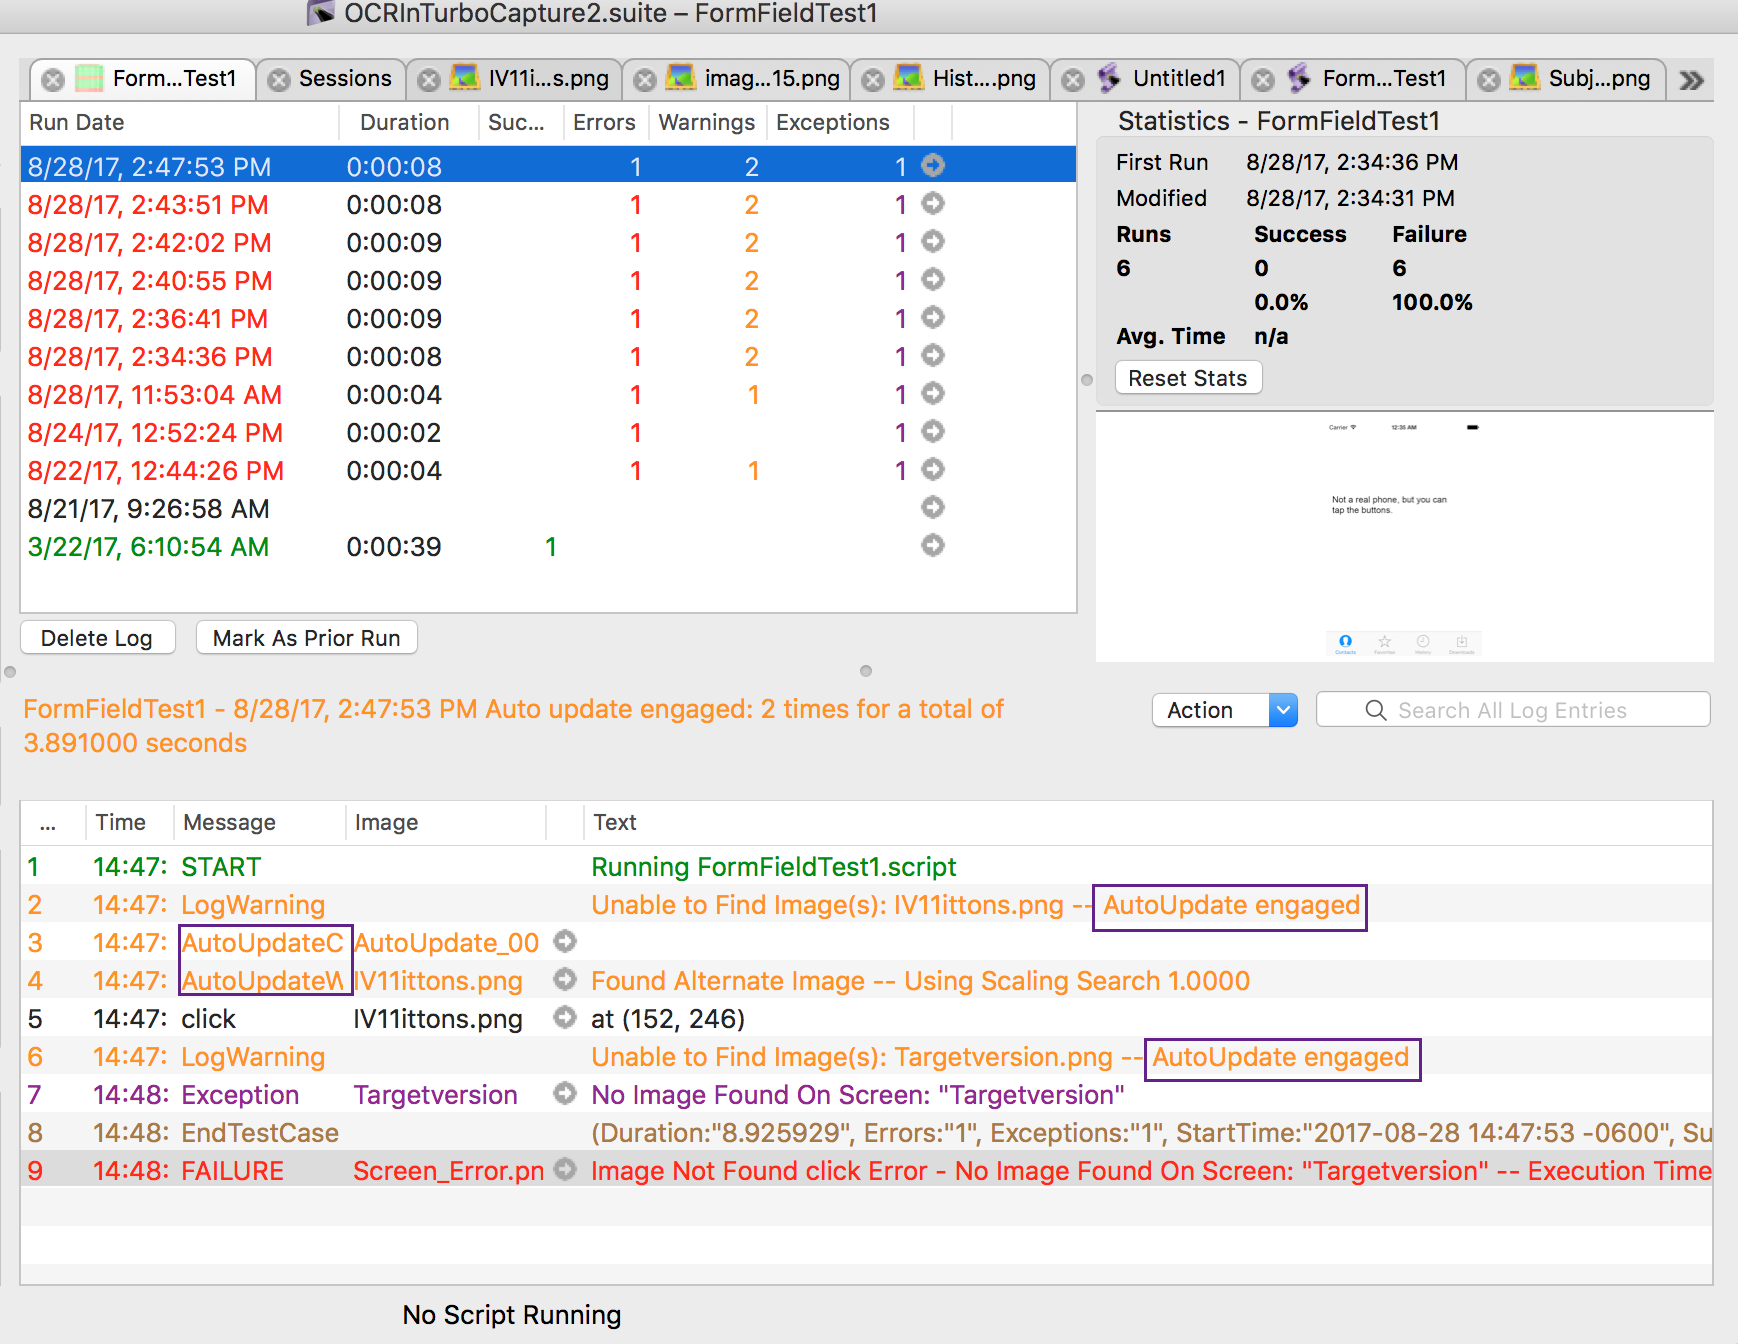
Review the results in the bottom of the Results pane, looking for the AutoUpdate string in the text and message columns to see how many times auto update has been engaged and how long it took to resolve that case. For example, look for the AutoUpdate strings marked by the purple rectangles in the following screenshot:
You can adjust the timer in Preferences by going to Eggplant > Preferences > Run > System. In the Auto-proceed countdown on Image/OCR Update section, input the desired time (in seconds) in the Auto-proceed Delay field. If you use a value of 0, the timer won't show at all and the manual OCR Update panel won't continue automatically go back to your script.
The Start Tab
The Start tab is the first part of the panel that shows when an OCR text search fails. This tab provides you with several diagnostic tools to help you adjust your OCR search parameters.
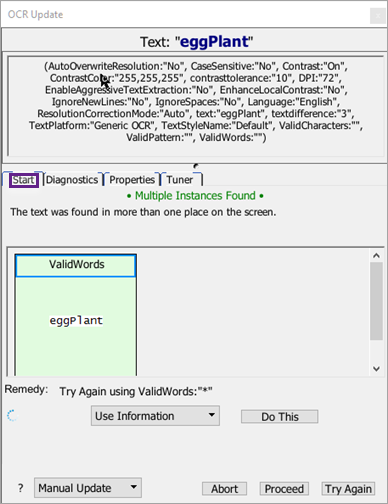
At the top of the window, the text string from the failed search is displayed. Beneath the text string, you will see the list of parameters that were used in the search.
Even if you did not explicitly include parameters in your code, certain parameters are assumed (the defaults), so this list shows exactly what has been used.
When the OCR Update panel opens, the Start tab might display a countdown timer. If you take no action, the panel closes and the script continues after the countdown runs out, which can be useful for unattended script runs. However, unless your script is prepared to handle the exception of the failed search, it fails after it continues.
Beneath the buttons that access the different tabs, the bottom half of the window presents actions you can take when an OCR text search has failed. You have two primary choices shown in the drop-down menu:
- Use Information: When a diagnostic search finds a potential match, you can use that information to let your script try the search again. Select the diagnostic in the upper part of the panel, then select Use Information from the drop-down list and click Do This. The script resumes running by performing the original search again, temporarily using the indicated parameter. The actual script code is not changed.
- Copy Information: You can also select a successful diagnostic in the upper part of the panel, then select Copy Information from the drop-down list. Taking this action copies the indicated parameter to the clipboard so that you can easily update your script if you decide the parameter will be helpful for future matches.
After choosing which action you want to take for this OCR search, click Do This to test the chosen action.
The Diagnostics Tab
The Diagnostics tab shows a variety of diagnostic searches to see what parameters can be adjusted in order to find the text string on the screen with an OCR search.
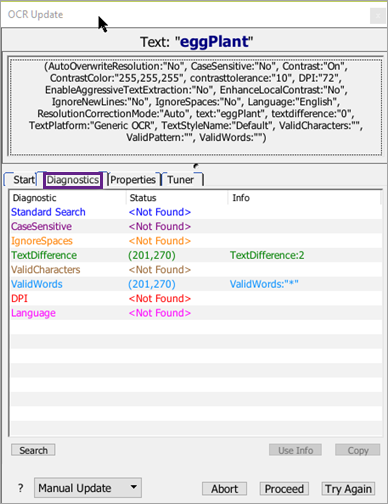
The Status column shows <Not Found> if a match could not be made with the parameter, or it shows information about the match if a possible match was found, including multiple matches. The Info column shows the parameter value necessary to make a match where one is possible.
The diagnostic searches conducted are:
- Standard: Searches for the text again using the original specifications. A result for this search means that the text has appeared since the first failure to find it. Most likely this means that the timing of the script at the step needs to be adjusted to allow more time for the desired text to appear.
- CaseSensitive: OCR text searches are not case sensitive by default. You can use the
caseSensitiveproperty to force searches to respect case and return only results that match your text string's capitalization exactly. In most cases, the diagnostic shows a successful match only if your script specifiedcaseSensitive: yes, in which case you might be able to make a match if the search isn't case sensitive. - IgnoreSpaces: This diagnostic looks for matches without respect to blank spaces, either in the text string you're searching for or in potential matches on the SUT screen. For instance, the OCR engine would match either "Egg plant" or "Eggplant" if your search string was "Eggplant." This parameter is on by default for OCR text searches, so the diagnostic generally suggests a possible match only if you've used
ignoreSpaces:"No"in your script. - TextDifference: This diagnostic attempts to find a match by looking for text that can have individual characters that are different from your original string. This parameter can be useful because the OCR engine can sometimes misread text on the screen, mistaking a 0 for an O, for instance. The "text difference" is the number of characters that would need to change between your search string and the text found on screen to make an exact match.
- ValidCharacters: The
ValidCharactersparameter limits the characters that the OCR engine will recognize. By default, the engine uses the entire set of characters for the language (or languages) in the current text platform. Sometimes, by limiting the characters, you can force the engine to "see" your text string. You can use the asterisk as a wildcard,validCharacters:"*", so that the OCR engine looks only for the characters in your original text string. - ValidWords: The
ValidWordsparameter limits the words that the OCR engine will recognize. By default, the engine uses the entire set of words for the language (or languages) in the current text platform. Sometimes, by limiting the words, you can force the engine to "see" your text string. You can use the asterisk as a wildcard,validWords:"*", so that the OCR engine looks only for the words in your original text string. ThevalidWordsparameter overrides the Language property. This override means that words that are not part of thevalidWordsproperty are not returned by the ReadText() Function. - DPI: By default OCR searches use 72 DPI for searches. However, if the resolution on the SUT is significantly different, you might be able to find your text by using the DPI parameter to set a different resolution for the search.
- Language: This diagnostic indicates if a match might be made with a language setting other than the default text platform.
When a diagnostic search finds a potential match, you can use that information to let your script try the search again. Select the diagnostic in the list, click Use Info, then click Try Again. The script resumes running by performing the original search again, temporarily using the indicated parameter. The actual script code is not changed.
You can select a successful diagnostic, then click Copy to copy the indicated parameter to the clipboard so that you can easily update your script if you decide the parameter will be helpful for future matches as well.
If you have changed conditions in your SUT, or changed search options on the Properties tab of the OCR Update panel, click the Search button to create a new search and refresh the diagnostics.
The Properties Tab
The Properties tab lets you try different parameters for your OCR search, or combinations of parameters, to see if a match can be made.
Each of the parameters listed on the Diagnostics tab is also available on the Properties tab.
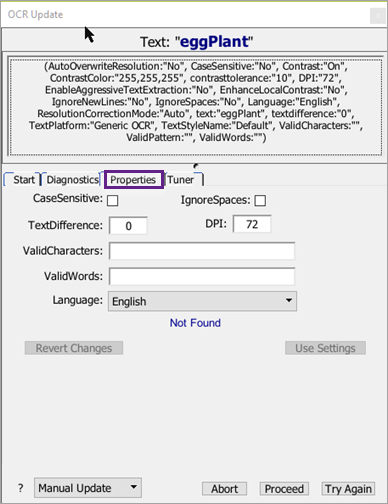
When you change a value, the original value from the script appears in red beside the altered field. At the bottom of the fields, in blue text, the result of using the new value is displayed. Note that your changes are cumulative, so if you change multiple properties, each of them is applied to the search to attempt to make a match.
If you want to resume your script with new parameters you've selected, click Use Settings, then click Try Again. The script resumes running by performing the original search again, temporarily using the indicated parameters. The actual script code is not changed.
The Tuner Tab
The Tuner tab lists the parameters you can fine-tune to improve your OCR searches. There are a number of properties in SenseTalk that allow you modify your OCR search. Spend time understanding all of the OCR properties so that you can make appropriate adjustments and achieve better search results in your test environment. Use the information shown here to resolve or improve your OCR searches:
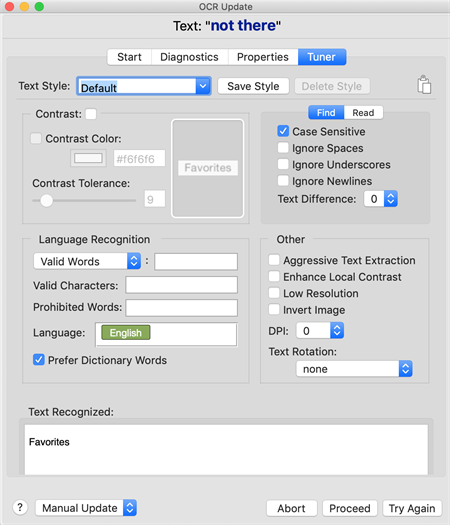
Text Not Found Area
At the very top of the panel, the text string you were searching for in the line of code that failed is displayed.
Text Style
A text style is a saved set of text properties as defined in the Eggplant Functional Text Preferences, OCR Tuner, or OCR Update panel. Each text style is typically tailored to a particular font or type of GUI element, such as a menu item or title bar that will be encountered repeatedly in an application under test. Text styles can be applied to both OCR searches and ReadText(). For more on the difference between reading and searching, see How to Use OCR.
The panel opens with the Default style selected. Once you modify the OCR Properties in the sections below this one, you have altered the current style. To save this new style, select the word "Default" in the Text Style drop-down menu and change the name, or select the style you want to override (the Default style can be modified). Click Save Style.
To delete the current selected style, click Delete Style. This option is disabled when the Default style is selected.
To the right of this section is the copy icon. This can be used to copy the current text properties as you have them set in the following sections for use in your script. For more on this see Save or Copy Property Settings.
Contrast Section
The Contrast section allows you to set and work with the Contrast property and related properties. The Contrast setting converts the image OCR takes of the system under test (SUT) to black and white before sending it to the OCR engine for recognition. This interactive section has a live-update area to the right that shows the current search rectangle as it is drawn in your Viewer window, and how it will be sent to the OCR engine with the current Contrast settings.
-
Contrast: Whether or not the SUT display is converted to a high contrast two-color image before it is sent to OCR for analysis. If
contrastis on, a color referred to as the "contrast color" (which can be set using theContrastColorproperty) is considered the primary color of the SUT display, and all other colors are treated as the secondary color. Text can be found in either color. TheContrastproperty is available for use with both searching for (finding) text and reading text.- Contrast Color: If
Contrastis on, the contrast color is considered the primary color of the SUT display, and all other colors are treated as the secondary color. For instructions on finding the background color, see Determining the Background Color. - Contrast Tolerance: When
Contrastis on,contrastTolerancesets the maximum per-channel color difference that is allowed for a pixel to be seen as the contrast color.
- Contrast Color: If
The Find Tab
The upper-right quadrant of the panel has two tabs: Find and Read. This is because OCR can be used to either find a given string of text, or read unknown text off of the SUT screen. Some properties are only available for use when reading text, or for searching text, but not both. The Find tab displays the following properties that can be set when searching for a given string of text. For more on the differences between reading and finding text, see How to Use OCR.
Ignore Spaces: The ignoreSpaces property causes OCR text searches to disregard spaces in your text string. For example, the string "My Computer" would match "MyComputer" or "M y C o m p u t e r". The ignoreSpaces property is on by default. This is because the OCR sometimes reads spaces that are not intended, especially in strings that are not discrete words, and in text with unusual letter-spacing.
Ignore Underscores: The ignoreUnderscores property causes OCR text searches to treat underscores as spaces during searches. For example, the string "My_Computer" would match "My_Computer" or "My Computer". The ignoreUnderscores property is on by default, because the OCR sometimes fails to recognize underscores.
Ignore Newlines: When enabled, ignoreNewlines causes OCR text searches to ignore line breaks, so a search will match a string even if it's broken over several lines. This property is only available for text searches (not available with ReadText).
The Read Tab
The upper-right quadrant of the panel has two tabs: Find, and Read. This is because OCR can be used to either find a given string of text, or read unknown text off of the SUT screen. Some properties are only available for use when reading text, or for searching text, but not both. The Read tab displays the following properties that can be set when reading text off the screen of the system under test (SUT). For more on the differences between reading and finding text, see How to Use OCR.
Trim Whitespace: When TrimWhitespace is on, all whitespace characters are removed from the beginning and end of returned text. When TrimWhitespace is off, the ReadText function can return text that starts or ends with whitespace characters. Only for use with reading text, not searching for pre-defined strings.
Multi-Line: This property only applies when reading text near a point, as opposed to reading text within a rectangle. When MultiLine is on, the ReadText function returns the line of text associated with your point, and any lines of text above and below that point if they appear to belong to the same block of text. When MultiLine is off, the ReadText function only returns the line of text associated with the point.
Language Recognition
There are many modifications you can make to an OCR search by working with language settings. OCR does not use a language dictionary by default, but a dictionary can be specified or modified, and you can also create a Custom OCR Dictionary. All of the OCR Properties in this section work with language, whether that is setting the Language property using one of the predefined OCR Languages, telling it what words and characters it should consider valid (eliminating all other matches), prohibiting certain words that may come up in matches, or working with patterns.
The Valid Words drop-down menu
This drop-down menu lists five different properties you can set, which are mutually exclusive. Only one can be set at a time, and the value you provide to that property goes in the text field to the right of this menu.
- Valid Words: Limiting the words that OCR can consider a match allows you to steer the OCR engine toward a successful match, or force the engine to recognize your text string correctly. You can use the asterisk (*) as a wildcard so that the OCR engine looks only for the words in your original text string. This property limits the words that may be found by the OCR text engine; for more see Customize the OCR Engine Dictionary. The
validWordsproperty overrides theLanguageproperty. This override means that words that are not part of thevalidWordsproperty are not returned. - Preferred Words: Set this property to a list of words to supplement the built-in dictionary for the current language.
PreferredWordscan be used for either reading or searching for text. This property modifies the OCR dictionary. For more information, see Customize the OCR Dictionary. - Valid Pattern: This property takes a regular expression value and returns only characters or words that match the pattern specified. For information on regular expression characters that can be used with SenseTalk, see Using Patterns in SenseTalk. If you want OCR to prefer a pattern but not require it, see PreferredPattern.
- Preferred Pattern: When this property is enabled and given a regular expression string, OCR gives preference to text that matches the provided pattern. For information on regular expression characters that can be used with SenseTalk, see Using Patterns in SenseTalk. If you want the OCR to require a pattern match, use ValidPattern.
- Extra Words: Set this property to a list of words to supplement the built-in dictionary for the current language. These words will be given preference the same way as other dictionary words.
Other Section
These OCR properties are not often used, but can be helpful in the right scenarios.
Aggressive Text Extraction: Enable this property if you want OCR to extract as much text from the image as possible.
Enhance Local Contrast: Enable this property if you want OCR to automatically increase the local contrast of the text image being sent to the OCR engine. This property may aid recognition when some or all of the text being read has relatively low contrast, such as blue text on a dark background. When Contrast is turned on, this property has no effect, so it is only useful when Contrast is turned off.
Low Resolution: A mode of processing used by the OCR engine to treat the image it receives from Eggplant Functional as low resolution (the image is not actually converted to a lower resolution). This might help OCR recognize smaller characters.
Invert Image: Enable this property for OCR to invert the colors of the text image (like a photo negative) before sending it to the OCR engine for processing.
DPI: The DPI property refers to the DPI (dots per inch) of the SUT display. If you are having problems finding text on the SUT, check the SUT's DPI setting, and adjust the DPI property accordingly.
Text Rotation: When this property is set, OCR identifies words at the degree of rotation specified by one of the predefined values: Clockwise rotates 90 degrees to the right; Counter-clockwise rotates 90 degrees to the left; Upside-down rotates 180 degrees; None does not rotate the text. Can be used for both reading and searching for text.
Text Recognized Area
This area displays the text being read in the current Capture area on the Viewer window using the settings you have provided in the above areas of the panel. This is a live update.