コードの再利用
それは避けられません:テストにおいて繰り返しは生活の事実です。幸いなことに、スクリプトやハンドラーが繰り返し作業を代行する簡単な方法がいくつかあります。
他のスクリプトからのスクリプトの呼び出し
コードを再利用する最も一般的な方法の一つは、別のスクリプトからスクリプトを呼び出すことです。スクリプトを呼び出すには、あなたのコードにスクリプトの名前を挿入し、その後にスクリプトが必要とする任意のパラメータを続けます。スクリプトの呼び出しは、スクリプト自体がコマンドまたは関数であるかのように扱うことができます。他のスクリプトを呼び出す詳細な情報については、他のスクリプトとハンドラーの実行を参照してください。
以下は、スクリプト内からスクリプトを呼び出す例です:
CycleWindows // 単純なスクリプト名をコマンドとして呼び出します

ConnectionScript "Old SUT", "New SUT" // パラメータ付きの単純なスクリプト名を呼び出します

put CaptureTheScreen("SomePrefix",1) into myScreenCapture
// パラメータ付きの関数としてスクリプトを呼び出し、結果を変数に入れます
コマンド呼び出しを使用するか、関数呼び出しを使用するかは、スクリプト自体に依存します。両方のタイプは入力パラメータを取ることができ、その場合呼び出されるスクリプトはparams宣言で始まる必要があります。関数呼び出しはまた値を返すことができ、その場合呼び出されるスクリプトはreturnステートメントを含む必要があります。
もしスペースや特殊文字のない単純なスクリプト名を使用し、スクリプトを同じスイートやヘルパースイートに保存している場合、スクリプト名を直接使用することができます。上記の例を参照してください。
関連しないスイートにあるスクリプトや、その名前にスペースや特殊文字が含まれているスクリプトについては、Runコマンドを入力し、その後にスクリプトのパスを入力します:
Run "/Users/Seiji/Documents/EggPlant Suites/Validation.suite/Scripts/ConnectionScript"
// 関連しないスイートからスクリプトを開くためにRunコマンドを呼び出します
他のスクリプトからスクリプトを呼び出すこの能力のため、特定のタスクやアクションを実行するセグメントでスクリプトを書くことを考えると便利です。この「モジュラー」アプローチは、あなたが異なるコンテキストでスクリプトを再利用する最大の機会を提供します。そのような場合、あなたの「メイン」スクリプトはテストや環境に特化したコードを含むことになりますが、汎用のタスクを完了するために別のスクリプトを呼び出します。
ハンドラーとヘルパースイートの使用に関するより詳細な情報は、これらは共にコードの再利用とモジュラーデザインを支援する機能であることを記載しています、下記を参照してください。
ハンドラ
同じスクリプト内でコードを再利用するために、handlerを書くことができます。これは基本的にサブスクリプトです。ハンドラーは、あなたが他のスクリプトを呼び出すかのように、いつでも呼び出すことができる主要なスクリプトの一部です。
例:CaptureTheScreen ハンドラ
to CaptureTheScreen prefix, count // ハンドラーの開始
  set fileName to prefix & "ScreenShot" & count // prefixScreenShotCountをfileNameに入れます
  set tempFile to "/tmp/" & fileName // "/tmp/filename"をtempFileに入れます
  CaptureScreen tempFile //スクリーンショットをキャプチャします
  return fileName // fileNameを関数の戻り値として設定します
end CaptureTheScreen //ハンドラーの終了
ハンドラの結果の返却
スクリプトやハンドラが値を返す場合、このような場合、次の行でResults関数を呼び出すことでその値にアクセスできます。したがって、上記の例を使用して、以下に示すようにハンドラを呼び出し、結果にアクセスすることができます。
例: ハンドラの結果の返却
CaptureTheScreen "MacTest", 6 // CaptureTheScreenハンドラを呼び出します
Set newFile to the result // 返された値を変数に入れます
コマンドまたは関数としてのハンドラ
CaptureTheScreenハンドラは汎用のハンドラなので、関数としても呼び出すことができます。主な使い方の違いは、コマンドはそれ自体が完全な文であり、それが値を返すかどうかに関係なく使用できる一方、関数は式の一部として呼び出さなければならない点です。
例: コマンドと関数としてのハンドラの呼び出し
CaptureTheScreen "MacTest", 6 // コマンドとして呼び出され、ハンドラが実行されます
put CaptureTheScreen ("MacTest",6) // 関数として呼び出され、ハンドラの値を返します。括弧に注意してください。
別のスクリプトからハンドラを呼び出す
別のスクリプトからハンドラを呼び出すには3つの方法があります:
- 所有格の
‘sを含むスクリプト名を呼び出し、その後にハンドラの名前とそのパラメータを続けます。 - スクリプトの名前を呼び出し、その後にドットとハンドラの名前を追加します。
- ハンドラの名前を呼び出し、その後に
ofとスクリプトの名前を続けます。
例: 別のスクリプトからハンドラを呼び出す
run Logging's CaptureTheScreen "MacTest", 6 // 所有格の'sとスクリプト名を使用してハンドラを呼び出します
run Logging.CaptureTheScreen "MacTest", 6 // script.handlerの形式でハンドラを呼び出します
run CaptureTheScreen of Logging "MacTest", 6 // handler "of" scriptでハンドラを呼び出します
コードリファクタリング
スクリプトを書いているうちに、スクリプトの一部が他のコンテキストや他のスクリプトで役立つ可能性があることに気づくかもしれません。たとえば、デスクトップに戻るといった、頻繁に繰り返す必要があるSUT上のアクションを実行する手順を書いた場合などです。スクリプトの異なるポイントでアクションを実行する必要があるかもしれませんし、同じSUTを異なるテストで使用している場合、同じ手順を異なるスクリプトで使用することができるかもしれません。
新しいスクリプトまたはハンドラへのコードの抽出
Extract Code 機能を使用して、既存のコードセクションを抽出して新しいスクリプトやハンドラを作成することができます。これにより、単純または複雑なコードセクションを新しいスクリプトに移動することができます。これらのスクリプトは、多くの異なるコンテキストで再利用できるように、モジュラーにすることを目指してください。
開始する前に
- グローバル変数とユニバーサル変数の抽出: コードブロックに明示的なグローバル変数やユニバーサル変数が含まれている場合、新しいコードにそれらを含めるか除外するかを選択できます。大きなスクリプトをいくつかの小さな部分に分割している場合、それらを含めることは理にかなっています。複数の場所から呼び出される再利用可能なスクリプトやハンドラを作成している場合、それらを除外することがおそらくより良い考えです。このアプローチは、新しいコンポーネントをできるだけクリーンで、焦点を絞り、再利用可能に保つのに役立ちます。
- 他の変数の抽出: 抽出することを選択したコードに、コードのそのセクションの外で参照される変数が含まれている場合:
-
選択したものの中で使用されている変数の中で、スクリプトの
早い段階で存在するものは、新しいスクリプトのparams宣言として追加されます。新しいスクリプトはコマンドとして呼び出されるため、スクリプトエディタでは、変数は新しいスクリプト名の後にパラメータとしてリ�ストされます。ExtractedScript MyVar -
スクリプトの後で
存在する選択範囲で使用されている変数は、新しいスクリプトのreturn宣言として追加されます。この場合、新しいスクリプトはコマンドではなく関数として呼び出され、返された値が変数に代入されます:extractedScript(MyVar) を MyOutVar に入れる
-
コードの抽出
再利用したいコードを選択します:
- スクリプトエディタで、関心のあるコードを選択またはハイライト表示します。
- ハイライト表示されたコードブロックを右クリックして**Extract Code...を選択するか、EditメニューからExtract Code...**を選択します。Extract Codeペインが表示され、コードブロックから新しいスクリプトやハンドラを作成できます。
新しいスクリプトを作成するには:
- Extract Codeペインで、Scriptを選択します。
- 新しいスクリプトの名前を入力します。
既存のものと同じ名前のスクリプトを作成することはできません。同じ名前を試すと、スクリプト名が赤くなって無効であることを示します。
SenseTalk識別子では無効な文字を入力しようとすると、名前も赤くなります。
- 新しいスクリプトはデフォルトで選択されたスイートのScriptsフォルダに保存されます。これを変更したい場合は、以下のいずれかを選択します:
- Whereリストまたはその下のファイルブラウザから既存のフォルダやサブフォルダを選択します。
- New Folderをクリックして新しい場所を追加します。
- デフォルトでは、コードブロック内の任意のグローバル変数やユニバーサル変数が抽出されます。新しいコードからこれらを除外したい場合は、Include globals in extracted codeチェックボックスをクリアします。
- Extractをクリックします。スクリプトエディタでは、選択したコードブロックが新しいスクリプトを呼び出す単一のコード行に置き換えられます。新しいスクリプトも作成され、Scriptsリストに追加されます。
新しいハンドラを作成するには:
- Extract Codeペインで、Handlerを選択します。
- 新しいハンドラの名前を入力します。
SenseTalk識別子で無効な文字を入力しようとすると、ハンドラ名が赤くなるまでそれらを置き換えます。
- デフォルトでは、コードブロック内の任意のグローバル変数やユニバーサル変数が抽出されます。新しいコードからこれらを除外したい場合は、Include globals in extracted codeチェックボックスをクリアします。
- Extractをクリックします。スクリプトエディタでは、選択したコードブロックが新しいハンドラを呼び出す単一のコード行に置き換えられます。新しいハンドラもスクリプトの最後に追加されます。
新しく作成したスクリプトは、抽出元のスクリプトだけでなく、他のスクリプトからもその名前で呼び出すことができます。他のスクリプトの呼び出しに関する詳細な情報は、上記の他のスクリプトからのスクリプトの呼び出しを参照するか、他のスクリプトとハンドラの実行ページをご覧ください。
ヘルパースイート
スイート内のスクリプト、画像、またはハンドラを他のスイートのスクリプトで再利用できるようにするには、そのスイートを "ヘルパースイート" として追加します。Eggplant Functionalスクリプトはまず自身のスイートで画像と他のスクリプトを検索します。ヘルパースイートを追加すると、指定した画像やスクリプトが自身のスイートに見つからない場合、それらのスイートを検索します。
ヘルパースイートを追加するには:
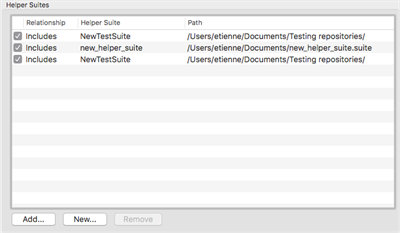
- ファイルメニューからNew Helper Suiteを選択するか、またはヘルパースイートパネルでNewをクリックします。
- 設定タブが開いたら、ヘルパースイートパネルの下部にあるAddをクリックして1つまたは複数のヘルパースイートを追加します。ファイルシステムブラウザダイアログが開き、ヘルパースイートとして指定したいスイートをナビゲートして選択します。
新しいヘルパースイートを作成するには、2つの方法のいずれかを使用できます。
-
スイートウィンドウの下部にあるSettingsボタンをクリックします。
-
新しいスイートに名前を付けて保存場所を選択します。
 ヘルパースイートパネル
スイートのロケーションパス
異なるスイートへのパスを参照するのは難しいことがあります。特に相対パスを使用していたり、スイートやファイルをソース管理のチェックイン・チェックアウトを行っていたりする場合です。これらのパスを処理するためのいくつかの方法があります。一つの選択肢は、以下の文で示すように、スクリプトでスイートのロケーションを取得し、それを変数に保存することです:
例:
put SuiteInfo().path // このスクリプトを含むスイートへのパスを返します
例:
put the folder of me // このスクリプトを含むScriptsフォルダへのフルパスを返します
詳しくは、ヘルパースイートの相対パスの使用をご覧ください。
スイートのグローバルプロパティ
ヘルパースイートの使用の代わりに、Eggplant Functionalは以下のグローバルプロパティを提供しています。これらのプロパティを使用すると、スクリプトが自身のスイートを検索する前後に検索するスイートを指定することができます:
the InitialSuitesグローバルプロパティでは、スクリプトが自身のスイートを検索する前に検索するべきスイートまたはスイートのリストを指定できま��す。the FinalSuitesグローバルプロパティでは、スクリプトが自身のスイートを検索した後に検索できるスイートまたはスイートのリストを指定できます。
例:
set the InitialSuites to (DSD & "myFirstSuite.suite", DSD & "mySecondSuite.suite")
例:
set the FinalSuites to (DSD & "mySuite.suite", DSD & "myOtherSuite.suite")
上記のコードでは、DSDはデフォルトのスイートディレクトリを表す変数です。これらのコード行を実行する前に、このディレクトリの適切なパス(または特定のスイートの場所)を変数に設定する必要があります。
クロスプラットフォームアプリケーション
このセクションの記事では、現在のスクリプトを基にして、テストを複数のオペレーティングシステムに拡張する方法を説明します。
プラットフォームと言語に特化したスイートの作成
最初は、テストが必要な各プラットフォームごとに新しいスクリプトのセットを作成するのが簡単に思えるかもしれませんが、アプリケーションが進化するにつれてこれらのスクリプトを一貫して保つことは実際には大きな課題となります。
より友好的な長期的な解決策は、ベーススクリプトから始めて、オペレーティングシステム間で変わる各メカニクスに対して外部スクリプトを呼び出すことです。それぞれのプラットフォーム特化のスイートに対してスクリプトを異なる形で記述し、スクリプトにどのスイートを使用するかを指示することができます。
例: 翻訳スクリプト
以下の例では、Quitという名前のスクリプトに保存し、他のスクリプトからコマンドとして呼び出すことができます。関数や条件文を使用して実行するコードラインを決定し、テスト中のアプリケーションに合わせて実行をカスタマイズします。
Windowsの場合:
TypeText ControlKey & AltKey & "x"
Mac用:
TypeText CommandKey & "q"
正しいスイートの指定
The InitialSuitesグローバルプロパティは、スクリプトがスクリプトや画像リソースを探すときに最初にチェックするスイート(またはスイート群)を指定します。(これらのスイートは、現在のスクリプトが実行されているスイートよりも優先されます。)もし初期スイートを複数指定した場合、次の「トップレベル」のスイートが検索される前に、各スイートのヘルパー(とそのヘルパー)が検索されます。
例: Quitスクリプト
この例では、�ベーススクリプトが正しいQuitスクリプトを見つけるために、the InitialSuitesの値を適切なスイートに設定します:
Set the InitialSuites to ("Windows") -- リソースをチェックする最初のスイートとしてWindowsスイートを指定
Quit -- 最初に見つかったQuitスクリプトを実行
全てのグローバルプロパティと同じく、the InitialSuitesはスクリプトの途中でいつでも変更することができます。(Initialは最初に検索されるスイートを指し、スクリプトの初期状態を指すわけではありません。)
多言語テキストの使用
インターフェース要素がそのテキストだけで識別できる場合、スクリプトで画像をキャプチャする代わりに光学文字認識(OCR)を使用できます。これにより、複数の言語スイートを作成する時間を大幅に節約できます。
たとえば、英語、フランス語、スペイン語のバージョンがあるアプリケーションで同じ「開く」ボタンをクリックする必要があるとします。各言語でボタンの画像を別々にキャプチャすることもできますが、代わりにOCRを使用する方が効率的です。
例: the InitialSuites
OCR検索では、Languageプロパティを使用して言語を指定できます。サポートされている全ての言語のリストは、OCR Language Supportを参照してください。
Click (text: "Open", Language: English) -- OCRが提供する英語の辞書を使用して"Open"というテキストを検索し、それをクリックします。
Click (text: "Ouvrir", Language: French) -- 上記と同じですが、フランス語の辞書を使用します。
Click (text: "Abierto", Language: Spanish) -- 上記と同じですが、スペイン語の辞書を使用します。
例:
この例では、画像コレクションのように機能する可能なOCR検索のリストを作成します。このコードは、テスト中のアプリケーションで使用されている言語(英語、フランス語、またはスペイン語)に関係なく、「開く」ボタンをクリックします:
Put {
  (text: "Open", Language: English),
  (text: "Ouvrir", Language: French),
  (text: "Abierto", Language: Spanish)
} into ButtonTextOptions -- 画像コレクションのような、可能なOCR検索のリストを作成します

Click ButtonTextOptions -- テキストがどの言語であるかに関係なく、「開く」ボタンをクリックします
さらに一歩進めて—翻訳スクリプト
以下に示すように、各言語特有のスイートに翻訳スクリプトを配置することで、言語特有のスイートをさらに効率的に使用することができます。
例: 言語特有のOCR検索を使用する
params EnglishWord -- 英語の単語を取り...
set translation to {Hello: "Bonjour",Open: "Ouvrir",Yes: "Oui"} -- 翻訳変数をプロパティリストに設定します。各英語のキーにフランス語の値が割り当てられます
translation's (EnglishWord) を返す -- 与えられた英語のキーのフランス語の値を返します
例: 翻訳スクリプトの呼び出し
Set the InitialSuites to ("French") -- "Translate"スクリプトがフランス語のスイートから来ることを保証します
Click (text: Translate ("Hello")) -- "Translate"スクリプトを"Hello"というEnglishWordパラメータで実行します。このプロパティリストのText値として"Translate"の返り値を使用します。
翻訳スクリプトを使用する場合は、ベース言語に対しても動作するバージョンを作成することを忘れないでください!自分の言語を自分に翻訳してもらう必要は実際にはありませんが、ベースのスクリプトはTranslate呼び出しに遭遇したときに何かを行う必要があります。ベース��からベースへの"Translate"スクリプトは何も翻訳する必要はありません。パラメータを取得して同じパラメータを返すだけで十分です。
例: 言語特有のOCR検索を使用する
params BaseWord// 単語を取得します...
return BaseWord// 同じ単語を返します。
デスクトップとモバイルデバイス間でのテスト
この例では、1つのマスタースクリプトが4つのサブスクリプトを呼び出して、Androidデバイス上のEvernoteアプリケーション、デスクトップマシン上のブラウザ、およびアプリケーションのデスクト��ップ版を通じてテストします。
パラメータの使用に関する完全な情報については、Parameters and Resultsを参照してください。
メインスクリプト(EvernoteTest.script)
//このスクリプトはAndroidデバイス上のEvernoteにノートを作成し、そのノートが処理され、Windows 7のVM上のウェブブラウザに表示されることを確認します//
//変数の初期化(データファイルやデータベースからも取得可能)
Put "Bananas" into MyFruit
Put "Carrots" into MyVeggie
AddItemsFromAndroid MyFruit, MyVeggie --Androidデバイスから食料品リストにアイテムを追加するスクリプトを呼び出す
CheckItemsInBrowser MyFruit, MyVeggie --Win 7のVMに接続し、Evernoteオンラインにログインして、アイテムが更新されたか��どうかを確認するスクリプトを呼び出す
CheckItemsInDesktopApp MyFruit, MyVeggie --Evernoteデスクトップアプリケーションを使用してリストアイテムを確認するスクリプトを呼び出す
最初に呼び出されるスクリプト(AddItemsFromAndroid.script)
//このスクリプトは、Win 7のVMに接続し、Evernoteデスクトップアプリケーションでリストアイテムを確認します//
Log "Entering Items in List via Android"
Connect GalaxyS3 //デバイスに接続します
Tap "AppMenu" //Evernoteアプリに移動します
Tap "Evernote" //リストに移動します
Tap "NoteIcon"
Tap "GroceryList"//リストを編集してアイテムを追加します
Tap "EditIcon"
WaitFor 30.0, "Check"
TypeText Fruit, return
TypeText Veggie, return
//リストを保存してホームページに戻ります
Tap "Check"
Wait 1
Tap "ElephantIcon"
TypeText HomeKey //デバイスのホームボタンを使用してホームページに移動�します
WaitFor 30.0, "ChromeIcon" //デバイスのホームページが表示されていることを確認します
二番目に呼び出されるスクリプト(CheckItemsInBrowser.script)
//このスクリプトは、Win 7のVMに接続し、ウェブブラウザを通じてEvernoteでリストアイテムを確認します
Params Fruit, Veggie
Log "Checking the list items in a browser"
Connect Win7Demo //Win 7のVMに接続します
//Evernote.comに移動します
DoubleClick "GoogleChrome"

TypeText "Evernote.com",return
//ログインして、食料品リストが選択されていることを確認します
Click "SignIn"
TypeText "Bob"
TypeText TabKey
TypeText "Bob"
Click "SignInButton"
Click "GroceryList"
//作成日を見つけてログに記録します
Put ReadText ("CreatedTLDate","CreatedBRDate") into DateCreated
Log "このリストは以下の日に作成されました: " & DateCreated
//最終更新日を見つけてログに記録します
Put ReadText ("ModifiedTLDate","ModifiedBRDate") into DateModified
Log "このリストは最後に以下の日に変更されました: " & DateModified
//食料品リストの内容を読み取ります
Put ReadText ("TLList","BRList") into AppListContents
Log "リストに含まれていたのは以下の通りです: " & ListContents
//フルーツが適切に同期されたかどうかを確認します
If ListContents contains Fruit
then
  log "リストには " & Fruit & " が含まれていました"
else
  logWarning "アイテム " & Fruit & " は表示されませんでした"
end if
//野菜が適切に同期されたかどうかを確認します
If ListContents contains Veggie
then
  log "リストには " & Veggie & " が含まれていました"
else
  logWarning "アイテム " & Veggie & " は表示されませんでした"
end if
//ブラウザを閉じます
Click "CloseButton"
三番目に呼び出されるスクリプト(CheckItemsInDesktopApp.script)
//このスクリプトは、Win 7のVMに接続し、ウェブブラウザを通じてEvernoteでリストアイテムを確認します
Params Fruit, Veggie
//パラメータを宣言します。パラメータの渡し方についての例は、「パラメータの渡し方と関数の呼び出し」を参照してください
Log "Evernoteデスクトップアプリケーションでリストアイテムを確認しています"
Connect Win7Demo //Win 7のVMに接続します
//Evernoteデスクトップアプリケーションを開き、食料品リストが選択されていることを確認します
DoubleClick "EvernoteDesktopApp"
If not imagefound (30.0, "GroceryListSelected")
then
  Click "GroceryList"
  FoundImageLocation()
end if
//リストを同期して、任意の変更を更新します
Click "ToolsMenu"
Click "Sync"
Wait 5
Put ReadText ("CreatedTLDate","CreatedBRDate") into AppDateModified
Log "このリストは以下の日に作成されました: " & AppDateModified
//作成日を見つけてログに記録します
Put ReadText ("CreatedTLDate","CreatedBRDate") into AppDateCreated
Log "このリストは以下の日に作成されました: " & AppDateCreated
//最終更新日を見つけてログに記録します
Put ReadText ("ModifiedTLDate","ModifiedBRDate") into AppDateModified
Log "このリストは最後に以下の日に変更されました: " & AppDateModified
//食料品リストの内容を読み取ります
Put ReadText ("TLList","BRList") into AppListContents
Log "リストに含まれていたのは以下の通りです: " & AppListContents
//フルーツが適切に同期されたかどうかを確認します
If AppListContents contains Fruit
then
  log "リストには " & Fruit & " が含まれていました"
else
  logWarning "アイテム " & Fruit & " は表示されませんでした"
end if
//野菜が適切に同期されたかどうかを確認します
If AppListContents contains Veggie
then
  log "リストには " & Veggie & " が含まれていました"
else
  logWarning "アイテム " & Veggie & " は表示されませんでした"
end if
//ブラウザを閉じます
Click "CloseButton"
最後に呼び出されるスクリプト:クリーンアップスクリプト(ClearList.script)
//このスクリプトは、Android経由でEvernoteにアクセスし、内容をクリアします
Params Fruit, Veggie //パラメータを宣言します
Log "Androidデバイス上のリストをクリアしています"
Connect GalaxyS3 //デバイスに接続します
//Evernoteアプリに移動します
Tap "AppMenu"
Tap "EverNote"
//リストに移動し、編集モードに入ります
Tap "NoteIcon"
Tap "GroceryList"
Tap "EditIcon"
WaitFor 30.0, "Check"
//アイテム1を削除します
TypeText ShiftKey, DownArrow
Click "DeleteButton"
//アイテム2を削除します
TypeText ShiftKey, DownArrow
Click "DeleteButton"
//リストを保存し、ホームページに戻ります
Tap "Check"
Wait 1
Tap "ElephantIcon"
TypeText HomeKey
WaitFor 30.0, "ChromeIcon"
マスタースクリプトからの実行
SchedulesペインはSuit Windowの便利なグラフィカルインターフェースで、一連のスクリプトを組織化し、実行することができます。 しかし、スクリプトをよりダイナミックに実行する必要がある場合は、マスタースクリプト��を書く必要があります。
マスタースクリプトを書く際の強力なツールはRunWithNewResultsコマンドで、これを使って返されたスクリプト結果をビルドアップし、未来のテスト実行スケジュールを生成することができます。
RunWithNewResultsは、別のスクリプトをパラメータとして取ることで動作します。パラメータスクリプトは自分自身の結果を生成し、それをマスタースクリプトに返します。これの利点は、前回の実行の戻り値に基づいて、スクリプトの実行を条件付きでスケジュールすることができます。マスタースクリプトを通じて任意の数のスクリプトを実行し、その結果も管理することができます。
例: マスタースクリプト
この例のスクリプトは、マスタースクリプトの機能を強調しています。まず、初期テストを実行します。そのテストが失敗すると、システム管理者に警告メールを送信します。それ以外の場合は、一連のテストを実行し、その結果をテキスト文字列に保存し、最後にそれをログに記録します。
set TestList to ("Test1", "Test2", "Test3") -- 後で使用するための一連のスクリプト実行を作成します
RunWithNewResults "InitialTest"
set Outcome to the result
if the status of Outcome is not "Success" -- "InitialTest"の結果が"Success"でない場合、実行の日付と時間を取得します...
then
  convert Outcome's runDate to date and long time
  sendMail (to: "administrator@yourcompany.com", from: "JoeTester@yourcompany.com", subject: "Initial Test Failed", body: "Test run at" && rundate of Outcome && "had" && errors of Outcome && "errors") -- 実行の日付とエラーを報告するメールを送信します。(&&はテキスト文字列をスペースで連結します)
else -- それ以外の場合...
  repeat with each testScript of TestList -- TestList内の各スクリプトについて...
    RunWithNewResults testScript -- スクリプトを実行し、その後...
    set Outcome to the result -- 結果をOutcomeに格納します
    put testScript & ":" && status of Outcome && Return after currentReport -- "Script: Status"をcurrentReportに追加し、その後に改行文字を追加します
    if the status of Outcome is "Failure" then -- もしOutcomeのステータスが"Failure"なら...
      run "CleanupScript" -- テスト環境をリセットするためにCleanupScriptを実行します
    end if
  end repeat -- TestListの最後のテスト後に終了します
  Log "Final Results:" -- "Final Results:"テキストをログに記録します
  repeat with each line of currentReport
    log it -- currentReportの各行をログに記録します
  end repeat
end if