Configuring Eggplant Integration for Micro Focus ALM
Configuring Eggplant Integration for Micro Focus ALM to work with your Application Lifecycle Management (ALM) system consists of the following three tasks:
- Configuring mappings
- Generating an encrypted password
- Configure secure connection (HTTPS) to Eggplant Integration server
Configuring Mappings
Part of configuring Eggplant Integration for Micro Focus ALM is providing information about your ALM server and projects by creating and modifying mappings that include values for your configuration. The Eggplant Integration for Micro Focus ALM includes a mappings editor that you can use to modify and create these mappings
Before you do any editing, you need to know about the different types of mappings.
Types of Mappings
Using the mappings editor in Eggplant Integration for Micro Focus ALM:
- Connection and project mappings (required for Eggplant Integration for Micro Focus ALM): These mappings are for your ALM connection, domain and project information.
- Entity mappings: The Run, Test, and Test Set "entity" mappings are for test entities in Micro Focus ALM. Micro Focus ALM divides its projects into categories, which are called "entities." Micro Focus ALM provides Run, Test, and Test Set entities. The Eggplant Integration for Micro Focus ALM can capture and upload this information about your tests to Micro Focus ALM, when you create these mappings.
See Formatting Mappings for ALM Entities for instructions on how to create entity mappings.
Eggplant Integration for Micro Focus ALM version 2.0 onwards supports Run, Test, and Test Set entities. The entities you use in Micro Focus ALM are ultimately the decision of your testing organization.
Formatting Mappings for ALM Entities
To use any of the supported entities, create mappings for them in the mappings editor of your Eggplant Integration.
Example: Mappings for the following Run entity fields:
- Host
- Operating System
- OS Build Number
- Comments
- Duration
Add the following mappings in the <!-- Mappings file --> section of the mappings editor, below the <!--mappings for Run --> section:
<!-- mappings for Run -->
<!-- <mapping alm_field="RN_USER_01" label="run user 1"/> -->
<mapping alm_field="RN_HOST" label="RunHost"/>
<mapping alm_field="RN_OS_NAME" label="RunOS"/>
<mapping alm_field="RN_OS_BUILD" label="RunOSBuild"/>
<mapping alm_field="RN_COMMENTS" label="RunComments"/>
<mapping alm_field="RN_DURATION" label="RunDuration"/>
The elements in a mapping are as follows:
mapping alm\_field=The name of the field in ALM.label=The name of the HTTP request query parameter value that should be mapped to the alm_field.default\_value=An optional default value you can provide (not shown above).
Step by Step: Using the Mappings Editor to Configure Mappings
The following steps describe how to use the mappings editor to configure and create your ALM mappings.
-
Display the Eggplant Integration for Micro Focus ALM Home Page.
-
On the Home page, click Configure ALM mappings link. The ALM mappings editor page appears, showing you the mappings file contents.
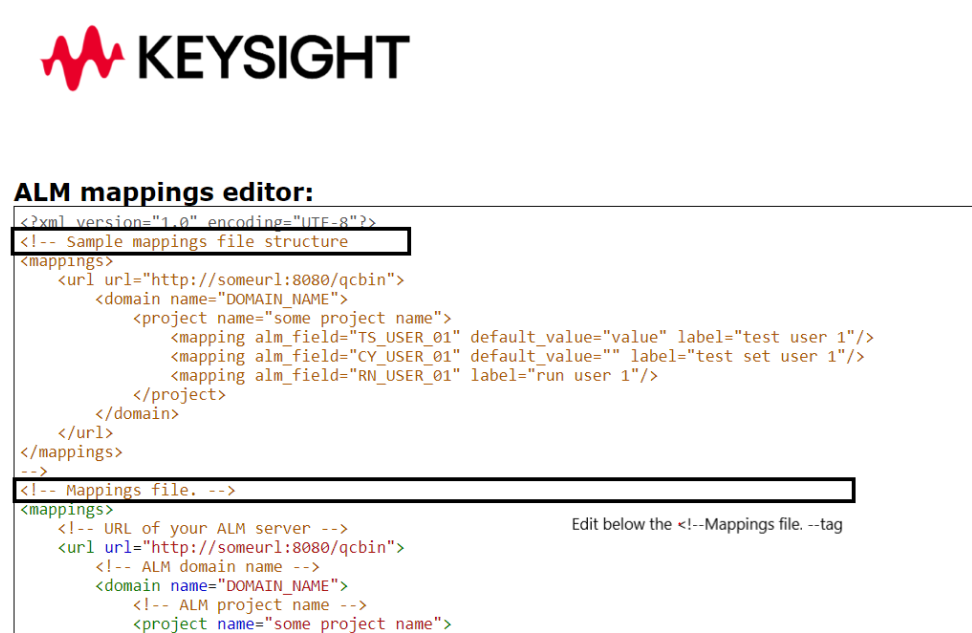 note
noteThe top of the page is a sample of the mappings file structure. Don’t edit this section!
-
Scroll down to the
<!-- Mappings file -->section. Modify the mappings below it: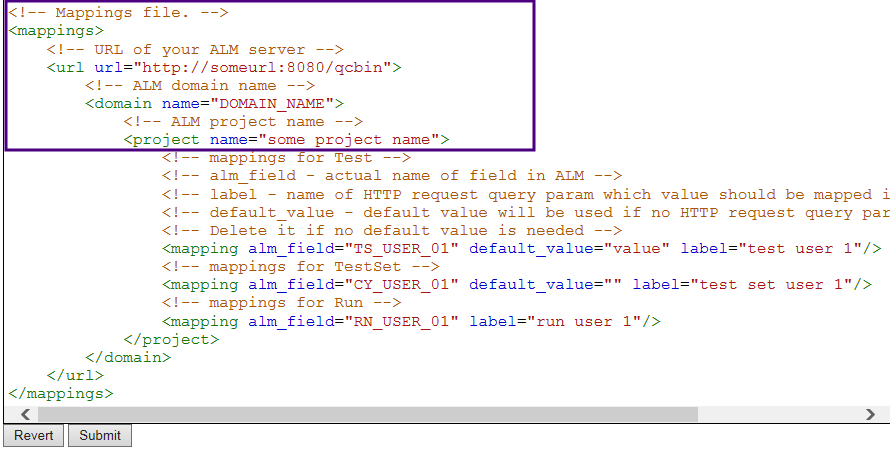
-
To configure multiple projects when configuring the
<!-- Mappings file -->section, use the following approach as a guideline: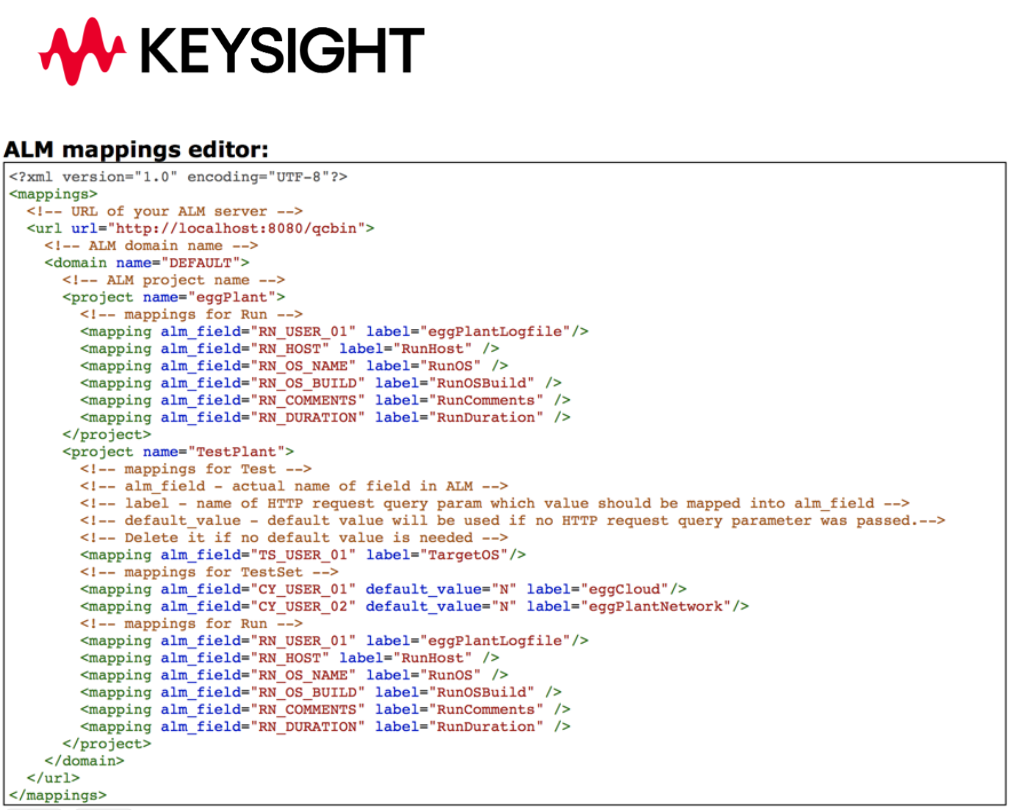
-
(Required) Provide the connection information for your Micro Focus ALM server under
<!-- URL of your ALM server -->, in the<url url="http://someurl:8080/qcbin">element , by replacingsomeurl:8080with the hostname or IP address and port for your Micro Focus ALM server. -
(Required) Specify your Micro Focus ALM domain name in the
<domain name="DOMAIN\_NAME">element by replacingDOMAIN\_NAMEwith your Micro Focus ALM domain name. If you plan to upload tests and results to more than one domain, you need to copy and paste the domain mapping for each domain and modify the domain name for each accordingly. The domain mapping begins with the<domain name="DOMAIN\_NAME">xml tag and ends with</domain>. -
(Required) Specify your project name in the
<project name="some project name”>element by replacingsome project namewith the name of the project you want in your Micro Focus ALM. If you plan to upload tests and results to more than one project, you need to copy and paste the project mapping for each domain and modify the project name for each accordingly. The project mapping begins with the<project name="some project name">xml tag and ends with</project>. Be sure you add your projects within the correct domain mapping. -
If you are using any of the supported ALM entity fields in your test organization, and you want to use them in this integration, create mappings for the fields within the correct project mapping. See Formatting Mappings for Micro Focus ALM Entities for full details.
-
If you created mappings to any ALM entity fields, and want to view data using labels, append the labels on which you want to search to the URL discussed in previous steps. For example, if you added
label="custom run field"to a custom field created in theRun tableof the database, append"custom run field":"myinfo"to the URL. -
When you finish creating and modifying mappings, click Submit below the mappings editor window. To help troubleshooting, an error message is displayed if the information is invalid.
Generating an Encrypted Password
The setup scripts in example suites are required for integrating Eggplant Functional with ALM. One of the configuration parameters for these scripts is an encrypted password for ALM. The Eggplant Integration for Micro Focus ALM provides a password encryption tool that you can use to encrypt your Micro Focus ALM password.
Follow the steps below to use the password encryption tool:
-
Click Encrypt password. The Encrypt password page opens.
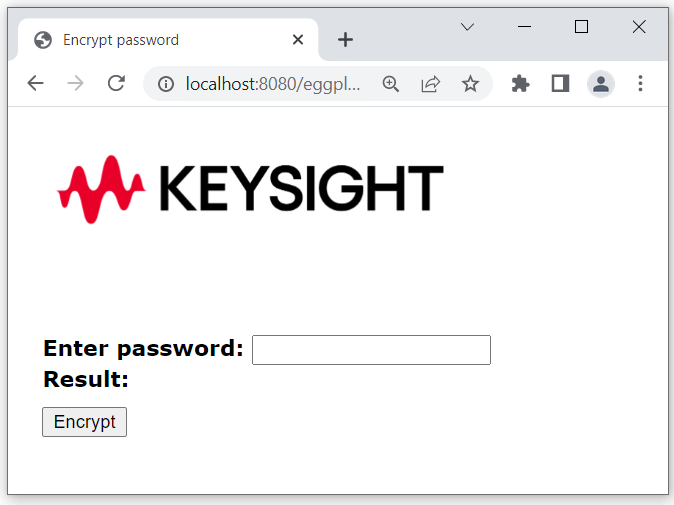
-
Enter the password for the ALM user that you want the Eggplant Integration to log in as, then click Encrypt. Your encrypted password appears.
-
Save the encrypted password. Add the password to the setup scripts as described in Integrating Eggplant Functional with Micro Focus ALM.
Configure secure connection (HTTPS) to Eggplant Integration server
Here are the steps to set up a secure connection (HTTPS) to Eggplant Integration server:
-
Generate or purchase an SSL/TLS certificate.
-
Put your keystore file (e.g. keystoreFile.pfx) into the installation directory of the Eggplant Integration server.
-
Add the following lines into
config.propertiesfile in the installation directory of the Eggplant Integration server.ssl.cert.file- the path to the keystore file (it can be either absolute path or relative to installation directory), e.g.keystoreFile.pfxssl.cert.password- password for the keystore file
Example:
# Path to certificate store file
ssl.cert.file=keystoreFile.pfx
# Password for certificate store
ssl.cert.password=changeit -
Restart the Eggplant Integration server. See Starting and Stopping the Eggplant Integration for Micro Focus ALM.