Installing Eggplant Integration for Micro Focus ALM
Eggplant Integration for Micro Focus ALM allows you to integrate Eggplant Functional with Micro Focus ALM. See Integrating with Micro Focus ALM to understand how this works. Follow the instructions on this page to install the Eggplant Integration.
The Eggplant Integration for Micro Focus ALM is only available for Windows operating systems.
After installation, you'll need to:
- Configure your Eggplant Integration
- Download and modify required scripts
- Run tests to verify your set up.
See Installing and Setting Up the Eggplant Integration for Micro Focus ALM.
If you want to remove the Eggplant Integration from your system, see Uninstalling Eggplant Integration for Micro Focus ALM.
Before You Begin
Here is a list of things to do before you install the Eggplant Integration for Micro Focus ALM:
Verify Micro Focus ALM version 11.52 or later is installed and operational on a computer that is network-accessible to the computer where you are installing the Eggplant Integration.
Gather the following information about your existing ALM installation:
- Host or IP address
- Port number
- Userid and password
- Domain
- Project name
You must provide this information during the Eggplant Integration installation. You can add more than one project later, during configuration.
Requirements
Be sure the computer on which you are installing the Eggplant Integration for Micro Focus ALM meets the following requirements.
-
Operating systems: Microsoft Windows 7 (SP 1), 8, or 10. Server 2008 R2, Server 2012, or Server 2016
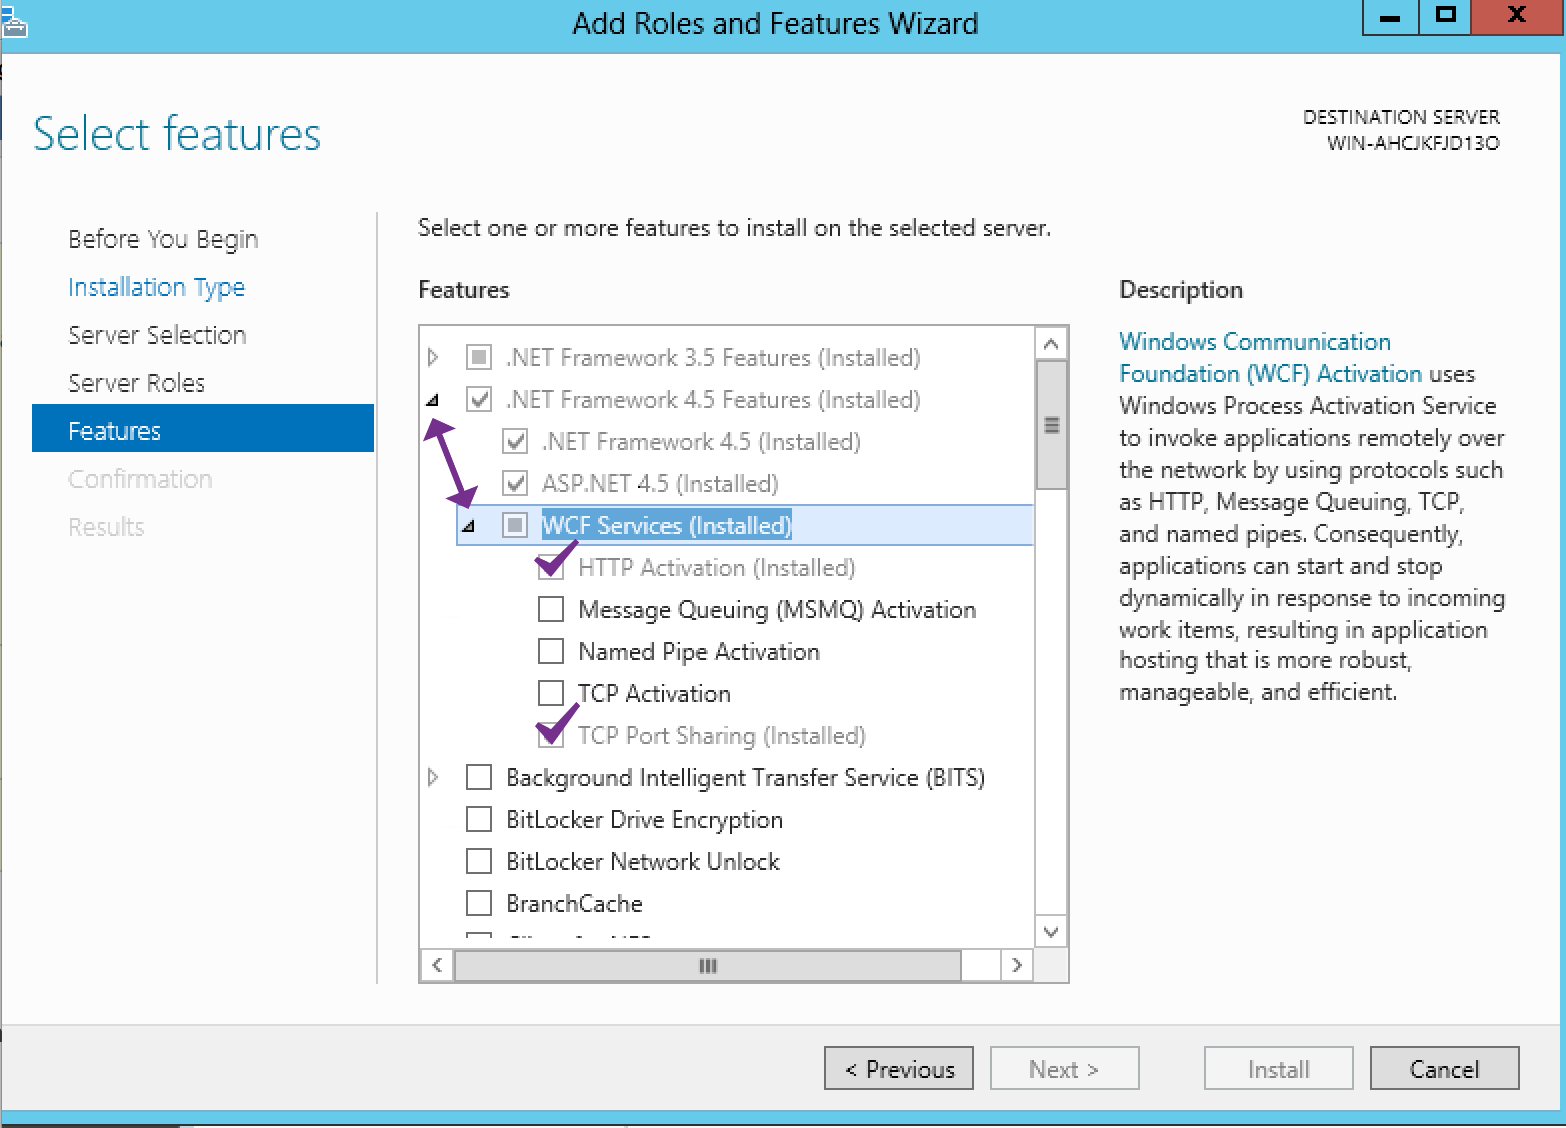
You must have the following server roles installed before installing the Eggplant Integration ALM on Windows Server 2012:
- HTTP Activation
- TCP Port Sharing
-
Web browser
-
Micro Focus ALM Connectivity from Micro Focus ALM versions 11 or later: Download and install this component from your Micro Focus ALM installation, specifically from the Micro Focus Application Lifecycle Management - Tools page:
http://<your_alm_hostname_or_ip_address\>:<your_alm_port\>/qcbin/PlugIns/TDConnectivity/TDConnect.exe. This tool enables the integration with Micro Focus ALM.noteTo access the Micro Focus Application Lifecycle Management - Tools page, you might need to add the URL for your existing ALM installation to the list of Trusted Sites in your browser security options.
-
License for your Eggplant Integration for Micro Focus ALM version 2.0: Contact your account manager if you need a license.
-
The Eggplant Integration for Micro Focus ALM version 2.0 installation file: Download this file from the Eggplant Eggplant Integration downloads page.
noteWhen you go to the downloads page, also download the integration suite. This suite contains scripts that you need to integrate Eggplant Functional with Micro Focus ALM. Instructions for using the suite are provided in Modifying the Integration Scripts.
Step by Step: Installing Eggplant Integration for Micro Focus ALM
Follow the instructions below to install Eggplant Integration for Micro Focus ALM:
-
Verify that your existing ALM installation is running and that you can connect to it from a web browser on the computer on which you are installing Eggplant Integration for Micro Focus ALM.
-
Download and install Micro Focus ALM Connectivity from the Micro Focus Application Lifecycle Management - Tools page
http://<your_hp_alm_hostname_or_ip_address\>:<your_alm_port\>/qcbin/addins.htmlin your Micro Focus ALM. This “add-in” enables integration with Micro Focus ALM. -
Download the Eggplant Integration for Micro Focus ALM installation file
eggplant-alm\_2.2.0.exefrom the Eggplant Integration downloads page. -
Double-click
eggplant-alm\_2.2.0.exeto run the Setup Wizard. The Setup Wizard panel opens. -
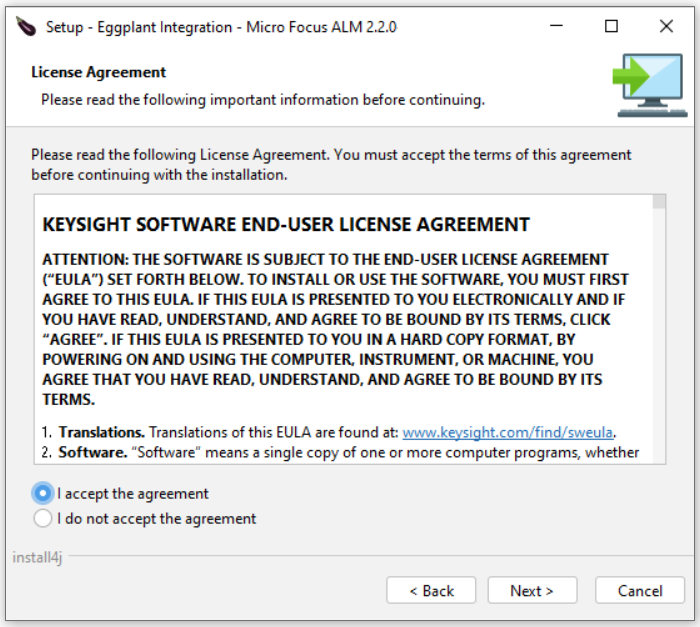
Click Next to proceed through the Setup Wizard. The License Agreement panel opens.
-
Accept the License Agreement and click Next.
-
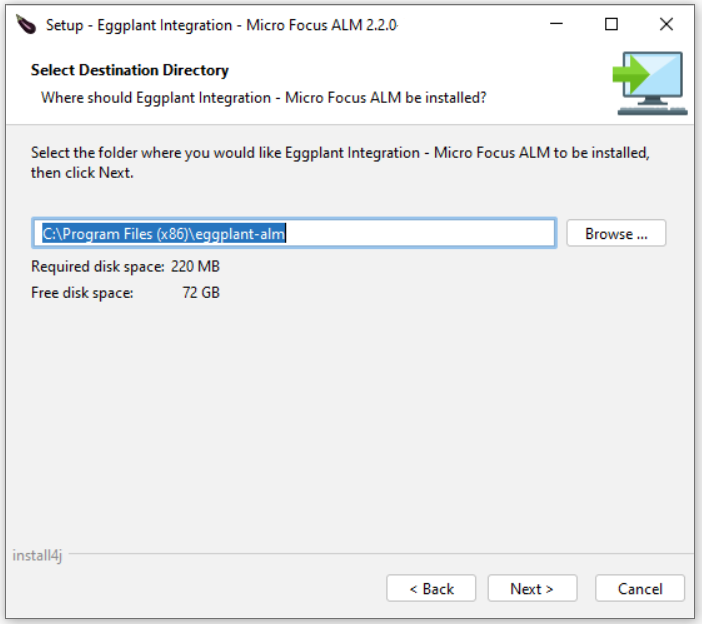
Specify the directory where you want to install the Eggplant Integration, or accept the default directory
C:\\Program Files (x86)\\eggplant-alm, then click Next. The Port selection panel opens.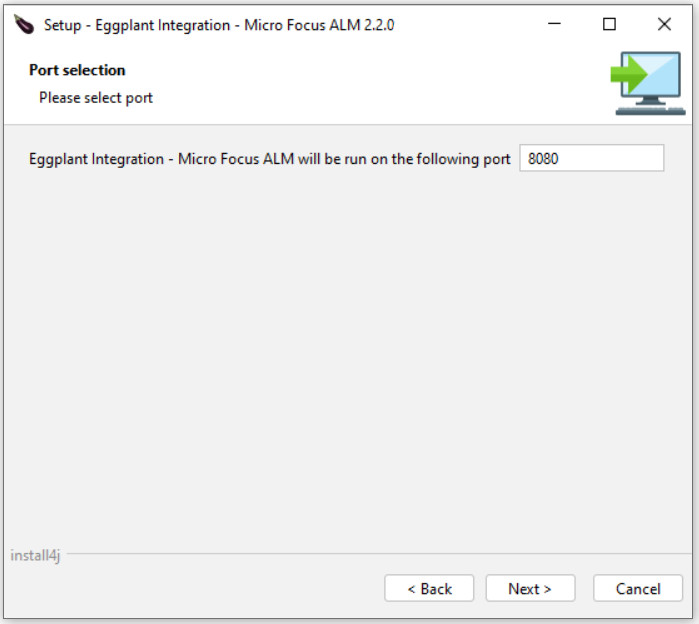
-
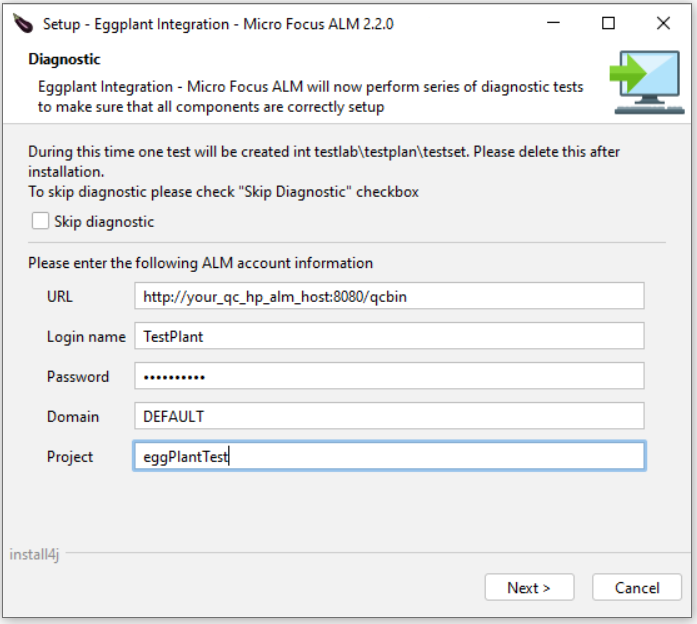
Specify the port on which you want the Eggplant Integration to run, or accept the default 8080, then click Next. The Diagnostic panel opens. The Diagnostic panel captures connection and project information for your existing ALM server. Setup runs diagnostic tests to verify the information you provide is correct. It also verifies that your license is valid and Micro Focus ALM connectivity is installed.
 note
noteYou can select the Skip diagnostic box at the top of the panel if you do not want to run the diagnostic tests. But we recommend running the tests to help ensure the success of your Eggplant Integration.
-
Enter the following connection and project information for your Micro Focus ALM:
URL: The URL to connect to your existing ALM server. The URL consists of the hostname or IP address, port, and
/qcbin. For example,http://<your_alm_hostname_or_ip_address\>:<your_alm_port\>/qcbin.Login name: The userid that you want to use to log in to your ALM server.
Password: The password for the userid you specified above.
Domain: The domain for your ALM server.
Project: The project that you want in ALM.
noteYou can add more projects after installation, as described in Configuring Mappings for Micro Focus ALM.
-
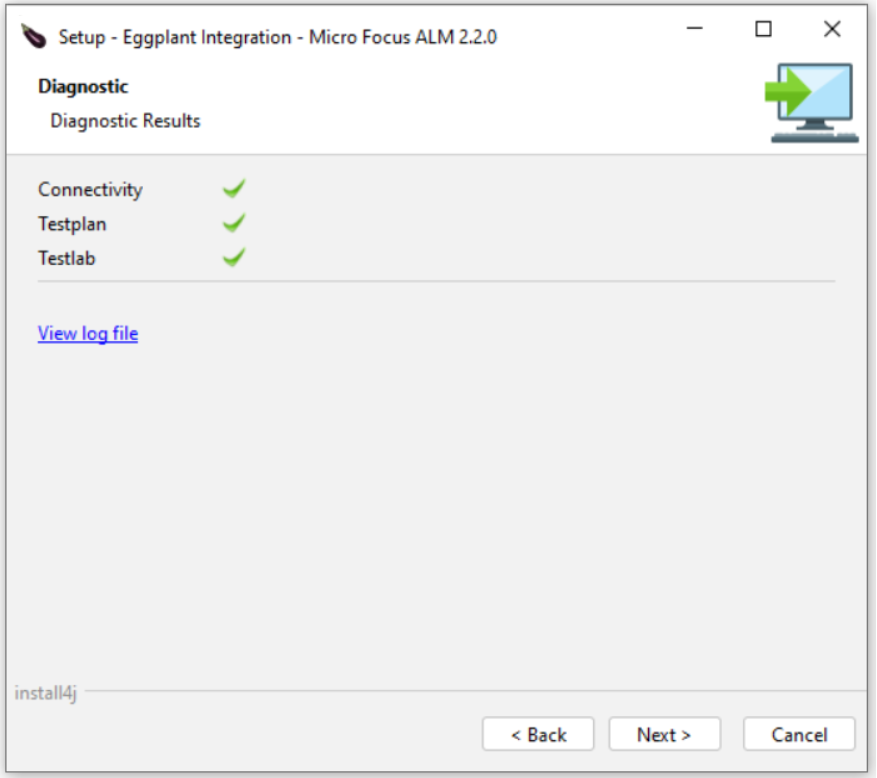
Click Next. The Setup program performs four diagnostic tests:
- Verifies the required Micro Focus ALM Connectivity component is installed properly.
- Validates the connection information that you provided for your existing ALM server.
- Attempts to create a sample test plan and test lab in Micro Focus ALM.
- Verifies the Eggplant Integration license.
-
Check the diagnostic test results:
- If you see a green check mark next to a diagnostic test, it succeeded.
- If you see a red X next to a diagnostic test, it failed. You can display any related errors by scrolling through the information in the scrollable panel on the page. Or, you can click the View log file for more details. Click Back to return to the Diagnostic panel to check or re-enter any of the information for your existing ALM server.
-
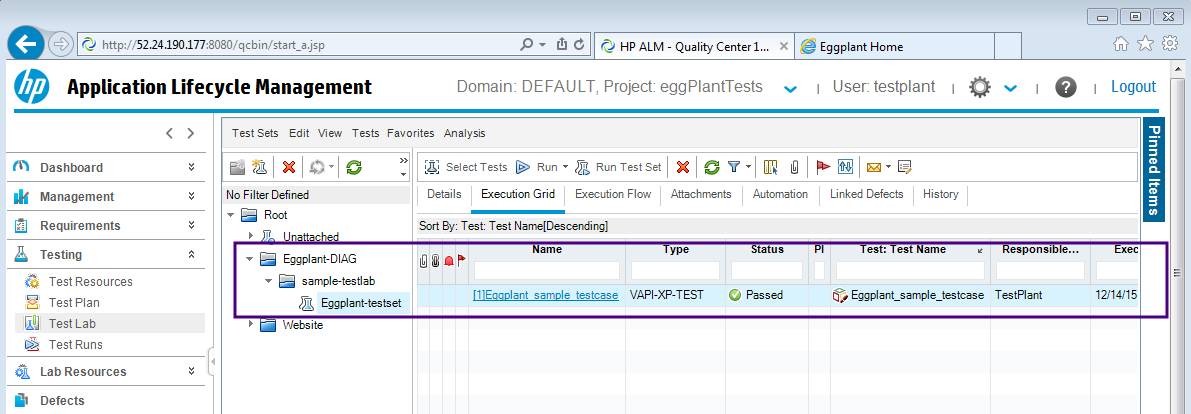
When all the diagnostic tests succeed, you can verify Setup created the sample test plan, test lab, and test case by logging in to your Micro Focus ALM and displaying them. They are named Eggplant-DIAG as shown below. The creation of these items confirms that Eggplant Integration installed successfully.
noteDelete the sample items from your ALM server after installation.
-
Click Next to finish the Setup wizard. The Setup program starts the Eggplant Integration web application and configures it to start automatically when its host machine restarts. The last panel of the Setup wizard shows you the URL for the Eggplant Integration web interface home page. For example,
http://<eggIntegration_hostname_or _ip_address\>:<eggIntegration_port\>/eggplantALM. -
Click the link to display the home page of the Eggplant Integration. If you encounter any errors, troubleshoot accordingly. See Displaying the Eggplant Integration for Micro Focus ALM Home Page for more information about the options on the home page.
-
Click Finish to close the Eggplant Integration Setup Wizard.
Eggplant Integration Micro Focus ALM is now installed and ready for configuration.