Capture Images with Autoscan
The Autoscan feature in Eggplant Functional determines all the areas on the screen of a system under test (SUT) that you might want to capture as images, highlights them, and enables you to quickly edit and save those images.
You can also generate Autosnippets using Autoscan. These are short pieces of code that can be used as snippets in Eggplant AI.
Step by Step: Autoscan Sessions
Autoscan sessions work differently in Live Mode than in Capture Mode. In Live Mode, Eggplant Functional scans the entire SUT window to find potential images. In Capture Mode, the Capture Area defines the portion of the SUT screen that Eggplant Functional scans. The menu option for Autoscan changes depending on which mode you're in.
- Connect to a SUT. When you've connected, the SUT appears in the Viewer window. If you're working in Capture Mode, adjust the Capture Area to include the parts of the SUT screen that you want scanned.
- Start an Autoscan session:
- From the main menu, select Control > Start Session > Autoscan Entire Screen (in Live Mode) or Control > Start Session > Autoscan in Capture Area (in Capture Mode).
- From the Viewer window, click Start Session > Autoscan Entire Screen (in Live Mode) or Start Session > Autoscan in Capture Area (in Capture Mode).
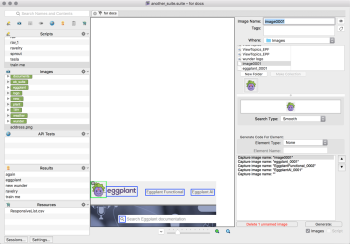
- Eggplant Functional scans the SUT screen. The area of the screen you searched opens in the Autoscan window, with potential images highlighted in blue. The element highlighted in green is the currently selected element.
- Drag the lower right corner of a highlight box to adjust its size. Click the X in the upper left corner of a highlight box to delete it. Click anywhere on the SUT screen in the Viewer window to create a new highlight box. Zoom in and out on the scanned area using the magnifying glass icons.
An Autoscan session performed in Capture Mode. Click image to view larger

A suggested image from an Autoscan session.
To move the hot spot in an image, Ctrl+click or Ctrl+drag the red crosshairs in the image (Cmd+click or Cmd+drag on Mac).
You can add and create Tags for ease of organization. Click the tag icon to the right of the Tags field to apply the selected tags to all of the images created in the session.
Images are saved in the Images folder of your suite by default; you can change that location using the Where drop-down menu. You can choose to create an image collection here, as well.
If any of the elements Eggplant Functional finds can be read using optical character recognition (OCR), the Use OCR checkbox appears in the session window. Select the checkbox to use an OCR search instead of an image search for individual images. To use OCR as the default search type for an entire session, Shift+click the Use OCR checkbox.
Note: This setting is session-specific. It is not saved in your defaults or between sessions. This setting also does not persist if you close a session and then return to that same session.Tip: You should use OCR only if you plan to generate Autosnippets from an Autoscan session.If you select Use OCR, additional OCR tuning properties appear.
 DPI: By default, OCR uses 72 DPI screen resolution for searches. If the resolution on your SUT is significantly different, you might need to adjust the DPI for the search.
Valid Words: This parameter limits the words that the OCR engine recognizes. By default, the engine uses the entire set of words for the language (or languages) in the current text platform. You can use the asterisk as a wildcard so that the OCR engine looks only for the words in your original text string.
Valid Characters: This parameter limits the characters that the OCR engine recognizes. By default, the engine uses the entire set of characters available for the language (or languages) in the current text platform. You can use the asterisk as a wildcard so that the OCR engine looks only for the characters in your original text string.
Valid Pattern: This property is a string that takes a regular expression value and returns only characters or words that match the specified pattern.
Contrast: Select this checkbox if you want OCR to treat the ReadText() rectangle as a flat, two-color image. This option can be useful when working with anti-aliased text. これでSUTの画面をフィルタし、OCRエンジンに2値画像を表示します。 Contrast relies on the following settings:
- Contrast Tolerance: A measure of how much a pixel can differ from the RGB value of the selected color and still be considered the primary color.
- Color: Click the color well and select a new color using the Colors panel. OCR treats this color as the primary color of the ReadText() rectangle. It is generally advised to select the background color for this selection. Tip: Use the color picker in the Colors panel to copy a color from any place in your display, including the Viewer window. Click the magnifying glass in the Colors panel, then click again wherever you see the color you would like to copy.
Enhance Local Contrast: Select this checkbox if you want OCR to automatically increase the local contrast of the image.
Enable Aggressive Text Extraction: Select this checkbox if you want OCR to extract as much text from the image as possible.
Case Sensitive: Select this checkbox to enable case-sensitive searching.
Ignore Spaces: Select this checkbox to have OCR searches ignore spaces between characters during a search.
Ignore Lines: Select this checkbox to have OCR searches ignore new lines during a search.
Language: Use this drop-down menu to add or remove OCR recognition languages. You can select multiple languages for use in OCR searches. To enable additional languages, navigate to Eggplant > Preferences, then click Text and scroll to Enabled Languages.
- Select, adjust, and name all the images you want to generate. At this point, you can choose to generate Autosnippets.
- When you've defined all of the images you want to add to your suite, select the Images checkbox and click Generate. Eggplant Functional saves the images with the names you chose.
Advanced Properties
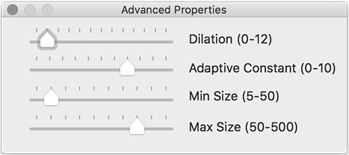
Eggplant Functional has advanced features to fine-tune the Autoscan process. Click the down arrow at the bottom of the Autoscan session screen to open the Advanced Properties window.

You can adjust the following properties:
- Dilation: Increases or decreases the size of the boxes around the suggested images. Can be used to combine adjoining boxes to capture elements of different sizes.
- Adaptive Constant: Adjusting this setting can help filter out noise in blurrier images or in images that have less contrast.
- Min Size: Sets a minimum size (in pixels) for the width or height of a suggested image. Any possible images found that are smaller than this size are ignored.
- Max Size: Sets a maximum size (in pixels) for the width of height of a suggested image. Any possible images found that are larger than this size are ignored.
