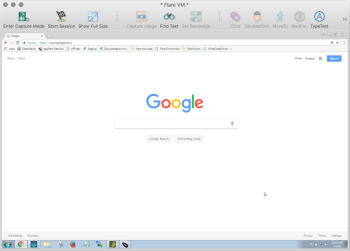
Viewer(ビューア)ウィンドウ
The Eggplant Functional Viewer window opens when you make a connection to a system under test (SUT) through the Eggplant Functional interface. The window shows an image of the remote SUT as you would see it on its own display.
Live Mode(ライブモード)
In Live Mode, you can use your local mouse and keyboard to interact with the SUT as a user. This interaction works as if you were using the SUT's own keyboard and mouse directly. In Live Mode, you can also copy and paste text between applications running on the SUT and your local computer.
You can use this functionality to navigate in the remote SUT, launch applications, and otherwise prepare the environment to capture images and perform the tests you're interested in.
Capture Mode(キャプチャモード)
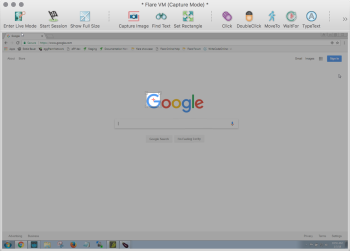
Capture Mode(キャプチャモード)でのViewer(ビューア)ウィンドウ
In Capture Mode, you can capture images from your SUT, combined with commands and functions that represent the actions you want to perform, then insert the resulting SenseTalk code into your current script. The Viewer window is dimmed in Capture Mode, except for the Capture Area, described below.
画像をキャプチャする
To capture an image from the SUT, click the image. The Eggplant Functional edge detection functionality automatically sizes the Capture Area around the image for you. In most cases, the auto-sized image should work fine for SenseTalk scripting and image searches. However, you can adjust the size and placement of the Capture Area manually as well; see The Capture Area below for details.
If you want to add the image to the suite without inserting code into a script, click Capture Image on the Viewer window toolbar, or right-click in the Capture Area and select Add Image.
To capture the image to the suite along with adding an associated line of code to your current script, click the appropriate button on the toolbar (e.g., Click, DoubleClick), or right-click in the Capture Area and select the appropriate action from the drop-down menu. The Viewer window provides many code options you can include with your captured images. This functionality is the basis for the assisted scripting method of script generation in Eggplant Functional.
When you have selected the method to capture the image, the Image Capture panel opens. This panel is basically a Save dialog box, but it provides additional opportunities for updating the options you want to use with the image in your scripts. See The Image Capture Panel for complete information.
For more information about image capture, see Image Capture Best Practices.
The Capture Area

The Capture Area
In Capture Mode, the Capture Area shows the area that is included when you save an image. そのエリアは通常の明るさで、長方形での表示です。一方、Viewer(ビューア)ウィンドウの残りの領域は暗くなります。 By default, Eggplant Functional uses edge detection to automatically size the Capture Area for images you click. When you click anywhere in the Viewer window while in Capture Mode, the Capture Area moves to that location and automatically sizes around what it detects as the image you clicked.
If you click an area of the screen where there is no image, or Eggplant Functional can't detect the edges of an image, the Capture Area still moves to that location and the size is set to the default, 64 X 64 pixels. You can use Shift+click to move the Capture Area to an image without using edge detection; the Capture Area moves to the new location without changing size so that you can manually adjust the edges as you wish.
To move the Capture Area, you can click and drag it to a new location. You can also nudge the Capture Area one pixel at a time by pressing the arrow keys. Use Shift+arrow to move the Capture Area in ten-pixel increments.
To resize the Capture Area, drag the edges. You can also nudge the size one pixel at a time with Alt+arrow (Option+arrow on Mac) keys. Add the Shift key to resize in ten-pixel increments.
The Capture Area includes a drop-down arrow at the upper-right. Clicking the button opens the context menu, which lets you select a command to include with the captured image to insert into your active SenseTalk script. Note that this is the same menu you see if you right-click within the Capture Area. Choose Add Image if you want to capture an image without adding SenseTalk code.
The OCR Tuner
Adjust optical character recognition (OCR) search properties with the OCR Tuner. Open the OCR Tuner from the drop-down arrow located in the upper right corner of the Capture Area.
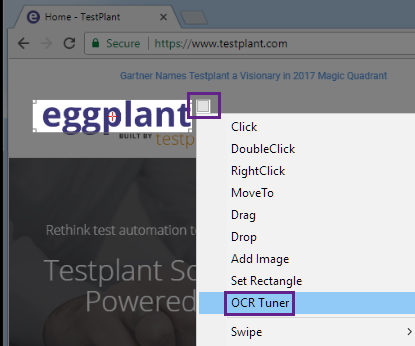
You can also adjust these properties from the OCR Update Panel and from Text Preferences. See Using the OCR Tuner for more information.
The Hot Spot

The Capture Area with the hot spot highlighted
The hot spot is the red crosshairs that you see inside the Capture Area. The hot spot is the point that is clicked when a script executes a Click or other command action on an image. The red crosshairs automatically turn black when the Capture Area is positioned over a predominantly red image.
To move the hot spot in a Capture Area, Ctrl+click or Ctrl+drag the crosshairs (Cmd+click or Cmd+drag on Mac). You can also nudge the hot spot in one-pixel increments with Ctrl+arrow (Cmd+arrow on Mac). 上記にShiftキーを加えると、10ピクセル刻みでホットスポットを移動できます。
Full-Screen Control
With full-screen control, you can view the SUT as your entire desktop. 小さなコントロールパネルで、通常のViewer(ビューア)ウインドウ機能へのアクセスを行います。 To open the control panel, choose Control > Control Panel from the main menu.
To customize the buttons displayed on the control panel, right-click in the panel, and choose Viewer window items from the context menu.
To enter full screen view, click the Enter Full Screen button, or use the keyboard shortcut Ctrl+Alt+Enter (Option+Cmd+Return on Mac). To return to your own desktop, click the Exit Full Screen button, or type the same keyboard shortcut you used to enter full screen view.
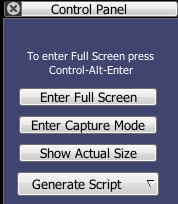
The Full-Screen Control Panel
Zooming
It is possible to zoom in on the SUT while in capture mode. The Viewer window must be set to show the SUT at full scale. To zoom in on Windows or Linux, hold Control and press the plus (+) key. To zoom out, hold Control and press the minus (-) key. On Mac, use the Command key instead of Control.
The Viewer Window Toolbar

The Viewer window toolbar
The toolbar buttons are described below. Because the toolbar can be customized, you might not see all the same buttons on your own toolbar. For information about adding and removing toolbar buttons, see Customize below.
Note that if you add buttons to the toolbar, or if you shrink the size of the Viewer window, you might see the overflow chevron (double arrow) at the right side of the toolbar. Click the chevron to open a menu with the additional options.

A double chevron in the Viewer window toolbar indicates additional items that won't fit on the window
The Default Toolbar Buttons
The following list describes the default set of buttons that appear on the Viewer window toolbar. See the Customize section to learn how to change and rearrange the buttons in the toolbar.
 Enter Capture Mode /
  Enter Live Mode
This button toggles the Viewer window between Live Mode and Capture Mode. When you click Enter Capture Mode, it switches the Viewer windows to Capture Mode and the button changes to Enter Live Mode. When you click Enter Live Mode, it switches the Viewer windows to Live Mode and the button changes to Enter Capture Mode.
 Start Session /
  End Session
This button starts and ends Rapid Image Capture, Turbo Capture, Autoscan, and Character Collection capture sessions. It toggles between Start Session and End Session according to whether a session is in progress.
 Scale to Fit /
  Show Full Size
This button toggles between showing the Viewer window at the SUT's full display size and showing the entire SUT scaled to fit the size of the Viewer window. Switching between the sizing options has no effect on the functionality of the Viewer window, image captures, or image matching.
 Capture Image
The Capture Image button captures an image of the area currently selected by the Capture Area and opens the Image Capture panel, which is described in detail below.
 Find Text
The Find Text button opens the Find Text panel, where you can search for text without using a previously captured image. The Find Text panel is described in detail below. The Find Text button is available in both Capture Mode and Live Mode.
 Set Rectangle
This button opens the Set Rectangle and Generate Code dialog box, which helps you easily set search rectangles and perform related actions on the SUT. This dialog box is described in detail below.
 Click,
  DoubleClick,
  MoveTo
These command buttons perform three actions at once:
- Save an image of the SUT as selected by the Capture Area into the Images folder of the current suite.
- Insert the respective SenseTalk command (Click, DoubleClick, or MoveTo) into the active script.
- Perform the respective action on the SUT.
 WaitFor
The WaitFor command causes a script to pause and wait for an image to appear in the Viewer window.
When you click the WaitFor button, an image capture panel opens. In the Maximum Wait text field, enter the longest period of time (in seconds) that you want the script to wait for the image to appear in the Viewer window.
When you run the script, the script executes the next command as soon as the WaitFor image appears. If the image does not appear in the maximum wait time, the test fails.
 TypeText
The TypeText command sends text as keystrokes typed in the Viewer window, allowing you to simulate typing on the SUT.
The TypeText button opens a panel in which you can enter your text parameters. When you create a TypeText command with this panel, clicking the Insert button automatically encloses your text parameters in quotation marks in your script.
 ホーム
ホーム
The Home button presses the home button on mobile devices.
 Press
Press
The Press button executes a tap and hold on mobile devices.
Customize the Toolbar
To customize the Viewer window toolbar, go to Window > Customize Toolbar. A panel opens in which you can select the buttons that are available in the Viewer window toolbar. You can also right-click in the toolbar itself to open the Customize panel.
To add a button to the toolbar, drag the button from the Customize panel to the toolbar. To remove a button from the toolbar, drag it off of the toolbar. While the Customize panel is open, you can also rearrange the buttons within the toolbar.
Default Buttons
To return to the default set of buttons, open the Customize panel. On Mac, drag the default button set to the toolbar. On Windows, click Reset.
Vertical Toolbar
The toolbar can also be displayed vertically. To do this, go to Window > Show Vertical Toolbar. To switch to a horizontal toolbar, go to Window > Show Toolbar.
The Image Capture Panel
The Image Capture panel is similar to a Save dialog box, with some additional script and image controls.
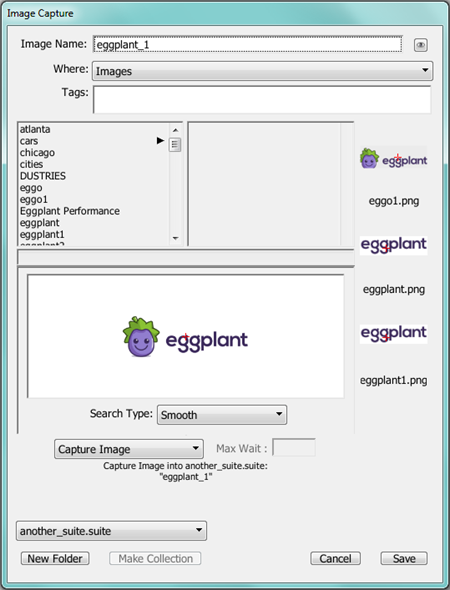
Image Name: The Image Name field defaults to a dynamically generated name that is unique to the current suite, beginning with image0001. This name might be sufficient for temporary scripts and experimentation, but more descriptive names are easier to follow as you start scripting in earnest.
Image names can contain alphanumeric characters, spaces, and most punctuation marks.
OCR Button: When you click the eyeball button, OCR suggests a name for the new image based on any characters it detects in the image.
Where: This drop-down list displays the folders in which you can save an image. The default choice is the Images folder of the current suite.
Tags: Apply existing Image Tags to the new image. You can also create new tags in this field.
Use Existing: If Eggplant Functional detects similarities between a new image and an image already in the suite that's open, it suggests that you use the existing image rather than save a new one.
Image Well: The central portion of the Capture panel that displays the captured image.
The hot spot in the image is indicated by red crosshairs. To move the hot spot, Ctrl+click in the image (Cmd+click on Mac) or Ctrl+drag the crosshairs (Cmd+drag on Mac).
Search Type: The Search Type drop-down list lets you choose a search type other than the default at the time of image capture.
The default choice in the Search Type drop-down list depends on the image you are saving. Eggplant Functional attempts to choose the most appropriate search type for each image. Tolerant is the most common default search type.
Command/Function: To insert a command or function into the script with your image, choose the command or function in the Command/Function drop-down list. To insert the image into the script with no command or function, choose Capture Image. To insert the image into a selected command or function in the script, choose Add Image.
Max Wait: Specify the maximum wait time associated with the Wait or WaitFor commands (in seconds) in this field.
Suite Location: Choose the suite you want to save the new image into from this drop-down list. Note that a suite must be open to display in this menu.
New Folder: To create a subfolder within the currently selected folder, click the New Folder button.
Make Collection: To make an Image Collection based upon an existing image, select the image and click the Make Collection button. The Image Collection takes on the same name as the image, and the image is automatically moved into the Image Collection. To learn more about this feature, see Creating an Image Collection.
Cancel: To cancel the image capture and close the Capture panel, click the Cancel button.
Save: To complete the image capture and close the Capture panel, click the Save button.
The Use Image Panel (Mac and Linux only)
The Use Image panel is similar to a standard Open dialog, with added script controls at the bottom. The Use Image button can be added when you customize the Viewer window toolbar.
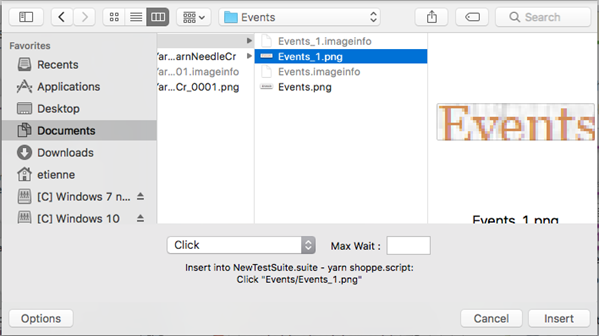
File Browser: Use this to navigate between the current suite’s Images directory and subfolders.
Command/Function: Choose a command or function to enter into the script with your image from this drop-down list. To incorporate the image into the selected command or function in the script, choose Add Image.
Max Wait: Specify the maximum wait time associated with the Wait or WaitFor commands (in seconds) in this field.
Options: Shows or hides the Command/Function list and Max Wait field.
Cancel: Cancels the image selection and closes the Use Image panel.
Insert: Inserts the generated command or function into the script, executes the command (if possible), and closes the Use Image panel.
The Find Text Panel
The Find Text panel allows you to search for text without using captured images.
OCR: (Recommended) The default platform is Generic OCR, which uses the OCR functionality in Eggplant Functional. OCRは解釈的アルゴリズムを使ってSUTの画面上のピクセルパターンを見て、画面に表示される文字を特定します。 辞書(デフォルトの辞書は英語)で検出をチェックして、それから様々な辞書にアクセスして、多くの言語の読み込みに対応します。 For a list of supported languages, see OCR Language Support.
To open the Find Text panel, click the Find Text button in the Viewer window, or choose Control > Find Text.
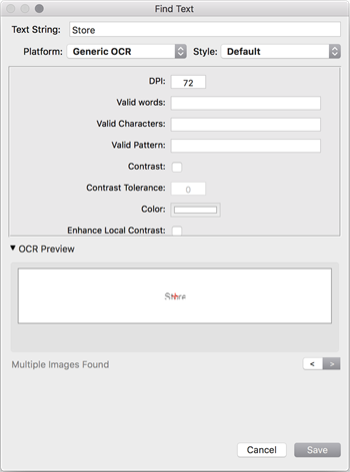
Use the following selections to define the text string and style for which you want Eggplant Functional to search.
Text String: The Text String field contains the actual text that appears in your image. You must enter text here before you can modify the parameters discussed below. As you start typing text in the Text String field, Eggplant Functional creates a command for the string and searches for the text in the background. If Eggplant Functional finds the text string, it marks the text string on the SUT with a yellow rectangle.
Platform: The Platform drop-down list comprises the text platforms that you define in Text preferences. テキストプラットフォームは、通常はSUTオペレーティングシステムとは区別されています。 Choose the Generic OCR text platform or a text platform that represents the SUT you are working with.
Style: The Style drop-down list contains choices of predetermined text styles. 開始点としてのスタイルを選択した後、必要に応じて個々の属性を変更できます。 For example, if your text uses a SUT’s standard menu font but displays it in red, you can choose the menu style, then change the text color to red.
When using the Style drop-down menu, the Default style provides many tunable parameters that can help you improve your OCR searches when using the Generic OCR Platform. If you change any of these parameters, the generated command changes, but the stored parameters for the style do not change.
Use the following parameters to fine-tune your OCR search:
DPI: By default, OCR uses 72 DPI screen resolution for searches. If the resolution on your SUT is significantly different, you might need to adjust the DPI for the search.
Valid Words: This parameter limits the words that the OCR engine recognizes. By default, the engine uses the entire set of words for the language (or languages) in the current text platform. You can use the asterisk as a wildcard so that the OCR engine looks only for the words in your original text string.
Valid Characters: This parameter limits the characters that the OCR engine recognizes. By default, the engine uses the entire set of characters available for the language (or languages) in the current text platform. You can use the asterisk as a wildcard so that the OCR engine looks only for the characters in your original text string.
Valid Pattern: This property is a string that takes a regular expression value and returns only characters or words that match the specified pattern.
Contrast: Select this checkbox if you want OCR to treat the ReadText() rectangle as a flat, two-color image. This option can be useful when working with anti-aliased text. これでSUTの画面をフィルタし、OCRエンジンに2値画像を表示します。 Contrast relies on the following settings:
- Contrast Tolerance: A measure of how much a pixel can differ from the RGB value of the selected color and still be considered the primary color.
- Color: Click the color well and select a new color using the Colors panel. OCR treats this color as the primary color of the ReadText() rectangle. It is generally advised to select the background color for this selection. Tip: Use the color picker in the Colors panel to copy a color from any place in your display, including the Viewer window. Click the magnifying glass in the Colors panel, then click again wherever you see the color you would like to copy.
Enhance Local Contrast: Select this checkbox if you want OCR to automatically increase the local contrast of the image.
Enable Aggressive Text Extraction: Select this checkbox if you want OCR to extract as much text from the image as possible.
Case Sensitive: Select this checkbox to enable case-sensitive searching.
Ignore Spaces: Select this checkbox to have OCR searches ignore spaces between characters during a search.
Ignore Lines: Select this checkbox to have OCR searches ignore new lines during a search.
Language: Use this drop-down menu to add or remove OCR recognition languages. You can select multiple languages for use in OCR searches. To enable additional languages, navigate to Eggplant > Preferences, then click Text and scroll to Enabled Languages.
Search Type: This drop-down list appears if you are not doing an OCR search, i.e, when you use the WindowsClassic platform. The Search Type describes the level of precision Eggplant Functional requires to consider a part of the Viewer window a match for your target image. The drop-down list lets you select from the following settings related to the image search:
- Precise: The Precise search type requires a very high degree of precision to consider an image matched in the Viewer window. この設定はあまり色の差異がない、またはコントラストが低い画像で有用です。
- Tolerant: The Tolerant search type accepts matches that have slightly different pixel colors caused by background and transparency changes. 厳密検索より許容値が広いので、レンダリングの些細なばらつきによりスクリプトが失敗する事例が減少します。
-
Smooth: The Smooth search type allows for dynamic font smoothing (text anti-aliasing) in images that contain text. If Eggplant Functional sometimes fails to locate an image that contains text, try changing the search type to Smooth.
Note: The Smooth search type was formerly called Text.
- Pulsing: The Pulsing search type allows for pixel colors that can change, such as the pulsing buttons on Mac.
- Smooth and Pulsing: The Smooth and Pulsing search type allows for both changing pixel colors and text anti-aliasing.
Command/Function: To insert a command or function into the script with your text property list, choose it from the Command/Function drop-down list on the lower left side of the UI. The preview field above the list shows the text that is inserted into your script. テキスト画像をスクリプト内の選択したコマンドやファンクションに組み込むには、Add Image(画像の追加)を選択します。
Max Wait: To specify the maximum wait time associated with the Wait or WaitFor commands, type the time (in seconds) in the Max Wait field.
Cancel: To cancel the text property list and close the Find Text Panel, click the Cancel button.
Save: The Save button inserts the text property list into your script with the chosen command or function, executes the command, if applicable, and then closes the Find Text panel.
The Set Rectangle and Generate Code Dialog Box
This dialog box helps you capture images and generate code to create search rectangles and similar objects. Follow the steps below to insert the appropriate code into your script.
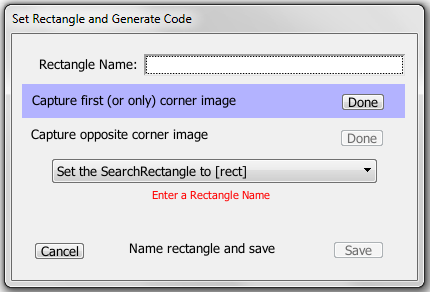
Step by Step: Using the Set Rectangle Dialog Box
- With the Viewer window in Capture Mode, use the Capture Area to highlight the area of the rectangle you want to define.
- Click the Set Rectangle button on the toolbar to open the Set Rectangle and Generate Code dialog box. Note that this button is part of the default toolbar set. However, if you have customized your toolbar, it might not show on your toolbar. You can also launch the dialog box from the main menu by navigating to Control > Script Command > Set Rectangle.
- In the Set Rectangle dialog box, enter a name in the Rectangle Name field. The name you use here will be assigned to images that you capture to define the rectangle in Step 4.
- Capture first or only corner image. Note that in the Viewer window, the rectangle you want to define is outlined with a yellow box, and the Capture Area has been moved to the upper left corner of that rectangle. You can move the Capture Area and resize it, just as you typically can. However, the hot spot remains on the upper left corner of your rectangle. In fact, if you move the hot spot, you move or resize the rectangle. When you have the Capture Area over an appropriate image, click Done for the first image on the Set Rectangle dialog box.
- (Optional) Capture opposite corner image. The second image will have its hot spot on the lower right corner to define the rectangle. You can create a new image to represent the opposite corner. If you don't, then this feature duplicates the first image, but places the hot spot of the second image in the lower left corner so that you define the correct rectangle.
- On the drop-down list, select the appropriate option for the code you want to insert in your script. The options are:
- Set the SearchRectangle to [rect]: Inserts code to create a search rectangle, which limits the area of subsequent searches.
- ReadText [rect]: Inserts code to read text (OCR) within the set rectangle.
- CaptureScreen [rect]: Inserts code to capture an image based on the set rectangle.
- [rect]: Inserts code to define the selected rectangle without additional code for a command or function to accompany it.
[rect as coordinates]: Inserts code to define the selected rectangle as coordinates instead of with images, and also doesn't include a command or function. Note that this method is not typically recommended as changes to screen size or orientation will change the absolute positioning of the coordinates, and you might not end up with the defined rectangle you were expecting.
Note: This option does not allow you to capture images because none are required.- Set the SearchRectangle to empty: Inserts code to clear any currently set search rectangle. Note: This option does not allow you to capture images because none are required.
When you make your selection from the drop-down list, a preview of the code that will be inserted is shown beneath the list.
- Save(保存)をクリックします。 If any required elements for the type of code you've chosen have not been provided, the Save button is not enabled. When you click Save, the image or images that you created are captured and added to the suite and the code is added to active script. If you click Cancel, no images are captured and no code is added.
