Reporting with Eggplant Performance Analyzer
Eggplant Performance Analyzer lets you view your performance test data visually through charts and tables. However, if you need information in a portable format for distribution or presentation, you can use the built-in reporting feature to create offline versions of your analysis views.
Creating a Report in Eggplant Performance Analyzer
You create a report based on an analysis view. To generate a report, right-click the analysis view in the Project tree and select Create report. You can also select the analysis view and click the Create report button on the Analyzer toolbar.
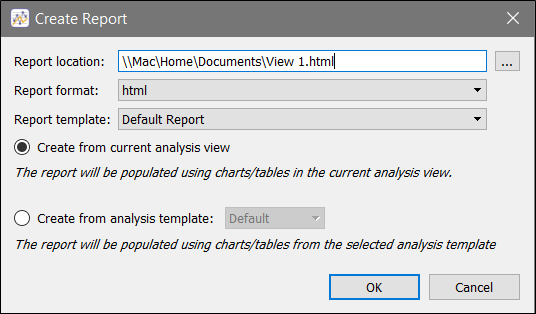
The Create Report dialog box includes several options for the report you are generating:

- Report location: Choose a location to save the report file.
- Report format: You can choose between
.pdf,.odt, or.html. - Report template: Analyzer includes the Default Report template automatically. However, if you have created other report templates, you can select them from the drop-down list. The report template determines the formatting of the report, and it is where you include introductory and conclusion text. See Step by Step: Creating a Report Template for more information about report templates.
- Choose the data to present: You have two choices for how the data is generated for the report:
- Create from current analysis view: Use this option if you want to generate the report based on the current state of the analysis view. The report option will reflect any changes you've made, such as adding or deleting charts, as well as changes you've made to individual charts, such as changing the data that is displayed, or changing a chart to a table view.
- Create from analysis template: Use this option select an analysis template from the drop-down list to base the report on. The report is based strictly on the settings in the template you select here.
When you've selected the appropriate options for your report, click OK. The report will be generated.
Step by Step: Creating a Report Template
Although you can create a report by using the Default Report template, you might want to have additional templates for different reporting purposes. To create a report template:
-
Right-click Report Templates in the Project tree and select New report template. Alternatively, you can select Report Templates, then click New report template on the Analyzer toolbar.

-
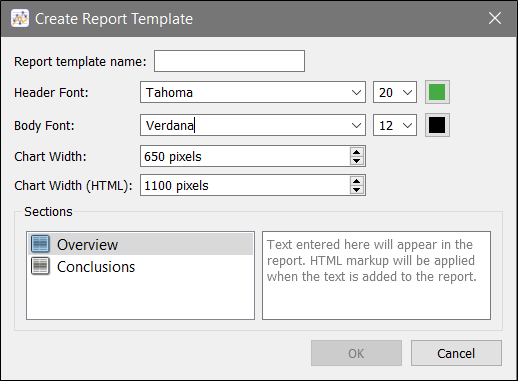
On the Create Report Template dialog box, enter a descriptive name for the new template.
-
You can set the font, font size, and font color separately for the header text and body text that appears in the report.
-
Set the Chart Width for non-HTML reports, in pixels. This setting controls the maximum width of the generated report.
-
Set the Chart Width for HTML reports, in pixels. This setting controls the maximum width of the generated HTML reports. You specify report formats (
.pdf,.odt,.html) in the Create Report dialog.The report includes two sections on the left panel: Overview and Conclusions. You can enter text in these sections by selecting your preferred title in the left column and then entering the text on the right column. You can use standard HTML markup for text formatting for any text you enter here.
noteYou might want to change the Overview and Conclusions text each time you generate a new report, assuming conditions in your tests have changed. Therefore, you can leave these sections blank when you create your template and edit or add text to them before you generate a new report based on the template. See Editing Report Templates below for information on editing a report template.
-
When you've selected your options for the report template, click OK to create the template. The new template is added to the list in the Report Templates node of the Project tree.
Editing Report Templates
Existing report templates are displayed in the Project tree beneath the Report Templates node. To review template settings or edit an existing template, select it in the tree.
To change the name of an existing template, right-click the template and select Rename report template. Edit the name or enter a new name in the pop-up dialog box, then click OK.
You can make any other edits to an existing template in the Analyzer Viewer pane when a template is selected. The header font and body font, font size, and font color can each be changed at the top of the pane. You can enter or edit text for the report Overview and Conclusions sections by selecting the category in the left column, then entering the text for that section in the right column. Remember that you can use HTML markup to add formatting to the text you enter for these sections.
All changes you make to a report template are saved automatically.