Using Grouping in Eggplant Performance Analyzer
Grouping in Eggplant Performance Analyzer lets you treat multiple items as if they were the same, despite subtle differences. Effectively, you group similar items so that they appear as one item on your charts or tables. This feature offers a powerful method for eliminating unnecessary duplication from your analysis views.
Grouping in Analyzer: An Example
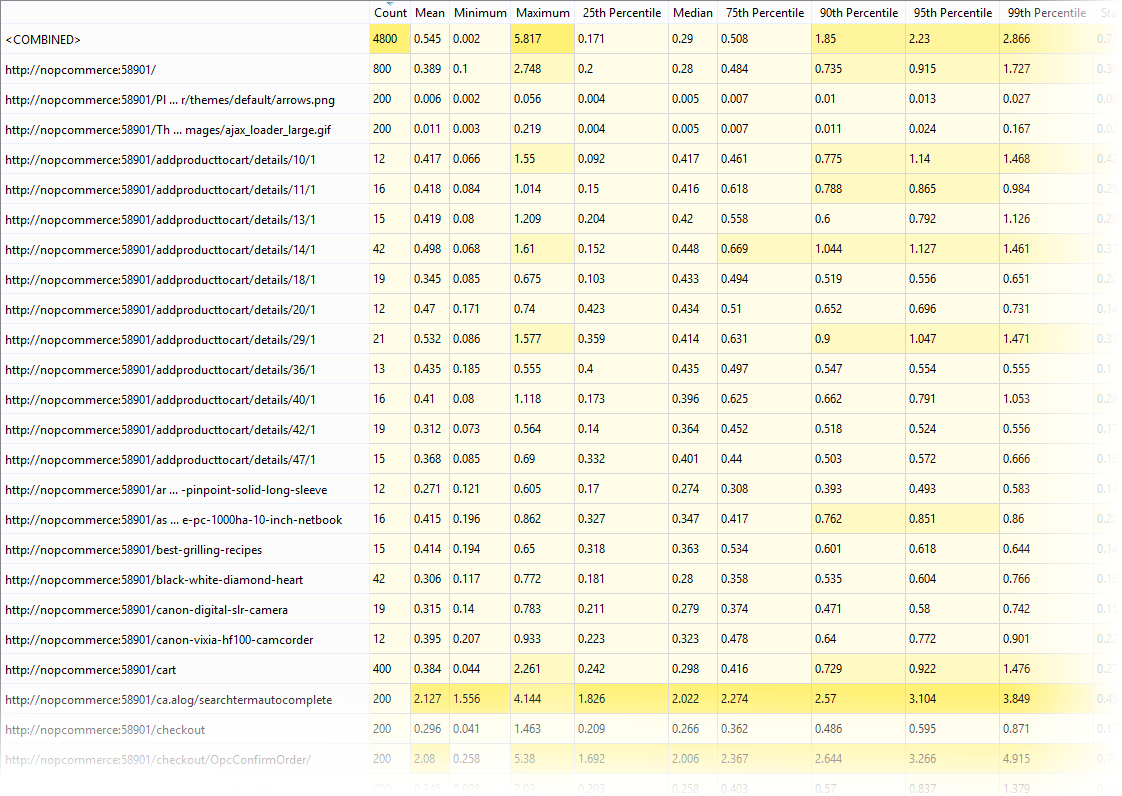
Let's take a closer look at a common application of grouping. Imagine you've just finished running a web test. The following is a snippet from the list of HTTP requests:

In this list, you can see a number of similar-looking requests, namely:
http:/addproducttocart/details/<some number>/1
As far as the server is concerned, these requests are all functionally equivalent; the only difference is that there is a dynamic number in the URL. The number is a product ID for whatever was being added to the cart. Instead of seeing this request for each product ID encountered, you might want to have a single row representing the performance of that particular bit of functionality.
To do so, you can create a grouping that effectively turns the dynamic number into something static. That way, Analyzer will automatically group these requests because as far as it is concerned, they are all the same.
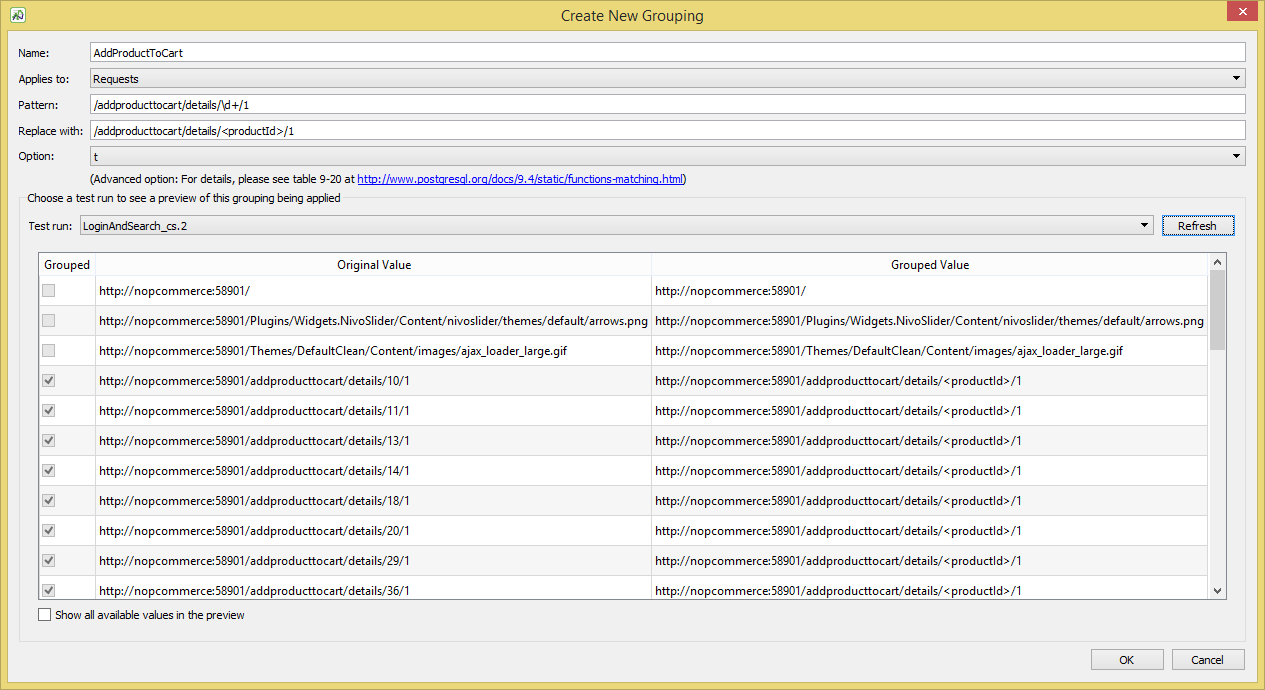
This could be achieved using the following settings:

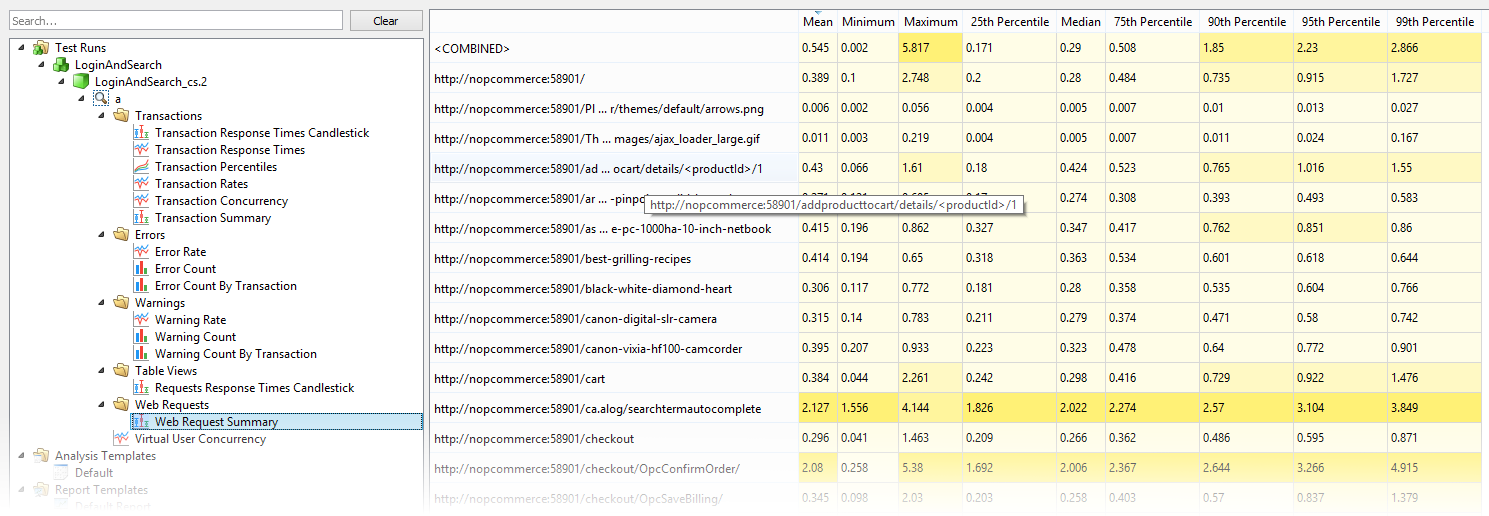
The regular expression /addproducttocart/details/\d+/1 matches all of the requests with dynamic product IDs. It checks for one or more digits between the sequence /addproducttocart/details/ and /1. All requests that match this pattern become grouped as indicated by the checkbox to the left, and will instead display as:
http:/addproducttocart/details/<productId>/1
...as shown below:

You could apply the same principle to errors. When a test doesn't go as planned, you might see the same error type repeatedly popping up, although the specific error text might vary each time. Rather than listing every single error occurrence in the test, you can use grouping to show a single entry for a particular kind of error and then report how many times it happened.
Step by Step: Creating Groupings
Groupings are applied to your data when you create analysis views. However, you can create groupings at any time. To create new groupings, follow these steps:
-
Use the Tools menu and select Manage groupings. Alternatively, from the Getting started page, you can click the Manage Groupings button.
-
On the Manage Groupings dialog box, click the Add Grouping button (green plus sign).
-
You use the Create New Grouping window to define a text string pattern from your results and what you want to replace the string with. To start, select the category from the Applies to drop-down list.
-
Unless you've already reviewed all your test run results data, it's probably useful to preview the line items in order determine where you can make meaningful groupings based on text strings. In the Test run drop-down list, select a test run to serve as a base, then click Refresh. The items matching the chosen category and test run are listed in the window.
-
When you've identified text that you'd like to group, enter the text in the Pattern field as a regular expression. What you enter as the pattern is what you want to match and replace in every instance where it's found. Consider the example above about adding products to an online shopping cart, where the product ID number is different each time. Using a regular expression, you could enter
/addproducttocart/details/\d+/1. This syntax finds the literal text/addproducttocart/details/then any numbers, then the literal/1. Therefore, this expression matches any of the HTTP requests from the example that follow the pattern/addproducttocart/details/<some number>/1.infoRegular expressions are a powerful tool for creating text matches. For more information on using regular expressions, see POSIX Regular Expressions in the PostgreSQL documentation.
-
In the Replace with field, enter the text you want your pattern-matched text to be replaced with. The entire matched string is replaced, including any literal text and regular expressions used to create the match. So in our example from above, you could enter
/addproducttocart/details/<productId>/1as the replacement text. The result will be that all the HTTP requests that had various product IDs—and therefore were counted as separate items statistically—now are all identical:http://nopcommerce:58901/addproducttocart/details/<productId>/1If you click the Refresh button again, the new value is displayed in the preview window in the Grouped Value column.
noteYou might need to scroll the window to view the additional columns in the preview.
-
(Optional) Select the appropriate advanced Option for regular expressions from the drop-down list. The default value will be appropriate in almost all cases; consult regular expression documentation for further information about these options.
-
Be sure to provide a name for the grouping. When you're satisfied with your grouping definition, click OK. The new grouping appears in the list on the Manage Groupings window.
-
(Optional) Add additional groupings by repeating steps 2 through 8.
-
When you've added all the groupings you need, click Close on the Manage Groupings dialog box.
Managing Groupings
You can return to the Manage Groupings screen at any time to add or remove event groupings, or edit existing groupings. However, remember that groupings can only be applied to your data at the analysis view level during the Create an Analysis View wizard. For information about analysis views, see Creating an Analysis View in Eggplant Performance Analyzer.
To add a new grouping, click the Add Grouping button (green plus sign) on the right side of the window, then follow the steps above in Step by Step: Creating Event Groupings.
To edit an existing grouping, select it in the list, then click the Edit Grouping button on the right side of the window. The Edit Grouping window displays the information currently used to define the grouping. You can edit any of the information except the category (e.g., Errors, Transactions). When you're done editing, click OK to save your changes.
To delete an existing grouping, select it in the list, then click the Delete Grouping button (red X) on the right side of the window. This action requires confirmation.
You can also create a new grouping by cloning an existing grouping. This method can be useful when you need to re-use the same or a similar regular expression for a different matching operation.
To use the cloning feature, select the original grouping in the list, then click the Clone Grouping button on the right side of the window. The Clone grouping window opens with all the fields filled in identical to the original, and you're free to edit the information to create a new grouping. Effectively, you're creating a grouping by using the original as a template.