Synchronize on an Image
Follow these instructions to capture an image that must appear during replay.
-
Click the camera
button on the Capture mode toolbar. The mouse cursor (or pointer) changes to crosshairs.
-
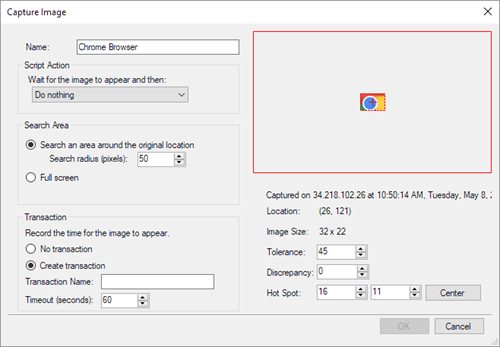
Hold down the left mouse button and drag the mouse cursor across the portion of the screen on which you want to synchronize. When you are satisfied with the selection, release the mouse button. The Capture Image dialog launches.

-
Enter the following information:
- Name: A name for the image. A bitmap file will be saved with this name under the folder
<workspace>\projects\<project>\data\Files\<Recording>, where<Recording>is the name of your recording. - Script Action: On replay, the virtual user searches for the image until an exact match is found or the default timeout is exceeded. Use the following drop-down menu selections to choose actions you want Eggplant Performance to perform on a captured image:
- Do Nothing: Select this option if you don't want to associate any action with the captured image.
- Wait for image, then click image hot spot: If you select this option, a
Clickcall is added to the script after theWaitForImagecall. - Wait for image, then double-click image hot spot: If you select this option, a
DoubleClickcall is added to the script after theWaitForImagecall. - Wait for image, then right-click image hot spot: If you select this option, a
RightClickcall is added to the script after theWaitForImagecall. - Move the mouse to the image hot spot: If you select this option, a
MouseMovecall is added to the script after theWaitForImagecall.
If you selected an option other than Do Nothing for your script action, use your mouse to move the hot spot to the desired location in the Capture window before leaving the capture mode. When you click OK to close the Capture Image dialog box, the specified click action will automatically occur at the chosen hot spot location in the Citrix session, so you can carry on recording as though you performed that click yourself.
- Search Area: The Search Radius expands the search area around the original location. For example, if the image may change location by +/- 50 pixels vertically or horizontally, then enter 50 in the search radius. Increasing the search radius increases the time and processor overhead required to find the image.
- Full Screen: The Search radius expands to full screen. You can choose to search the full screen at the expense of high processor usage.
noteThe search area is constrained to the screen boundaries.
-
Transaction: Eggplant Performance selects Create Transaction by default. If you do not want to set a transaction to record the time for the captured image to appear, select No Transaction.
If you select Create Transaction for the captured image and name the transaction, the script entry is generated with
StartTransactionandEndTransactioncalls before and after theWaitForImagecall. The result of setting a transaction is that the script records the time for the image to appear. You can adjust the Timeout parameter to the maximum number of seconds to wait before a Timeout Exception is raised. The VU continually attempts the match during the wait period until the match is successful or the Timeout value is exceeded.
The DefaultPollFrequency Property is the interval between attempts to find the image. A low value increases the timing accuracy but increases the overhead at runtime. A suggested lower limit is 100 ms, the initial default is 2000 (2 seconds).
The right side of the Capture Image dialog contains the captured image and some adjustable settings:
- Tolerance: Tolerance is a measure of how much a pixel can differ from the RGB value of the selected color and still be considered the primary color. Use this setting to set the tolerance to color variation when finding a match to the image. Setting this number to a higher value allows for more tolerance to color variation.
- Discrepancy: Use this setting adjust the number of pixels that can be ignored when finding a match to the image.
- Hot Spot: The hot spot is the point that is clicked when a script executes a
Clickor other command action on an image. To move the hot spot, Ctrl+Click on the image or the surrounding area, or click and drag the hot spot crosshairs.
- Name: A name for the image. A bitmap file will be saved with this name under the folder
Generated Code
The values entered into the Capture Image dialog will be used to populate the WaitForImage method inserted in the generated script.
public Rectangle WaitForImage(string bitmapFile, int xPos, int yPos, int width, int height, int searchRadius, int timeout)
The following code shows examples of method calls inserted into a script for each of the different Script Action types. Using transactions, they time how long it takes for their respective image to appear on the screen, pause, then perform their respective action.
// Do nothing
StartTransaction("doNothing");
WaitForImage(@"myCitrixRecording\imageDoNothing.bmp", 368, 196, 44, 37, 50, 60000);
EndTransaction("doNothing");
Pause();

// Click on the image hot spot
StartTransaction("click");
WaitForImage(@"myCitrixRecording\imageClick.bmp", 625, 187, 86, 83, 50, 60000);
EndTransaction("click");
Pause();
Click(@"myCitrixRecording\imageClick.bmp", 625, 187, 86, 83, 50, 60000);

// Double click on the image hot spot
StartTransaction("doubleClick");
WaitForImage(@"myCitrixRecording\imageDoubleClick.bmp", 608, 570, 76, 67, 50, 60000);
EndTransaction("doubleClick");
Pause();
DoubleClick(@"myCitrixRecording\imageDoubleClick.bmp", 608, 570, 76, 67, 50, 60000);

// Right click on the image hot spot
StartTransaction("rightClick");
WaitForImage(@"myCitrixRecording\imageRightClick.bmp", 8, 417, 78, 69, 50, 60000);
EndTransaction("rightClick");
Pause();
RightClick(@"myCitrixRecording\imageRightClick.bmp", 8, 417, 78, 69, 50, 60000);

// Move the mouse to the image hot spot
StartTransaction("mouseMove");
WaitForImage(@"myCitrixRecording\imageMouseMove.bmp", 76, 104, 95, 98, 50, 60000);
EndTransaction("mouseMove");
Pause();
MouseMove(@"myCitrixRecording\imageMouseMove.bmp", 76, 104, 95, 98, 50, 60000);