The Image Update Panels
The Image Update panels help you manage, modify, and work with previously existing images during and after runtime. The panels are triggered when an image or text search is unsuccessful. When a search failure occurs, depending on the settings selected, you either see the Image Update panel, or the Auto Update panel.
The Image Update panel is shown during runtime at the time of search failure. It allows you to change existing image search settings, capture new images, create collections, or replace previously existing images in order to remedy the search failure before continuing the script run. The Auto Update panel displays following a script run where an image search failure occurred, and Eggplant Functional found a remedy, modifying the search settings in order to find a match. Those changes can be saved automatically to your script and assets.
Menu options used to enable the Image Update panel also apply to the OCR Update Panel.
See the Image Diagnostics section on The Image Viewer page for information about image search settings and selecting diagnostic searches.
Enabling the Image Update Panel
The Image Update panel lets you work with image diagnostics and fix image searches when an image is not found during a script run. Depending on the selected settings, this panel also appears when multiple instances of an image are found that were not anticipated by the script, and can also trigger the Auto Update functionality, allowing you to save any changes made to images during the script run.
The Image Update panel appears at runtime when you choose the Guided Update (Show Panel) option. If Auto Update (Log Changes) is selected, then the Auto Update panel displays following the script run. Run menu options control both the Image Update panel and the OCR Update panel.
You can enable the Image Update panel and related Auto Update panel functionality on the main menu by adjusting the options shown in the Run > Image Update menu.
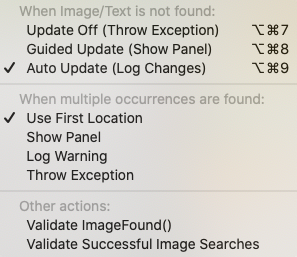 The Image Update panel menu, found under Run > Image Update
Eggplant Functional allows you to enable both Auto Update and Validate Successful Image Searches at the same time. Doing so forces your system to run Auto Update on every search and can cause your scripts to run very slowly.
Your choices when using the Image Update menu are as follows.
When an Image or Text Is Not Found
-
Update Off (Throw Exception): Eggplant Functional throws an exception and the script fails when an image or optical character recognition (OCR) search does not return a match. The Image Update functionality is not used.
-
Guided Update (Show Panel): This option opens the Image Update panel during runtime when an image search fails, so that you can adjust settings to find an appropriate match. This option lets you use the Image Update panel interactively, which gives the most complete control over text matches. This method is best for attended script runs. This option was formerly called Show Panel (Manual Update).
-
Auto Update (Log Changes): Eggplant Functional logs a warning, and then runs various diagnostics to find the image or text that wasn't found. If it finds the image with the new settings, it logs which settings were used, and then continues the script run using those new settings. If you select Auto Apply from the Asset Healing section in the Run preferences panel, remedies are applied and saved to the script. This changes the image search settings for future script runs, and affects any other tests using that image.
New FeatureAutomatic Asset Healing is available starting in Eggplant Functional 21.0.0.
If Identify Remedy is selected, but NOT Auto Apply, changes made during the script run apply to the current script only. When a script run ends, the Auto Update panel appears, and you can then decide which of the changes you want to save. Applying these changes modifies the image search settings for future script runs, and affects any other tests using that image. When applying changes, check your test to see where the image is used, as changes saved to the image search settings might conflict with your script.
For more on using the Auto Update panel, see Using the Auto Update Panel.
When Multiple Occurrences Are Found
- Use First Location: Uses the first instance of the image found by Eggplant Functional.
- Show Panel: The Image Update panel displays the message "Multiple Instances Found", so you can interactively change settings and specify how you want to handle the multiple instances found.
- Log Warning: Logs a warning in the script results. This does not affect the result of your script, but is recorded in the script results.
- Throw Exception: Throws an exception, which causes the running script to fail. This is recorded in the script results.
Other Actions
These options only display messages when the main panel setting regarding its response to a failure to find an image or text is set to Guided Update (Show Panel). See When Image/Text is Not Found.
-
Validate ImageFound: When a script contains
Imagefound(<image_name>)and Eggplant Functional is unable to find a match for the image or text specified, it displays the Image Update panel with the validation message "ImageFound() Will Return False". Then, you can interact with the panel to determine how to handle the text or image not being found. -
Validate Successful Image Searches: When a script contains an
ImageFoundfunction, such asImageFound(<image_name>), and the text or image specified is successfully found, the Image Update panel is displayed with the validation message "Validate Image Found". Validating successful image searches can be useful in the rare situation where you need to verify that Eggplant Functional is finding the correct image. For instance, you can use Validate Successful Image Searches to review your application if visual elements are updated to match new UI elements, to make sure the script isn't still finding matches to old images.noteSelecting this menu item changes The ValidateSuccessfulSearches Global Property's default setting to
On.
Using the Image Update Panel
The Image Update panel comprises three tabs, described in more detail below: The Start tab, the Diagnostics tab, and the Properties tab. Each tab allows you to make adjustments that make your Eggplant Functional scripts more successful.
All of the tabs in the Image Update panel include the Manual Update drop-down menu. The Manual Update drop-down menu includes the selections for the Image Update options explained in Enabling the Image Update Panel. As you make changes to the Image Update options, you must click Try Again to continue the script with the new preference.
The Start Tab
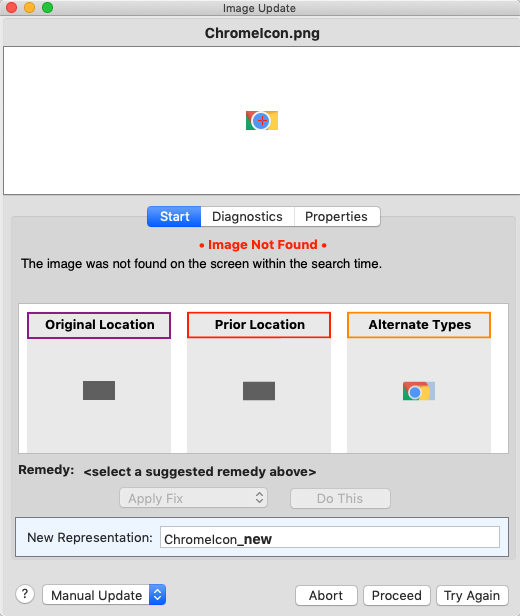 The Start tab in the Image Update panel
The Image Update panel opens with the Start tab displayed. The Suggested Remedies section of the panel offers options to fix or replace the image that can't be found based on the following diagnostic searches performed by Eggplant Functional:
-
Standard Search: Searches for the image again using the original specifications. A result for this search means that the image has appeared since the first failure to find the image. Most likely this result means that the timing of the script at the step needs to be adjusted to allow more time for the image to appear.
-
Dynamic Tolerance: Searches for the image while increasing the RGB color tolerance value up by a particular increment (default = 5) until a match is found. A result for this diagnostic means that the RGB values of the image have shifted.
-
Alternate Types: Searches for the image while using the different SearchType filters, which are
Smoothed for Text,Adaptive to Image,Pulsing to Element, andSmooth and Pulsing. If the image is text-based, a result indicatingSmoothed for Textsuggests that the system under test (SUT) is using anti-aliasing in its text. A result forPulsing to ElementorSmooth and Pulsingsuggests that the background portion of the image either has a pulsing effect or perhaps another effect such as a variable gradient. For more on these search types, see Search Type. -
Scaling Search: Searches for the image at a different scale than the original image.
-
Discrepancy Search: Performs the search while allowing a certain percentage or number of the pixels in the image to differ. The percentage of pixels (with a percent sign) or number of pixels (with no percent sign) by which the image and a match in the Viewer window can differ.
noteDiscrepancy can be slow to use and can result in false positive matches. Preferable approaches include setting the Search Type to Smoothed for Text in the Image Update panel, cropping the image using the Image Editor, or creating an Image Collection that includes several acceptable versions of a basic image. You can also capture a new image if the current image can only be found using a discrepancy search.
-
OCR Search: Scans the original captured image for text, and then conducts a search for that text. For example, if the original image is of a button that says
Searchon it, this search uses OCR to look for the wordSearchon the screen. -
Prior Location: References the results for the current script in which the current line of code was successfully run. Highlights the location on the screen where the image was found in that successful run of this test. The results that this search uses can be specified manually using the Mark As Prior Run button in the results portion of the suite for any script.
noteThis remedy is not available when the Image Update panel menu is set to use the Auto Update (Log Changes) option
andwhen Auto Apply is selected on the Run preferences page. -
Original Location: References the coordinate pair of the location at which the image was first captured.
noteThis remedy is not available when the Image Update panel menu is set to use the Auto Update (Log Changes) option
andwhen Auto Apply is selected on the Run preferences page. -
Crop Edges: Searches by progressively cropping in on the image, looking for smaller and smaller images. As long as the inside of the image does not match anything else on the screen, the edges are not important.
-
MatchingDOM: Searches for an asset using DOM properties. This search type works for mobile WebDriver connections only and can be useful when testing across mobile platforms. This search type isn't available if you're using Asset Healing.
The remedies that appear in the Image Update panel provide a fix that either allows the image to be found exactly once on the current SUT screen or offers the possibility of capturing a new image at a specific location on the screen. Each option shows the image that would be captured from the current screen if used.
Selecting a Suggested Remedy shows a highlight rectangle on the SUT screen in the color for that diagnostic. The Remedy drop-down list changes depending on the option you choose. Available remedies are:
- Apply Fix: This option performs the selected fix to the current image.
- Replace Image: This option automatically recaptures the image without changing any of its properties. The search is then run again.
- Add Representation: This option adds a new representation of the image to the current suite. The new representation is added to the same collection as the original image, and Eggplant Functional suggests a name for the image in the New Representation field.
- Capture to Helper: This option captures a new version of the desired image and saves it in a helper suite. If you select this option, a drop-down menu appears, listing available suites to which the image can be captured
Select a Remedy action from the drop-down list, then click Do This. For the options listed above, Eggplant Functional fixes the image and tries the search again.
If you select Standard Search as the remedy, none of the Remedy actions are enabled. Clicking Do This logs a warning telling you to change the timing in the script before trying again.
Enter a name in the New Representation field. If you choose to add a new representation of this image to a collection, the name in this field is used. If you alter the naming convention used in this field, it remembers the convention for further image updates.
The Diagnostics Tab
The Diagnostics tab lists the results of diagnostic searches so that you can see what settings can be adjusted or what search types can be used in order to find the image on the screen. The options listed correlate to the options in the Start tab, described above.
To use the Fix, Recapture, or Add Rep (which stands for Add Representation) buttons, select an appropriate diagnostic search that returned positive results. For instance, in the example below, the Original Location can be used to Fix the image:
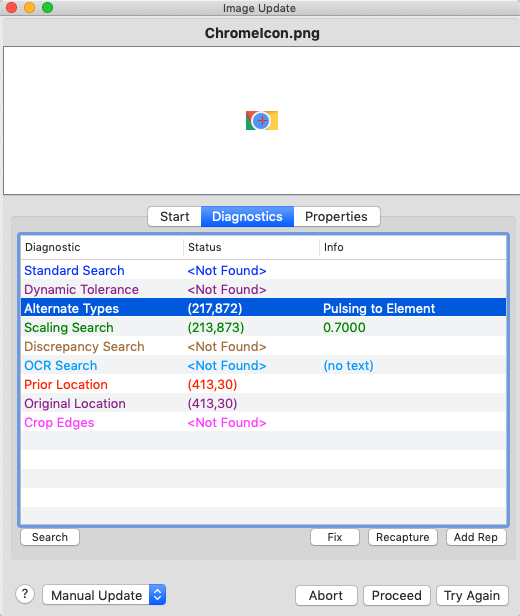 The Diagnostics tab, with Scaling Search selected
In the following example, selecting Original Location enables the Recapture and Add Rep options:
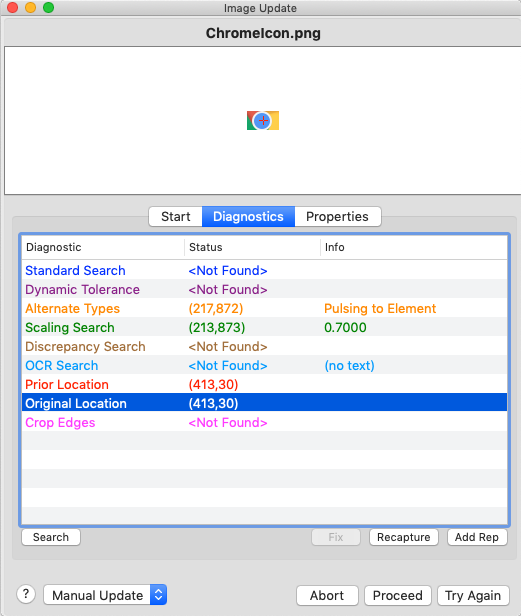 The Diagnostics tab in the Image Update panel
Recapture captures the image again using the location where the selected search type is finding the image. Add Rep adds a representation of the image to an image collection, or creates a collection if one does not already exist.
The Properties Tab
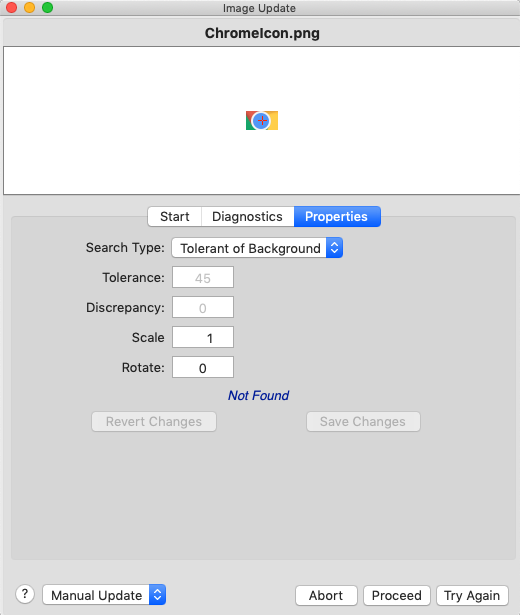 The Properties tab, visible in the Image Update panel
Use the Properties tab to manually adjust different image settings without permanently altering the state of the captured image in your suite. You can change the Search Type, Tolerance, Discrepancy, Scale, and Rotate values in this panel, then press Enter to conduct a search of the current active connection to see what settings work best. The original settings show to the right in red. To fix the image permanently, click Save Changes. To revert to the original settings, click Revert Changes.
Working with Images in the Viewer Window
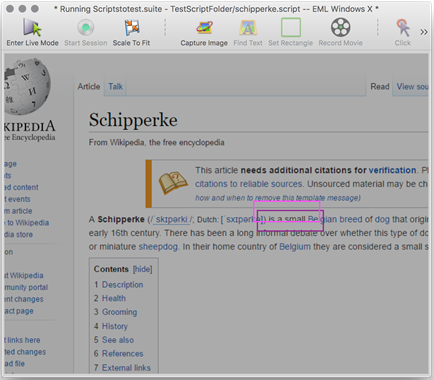 The Viewer window during an Image Update panel Diagnostic Search
When an image is not found, or multiple instances of an image are found, the Image Update panel appears and conducts a variety of diagnostic searches. The results are highlighted in the remote screen window. Boxes of corresponding colors are shown in every location on the screen of the SUT where an image is found with one of the diagnostic searches.
Hovering over one of these colored squares turns the square white.
 A highlighted image match in the Viewer window
If clicked, the capture area snaps to that box, and you can use that selection to add a representation for an image collection, or fix the current image that you are working with in the Image Update panel.
 A selected image match in the Viewer window
Clicking the arrow to the right of the capture area in this instance brings up the following drop-down menu:
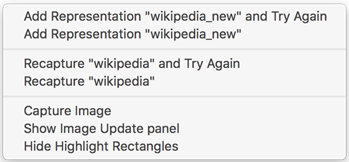
Options are to:
- Add Representation and Try Again: Captures an image using the selected image-capture bounds and adds it to the current collection or creates a collection using the current image and the newly captured image. Then, it tries the search again with the new/ updated image collection.
- Add Representation: Captures an image using the selected image-capture bounds and adds it to the current collection or creates a collection using the current image and the newly captured image.
- Recapture and Try Again: Captures an image using the selected image-capture bounds and replaces the current image with this new image. Then, it tries the search again with the newly captured image.
- Recapture: Captures an image using the selected image-capture bounds and replaces the current image with this new image.
- Capture Image: Captures an image using the selected image-capture bounds and brings up an image capture panel so you can name the image and adjust any other settings as desired before saving.
- Show Update Image Panel: This brings up the Update Image panel if it is not currently displayed.
- Hide Highlight Rectangles: This hides the highlighted rectangles displayed after a search.
The arrow to the right of the capture area that reveals this drop-down menu is disabled when you hold down the Command or Control key to move the hot spot relative to the capture area. This behavior enables more precise placement of the hot spot, especially when using captured images to create search rectangles, as might be done with an OCR search.
Using the Auto Update Panel and Asset Healing
Select Auto Update (Log Changes) from Run > Image Update to enable the Auto Update panel. The panel appears at the end of every script run and presents all failed search instances from that run that were found using asset healing. When an image or text is not found, Auto Update looks for and then applies remedies to that image or text search's settings during the script run in order to find a match. In some cases, image updates can be automatically applied and saved.
For each of these instances, the image or text not found displays in the upper left corner of the panel, along with the settings Auto Update used during the script run to find that text or image. A screenshot of the SUT at the time of search failure occupies the lower portion of the panel. This screenshot also shows the location of the found image or text, and the original location, if available.
The Auto Update panel shows you the remedies for a script run. If you select Identify Remedy only, you see the image remedied and the Apply button for you to decide if you want to make the changes permanent. If you selected Auto Apply, you see the image remedied and Changes Applied. Eggplant Functional changed your image and saved those changes permanently.
Automatic Asset Healing
If Eggplant Functional uses a remedy that is configured to be automatically applied, it makes any needed changes and saves them to the image for future use. To enable Asset Healing, select the Auto Apply checkbox next to the search type you want to use in the Asset Healing section of the Run preferences tab. When the script run ends, the Auto Update panel opens and shows which diagnostic remedies were used to make the script succeed. You define the thresholds for the diagnostic remedies in the Run preferences tab. Those thresholds enable automatic asset healing.
Changes made using Automatic Asset Healing modify the image properties and save them permanently if Save as new Image Rep is disabled. This affects any script in which that image is used.
Automatic Asset Healing is available starting in Eggplant Functional 21.0.0.
When you're using Asset Healing, the Auto Update panel still opens after the script run finishes and reports any remedies that were applied to your assets to make the test pass. If your defined threshold was not met during execution, messages in the Auto Update panel will suggest what threshold setting would have automatically updated the image.
Adding Image Representations
You can choose to have Eggplant Functional add a new representation of an image instead of healing the existing image. Select the Save as new Image Rep checkbox on the Run preferences tab to enable this feature. If you are working with an image collection, the new image representation is added to the collection. If you are not working with an image collection, Eggplant Functional creates one for you containing both the original image and the new representation.
Adding image representations during auto healing is available starting in Eggplant Functional 21.1.0.
Auto Update Priority
Auto Update tests the image and OCR diagnostics in the order they are seen on the Run preferences panel (Dynamic Tolerance, Alternate Types, Crop Edges, Scaling Search, Discrepancy Search, OCRSearch). This means that if it finds a diagnostic that works that comes earlier in the list, it will always choose that over another diagnostic that comes later.
If Auto Update finds a diagnostic that works for Auto Update, but not for Auto Apply (because the diagnostic is not enabled for Auto Apply or it is not within the threshold), it will continue searching until it finds one that works for Auto Apply. A diagnostic that works for Auto Apply will always take precedence over one that does not.
Asset Healing Examples
The following examples show how asset healing can improve your workflow.
Example: Asset Healing Requiring Input
In this example, Auto Apply is enabled in Run preferences, but the threshold for the search type has not been met. The user must adjust the threshold to make search succeed.


Example: Successful Asset Healing
In this example, Auto Apply is enabled in Run preferences, and the threshold for the Dynamic Tolerance search type is satisfied, so Eggplant Functional automatically made the change. The Apply button in the Auto Update panel is disabled in this scenario.


Viewing and Saving Remedied Search Instances
With Identify Remedy selected in Run preferences, the Auto Update panel presents all remedied search instances from the recently completed script run. For each of these instances, the image or text not found displays in the upper left corner along with the settings Auto Update used during the script run to find that text or image. A screenshot of the SUT at the time of search failure occupies the lower portion of the panel. This screenshot also shows the location of the found image or text, and the original location, if available.
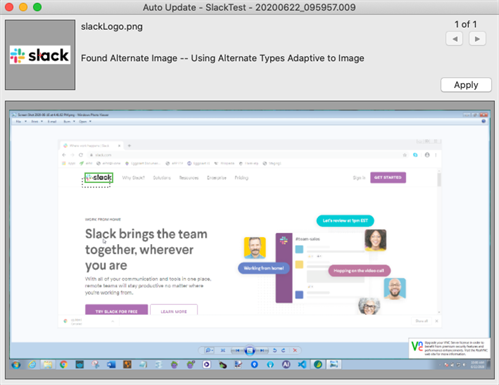 The Auto Update Panel, displaying an instance of a modified image search following a completed script run.
The title bar of the Auto Update panel displays the name of the script and the date of the script run. This is helpful to know, as multiple Auto Update windows can be open at the same time.
Use the Auto Update panel to review and apply the remedied search settings for each image or OCR search. Changes to images can be applied through the panel; to update OCR searches, you must edit your script directly. To view and save the remedied search instances, follow these steps:
-
Review the image or text, related screenshot, and settings adjusted by Auto Update. Determine whether or not you want to apply the changed settings permanently. The provided SUT screenshot taken at the time of initial search failure shows where the image was found with the adjusted search settings. This location is highlighted with a solid-outline rectangle. The original image location is highlighted with a dashed rectangle. To change the color of the background behind either the screenshot or the captured image as well as the color of the highlight rectangles for better contrast, click the image. For more information about these settings, see Using the Image Update Panel: The Start Tab.
-
Click the Apply button if you want to apply the updated search settings of the current remedied search instance to your image. This action cannot be undone.
ImportantApplying these changes modifies the image properties and saves them permanently. This affects any script in which that image is used, so take that into consideration when applying changes.
Remedied OCR searches cannot be applied from this panel. To make the search setting changes applied at runtime permanent, you must edit your script to incorporate the changes suggested by the panel. The name of the script that this search was a part of is shown in the top bar of the panel, as well as the run time, which are useful when locating the OCR search to be modified.
-
Use the arrows in the upper right corner of the panel to navigate back and forth between remedied search instances to review and apply changes. Apply as many or as few of the suggested changes as desired.
-
Close the panel when you are done applying changes. This panel is accessible at any time through the Results pane of the Suite Editor under the Remedy column.
Example: User-Applied Remedy
In the first example, Eggplant Functional has suggested a remedy that the user needs to apply. Identify Remedy is selected, but not Auto Apply.


Checking the Frequency of Auto Update Engagement
Because Auto Update engages when your script encounters image and text search failures, it is good to track how often your scripts are engaging the Auto Update functionality. To see how often this is happening, do the following:
-
Click the script in question in the Results list on the left side of the Suite window. This action displays a Results pane in the main body of the suite window, showing individual test records for each execution of that script.
-
Select a script run from the script run list to analyze.
-
Review the results in the bottom of the Results pane, looking for the warning messages logged by AutoUpdate during the script run. By searching for these AutoUpdate occurrences, you can see how many times auto update engaged during the script run and how long it took to resolve each case. For example, in the following screenshot, the AutoUpdate warnings are highlighted:
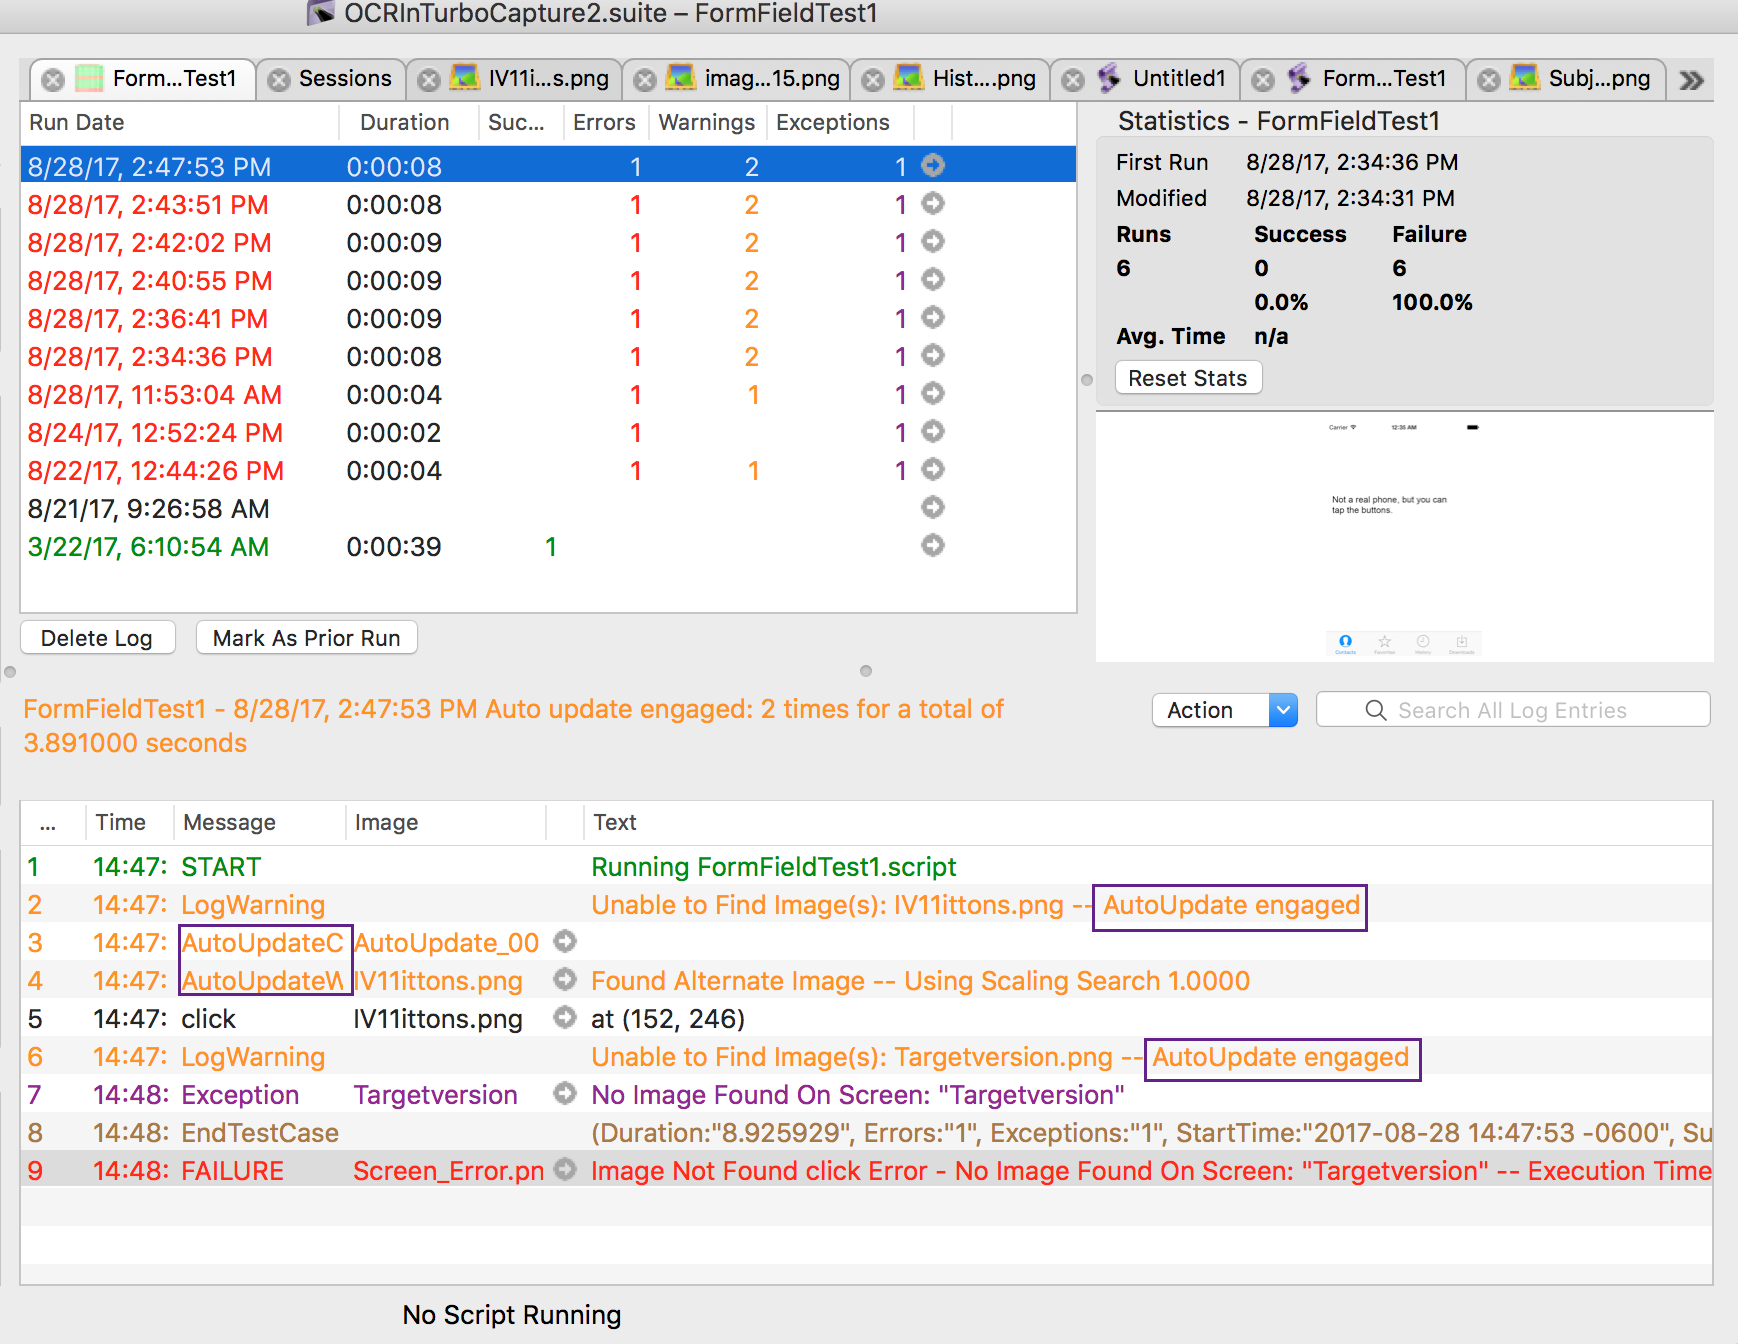
You can also look in the Remedy column of the script run list to see if the Auto Update engaged and was able to find a match, resulting in an Auto Update panel appearing after the completion of that script run. Open this panel to view all remedied search instances during that test, and apply any of the changes as desired.