Managing Applications Under Test
The Applications Under Test section can be found in the Workspace tree in the left sidebar of Eggplant Performance Studio. This section is used to store your defined applications under test (AUTs). The AUT object stores information about the application so that creating a test for that AUT is easier.
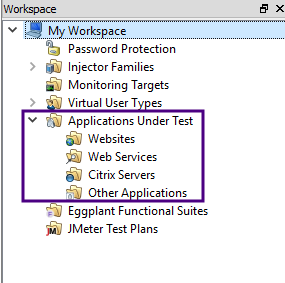
Within the Applications Under Test folder in the tree, you'll find folders for the types of applications you can define:
-
Websites: This section stores information about your website applications.
-
Web Services: This section stores information about Simple Object Access Protocol (SOAP) and OpenAPI Representational State Transfer (REST) web services applications.
-
Citrix Server: This section stores your defined Citrix server applications.
-
Other Applications: This section stores application definitions that you plan to test by using UI-level scripts with Eggplant Functional.
After you define an application, it is listed under the folder for its type. For instance, if you create a Citrix application, it shows under the Citrix Servers folder.
Step by Step: Defining an AUT
Follow these steps to define a new application under test (AUT) to use for your performance testing.
-
In the Studio Workspace tree, right-click the Applications Under Test folder, then select Create new application under test to open the Create Application Under Test dialog box.

-
Enter a name for the application in the Application name field.
-
(Optional) Enter a description for this application in the Description field.
-
Select the application type that you want to define. Depending on which button you choose, you then need to enter additional information:
- Website: Use this type to define a website to test. Enter the web address in the URL field. Note that
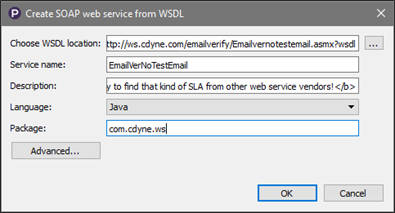
http://(orhttps://) is required. - SOAP web service: Use this type to define a web service application. Enter the network or local address of the Web Services Description Language (WSDL) service in the WSDL field. You can use the Browse button to locate the file if it is on the local file system.
- REST web service: Use this type to define a REST web service application. Enter the network or local address of the OpenAPI YAML or JSON file in the YAML/JSON field. Use the Browse button to locate the file if it is on the local file system.
- Citrix server: Use this type to define a Citrix server application. Enter the Citrix hostname or IP address in the Host field, and set the connection port value in the Port field (the Citrix default of 1494 is entered initially). In the Application field, you can include an application name to launch initially by entering its name preceded by a hashtag (e.g., #Notepad). Leave the Application field blank to launch the desktop.
- Other: Use this type for other applications that use UI-level tests.
- Website: Use this type to define a website to test. Enter the web address in the URL field. Note that
-
Click OK.
-
(Only for Web services; for other application types, skip this step.) Enter or verify details about your web service.
-
If you entered a name on the Create Application Under Test dialog box that doesn't match the actual name for the web service you entered, the Choose Web service name/description dialog box opens to let you pick the name. The registered name for the web service is selected in the Name drop-down menu by default, but you can select the name you previously entered from the menu if you prefer. Then click OK.
-
The Create SOAP/REST web service... dialog box appears, with information pre-populated from the web service definition file provided in step 4. This information can be changed, if necessary, but in most cases the values taken from the web service definition file are correct. However, you must pick the language you want to use to generate the web service scripts. You can choose either Java or C# from the Language drop-down menu.
-
(SOAP web services only) Use the Advanced button to access additional features such as command line options and XML bindings. These advanced options are described in Using Advanced Options for Creating a Web Service.
-
Click OK when you are satisfied with the web service definition.
-
The new AUT is added to the folder list for its application type in the Workspace tree. Defined AUTs are available to select when you create a new Objective (provided there isn't already an in-progress Objective based on that AUT).
You can also create a new AUT by right-clicking the folder for a specific application type. If you use this method, the dialog box includes the options only for that type of application.
Modifying AUTs
To modify an existing AUT, select it in the Workspace tree under the Applications Under Test folder. The AUT displays in the center section of the Studio window. Each application type provides different options for modification. Before creating a test or an Objective from the AUT, you should consider setting the options for the AUT here.
Website
The Website AUT detail page gives you the following options you can set or change:
- Description: Enter a description, or modify a previous description (optional).
- URL: Change the entered URL, if necessary.
In the Scripting Preferences section, select the type of scripts you want to use to test this application. You have two choices, and note that you can include both types:
-
Create network-level scripts: These scripts work by simulating the network traffic between the website and the browser. Because this type doesn’t need to automate a real browser, it is the best choice if you need to simulate a large number of users accessing the website at the same time.
If you choose this type, you should also choose the scripting language, either Java or C#.
-
Create user interface–level scripts with Eggplant Functional: These scripts work by automating real browsers. This method consumes more resources than network-level scripts, but scripting is usually easier, and you can also measure more realistic end user experience.
In addition, you can set Expected Load, as described below.
Web Services
REST Web Services: The Web Services AUT detail page shows the following information about the generated web service application (REST):
- Description: Enter a description, or modify a previous description (optional).
- OpenAPI document: This field displays the path to the entered web service YAML/JSON file. You can't change the value in this field. If you want to modify or change this information, you need regenerate the web service application, which you can do by right-clicking the web service AUT in the Workspace tree, then selecting Regenerate web service.
- Classes: This section displays the methods that are exposed by the web service.
SOAP Web Services: The Web Services AUT detail page shows the following information about the generated web service application (SOAP):
- Description: Enter a description, or modify a previous description (optional).
- WSDL: This field displays the path to the entered web service WSDL file. You can't change the value in this field. If you want to modify or change this information, you need regenerate the web service application, which you can do by right-clicking the web service AUT in the Workspace tree, then selecting Regenerate web service.
- Operations: This sections displays the methods that are exposed by the web service.
- Service source files: This section lists the script files that are generated for the web service application. Use the button at the right to open the folder containing all the script files. You can right click a script in the list, then select Edit to open the script in the associated IDE for that language.
In addition, you can set Expected Load, as described below.
For more complete information about creating and working with web services applications, see Managing Web Services in Eggplant Performance Studio.
Citrix Server
The Citrix Server AUT detail page lets you set or change the following fields:
- Description: Enter a description, or modify a previous description (optional).
- Host: Change the entered Citrix hostname or IP address, if necessary.
- Port: Change the entered port value, if necessary.
- Application: Enter, or change, an application name to launch a specific application. The application name must be preceded by a hashtag (e.g., #Notepad). Leave this field blank, or clear existing information, to launch the desktop.
In addition, you can set Expected Load, as described below.
Other Applications
The Other AUT type provides only the option to set Expected Load, as described below.
Expected Load
Each of the AUT type detail pages lets you specify expected load levels in the Expected Load section:
- Estimate concurrent users: Set Typical and Peak values for your expected number of concurrent users on the system.
- Estimate transaction rate: Set Typical and Peak values for expected transaction rates on the system. Note that you can use the drop-down menus to set the values as second, minute, hour, or day.
- Estimate HTTP request rate: (Websites and Web Service only) Set Typical and Peak values for expected HTTP request rates on the system. Note that you can use the drop-down menus to set the values as second, minute, hour, or day.
Typical is the amount of load you expect the system to experience under normal operating conditions. Peak is the maximum amount of load you expect.