Creating an Eggplant Performance Test from Objectives
The easiest way to get started with creating an Eggplant Performance test is to use the Objectives feature in Studio. This feature guides you through the test creation process so that you can:
- Define an application to test
- Record user journeys within the application
- Generate scripts from the recording
- Create data files to provide data to virtual users during test runs
- Fine-tune other aspects of the test
- Create the test itself.
Using Objectives
The Objectives pane is typically found in the right sidebar of the Studio UI.
The Studio interface is customizable, so you can move this pane into a different location or open it as a separate window if you prefer.
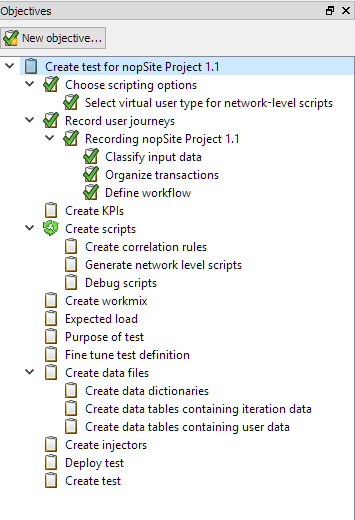 The Objectives tree shows the steps you need to complete to create your test
The column under Objectives is empty until you create your first objective. Only objectives that are active, or in progress, are displayed.
When you create an objective, the steps necessary to create the test are displayed in a tree hierarchy. As you complete steps, you see a green check mark in the tree to show your progress.
The Viewer pane, in the central portion of the Studio window, is where you complete the actions for each step of an objective. It displays information about what you need to do to complete a specific step and provides the controls or links to make the necessary updates.
To create an objective, you must first:
- Create a workspace: If you don't already have a workspace, or want to create a new one, see Managing Workspaces.
- Create a project: If you don't already have a project, or want to create a new one, see Managing Projects.
Step by Step: Creating a Test from Objectives
The objectives feature is a useful guide to test creation, but you don't necessarily have to perform every step in order. If you've created tests before, some steps might be marked as complete immediately because you already have the required assets in your project or workspace. If that's the case, you can either accept the existing assets or create new ones as you walk through the steps.
-
Create a new objective. Either:
- In the Objectives pane, click New Objective.
- If you have defined applications under test (AUTs) in the Applications Under Test section of the workspace, right-click an AUT and select Create new objective. Continue to step 3.
-
Select the application that you want to create a test for. Either:
- If no applications under test (AUTs) have been created in the workspace, the Create Application Under Test dialog box opens for you to define an AUT that you want to test. For complete information about defining an AUT, see Managing Applications Under Test.
- If you have AUTs in the workspace, the Create New Objective dialog box opens. You can choose an existing AUT or decide to define a new one, which takes you to the Create Application Under Test dialog box.
noteIf you have an in-progress objective based on an AUT, that AUT is not available to select to create a new objective. After the objective is complete and the test created, the AUT is made available again to create a new objective, if desired.
After you choose the AUT, the objective is created and appears in the Objectives pane.
- If you created a new AUT, or chose an AUT that had no scripting options selected, the Objectives tree for the new objective initially contains only one additional node, the Choose scripting options step.
 A new objective from a new application under test (AUT) shown in the Objectives tree
- If the new objective is based on an AUT that has scripting options selected, the Choose scripting options step is marked complete with a green check mark, and additional steps show below it in the tree. The specific steps you need to complete to create a test are dependent on the scripting options you choose.
-
Follow the on-screen instructions to complete your test definition.
When the objective is created, the first step is selected: Create test for <AUT name>. This step is the parent to the whole objective and doesn't include any action items. However, it does include a relationship diagram of the tasks you need to complete as you define your test.
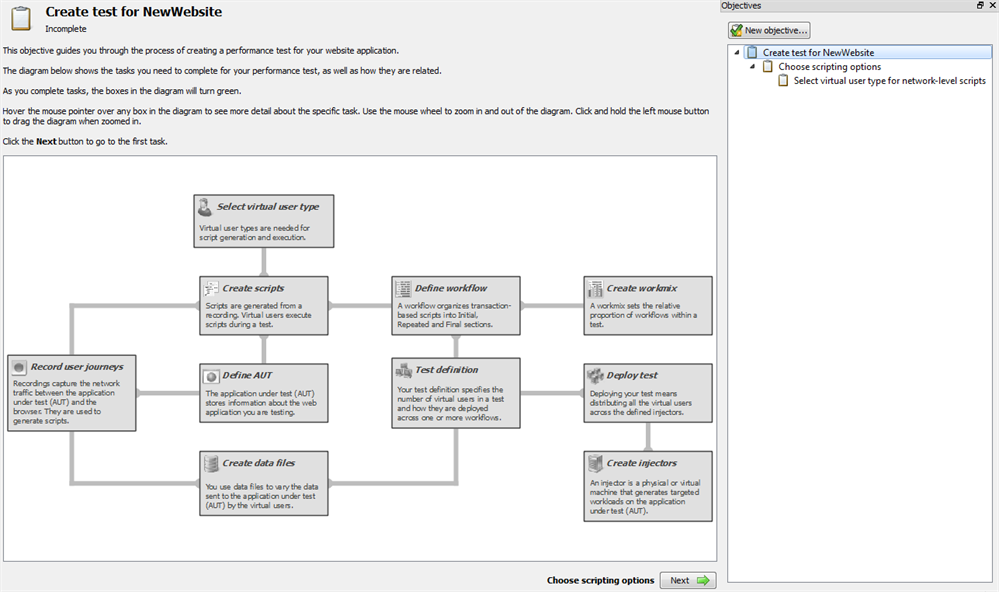 The relationship diagram for a new objective shows the requirements for test creation
As you complete the test creation requirements, the boxes in the chart turn green. You can select the first step in the tree at any time to view your progress. The individual steps in the tree also show a green check mark as they are completed. Some of the requirements in the chart involve completing multiple steps in the Objectives tree. You can hover your cursor over a box in the chart to see what specific requirements are necessary to complete that piece of the test definition.
-
When you're ready to proceed, click Next at the lower-right side of the chart.
-
Continue through the steps by following the on-screen instructions and performing the actions as required in the Viewer pane.
Some steps will vary depending on the type of application that you've chosen, or the virtual user type. For example, a web service application has different requirements from a Citrix server application. However, most steps are the same, regardless of the application type. For example, you always need to:
- Choose a virtual user type
- Build a workflow for the test.
Of course, there are many steps to complete. Read the on-screen instructions carefully, and take the appropriate actions to complete each step. As you complete a step, click Next to move to the next step, or select the step in the Objectives tree.
-
When you reach the final step, on the Create test page, click Create Test to create the test. All previous steps must be marked as complete before you can do this. You can either accept the suggested test name, in the Test name box, or enter a name of your choice.
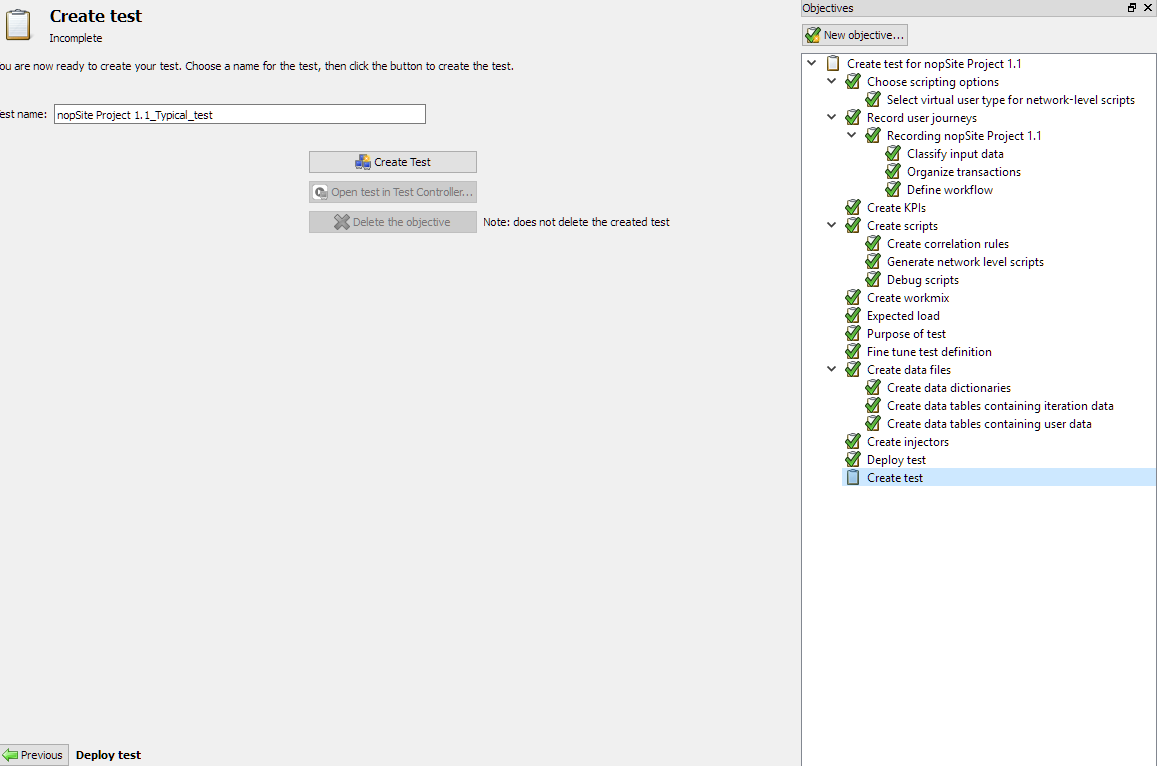 The final step in an objective lets you create a test from the various assets of the test definition
The new test is added to the Tests directory of the Project tree. When you create a test from the objectives page, the project is built at the same time. Therefore, the test is immediately ready to run in Test Controller. If you're ready to run the test, click Open test in Test Controller.
For more information about running tests, see the next part of the quick start guide, Running an Eggplant Performance Test.
Working with Objectives
The objectives feature is not a traditional wizard:
- You don't necessarily need perform the steps in order.
- You don't have to complete the steps at one time.
You can work through some steps, then return later to continue working on the same objective. Just select the relevant step in the Objectives tree.
You can also return to completed steps and edit your previous choices. Keep in mind, however, that in many of the steps, you are creating assets that are added to the workspace or project. For instance, if you create a KPI collection on the Create KPIs step, then later change to a different KPI collection, the first collection is still available in the KPI folder in the Project tree.
Although you don't have to complete all steps in order, some steps have dependencies on previous steps. If you select a step in the Objectives tree that has a prerequisite that hasn't been met, the text and any controls on the page are grayed out, and any tasks you need to complete prior to this task are listed at the top of the page.
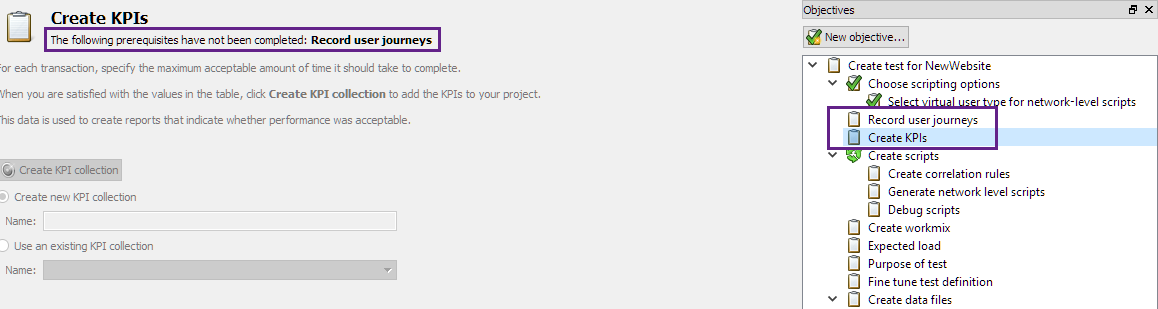 An objective step showing a prerequisite that needs to be met
Working with Multiple Objectives
You can have multiple objectives in progress at the same time. If so, they stack in the Objectives tree. You can temporarily hide, or close, objectives that you're not actively working on. To close an objective, just click the arrow beside the parent task, Create test for <AUT name>, to hide its steps from view. Click the arrow again to reopen an objective.
Working on Test Assets in the Workspace or Project
All of the steps you complete by following an objective can also be completed directly in the workspace or project. In fact, you can edit, update, or delete assets that you create by selecting them in the Workspace or Project trees. As you get more familiar with all the elements that make up a performance test, you might choose to create your tests from scratch as well. For information about following this approach, see Creating an Eggplant Performance Test Manually.
Deleting Objectives
After you complete an objective by creating a test, you can delete the objective. In fact, the final task page includes a button, Delete the objective, that becomes active after you create the test. You can also delete an objective by right-clicking the parent task, Create test for <AUT Name>, in the Objectives tree, then selecting Delete objective.
Deleting an objective removes the objective and all subtasks from the tree, but it doesn't remove any assets that were created as part of the objective. For instance, deleting an objective doesn't remove a test that was created by using the objective or any workflows, KPI collections, and so forth, that you created as you walked through the steps.
When you delete an objective, the AUT the objective is based on becomes available again to create a new objective.
Next Steps
After your test has been created, you can run it in Eggplant Performance Test Controller. Continue to Running an Eggplant Performance Test in this sample quick start guide for more information.