Setting Up Eggplant Performance Injectors on Windows
By default, the Windows injector software is installed with Eggplant Performance. But you can also install the Windows injector on a separate, remote machine using the injector-only .msi file.
This page provides instructions for installing and setting up the injector separately. For information about how injectors work, including information about the localhost injector installed with Eggplant Performance, see Managing Injectors.
For performance tests that use Optical Character Recognition (OCR) with Citrix virtual users (VUs), you must install an additional package on each injector machine: the Eggplant Performance OCR engine. Install this component alongside the Windows injector, or alongside Eggplant Performance for the localhost injector.
The OCR engine package uses 1 GB of disk space. Only install this component if you need it.
If you want to install Eggplant Performance on the same machine as a Windows injector, you must remove the existing injector before you can install Eggplant Performance.
The Eggplant Performance installer will detect the existing injector and display a message telling you that you must uninstall it before you can proceed. Similarly, you must uninstall Eggplant Performance before you can install an injector.
If the Eggplant Performance localhost injector is sufficient for your testing, you do not need to perform the steps below.
Installing and Configuring Windows Injectors
If you want to install injectors separately on additional Windows systems without the full suite of Eggplant Performance applications, follow the instructions below. The instructions are divided into the following tasks:
- Install the injector
- Run the injector
- Install the injector service
- Configure the injector service port
- View the logs
Injectors do not require a license to operate.
Step by Step: Install the Injector
-
Verify that the machine on which you want to install the injector meets the system requirements.
-
Download the latest Eggplant Performance Injector (Windows) installer.
-
Execute the installer.
Run the Injector
-
Find the batch file for the injector-only installation:
runInjector.bat. By default, the file is located in either:C:\Program Files (x86)\eggPlant Performance\bin\C:\Program Files (x86)\eggPlant Performance Injector\bin\ -
Run the batch file. By default, the injector listens on port 39000. To change this, pass the desired port number as a parameter to the batch file on the command line.
C:\Program Files (x86)\eggPlant Performance\bin>runInjector.bat -p 39001If you change the port, you must also set the corresponding Injector port within the Injector definition on the Controller.
Install the Injector Service
Instead of manually running the injector batch file every time the injector is needed for a test run, you can install the injector as a Windows service, which starts up in the background every time that Windows boots up. Running the injector as a service allows you to:
- Manage the injector process remotely, providing you have sufficient permissions.
- Set the injector to Automatic so that it restarts any time the machine reboots.
To install the injector as a Windows service:
-
Find the
installInjectorService.batbatch file. By default the file is located in:C:\Program Files (x86)\eggPlant Performance Injector\bin\ -
Run the batch file as Administrator. A Windows service called Eggplant Performance Injector Service is created.
After you install the injector service, we recommend changing the Startup type from Manual to Automatic:
-
In Control Panel, open System and Security > Administrative tools, and then open Services.
-
Locate the service named Eggplant Performance Injector Service, right-click it, and then click Properties.
-
On the General tab, select Automatic from the list for the Startup type.
-
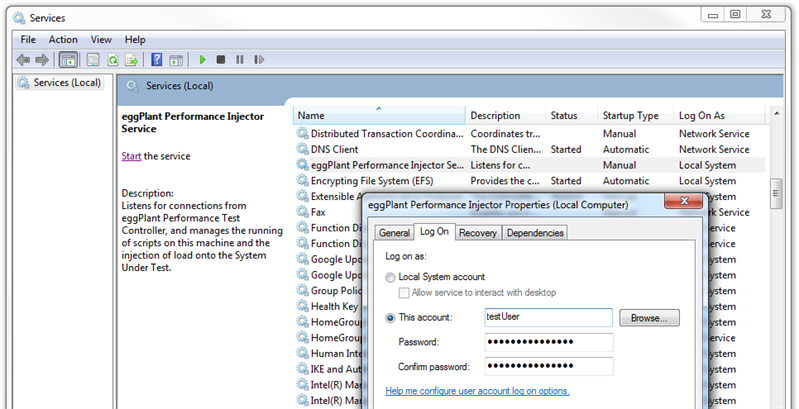
If necessary, on the Log On tab, change the user account that you use to log on for the service. The Local System account often does not have the necessary permissions to start the service.
-
Click OK to save your changes.
Uninstall the Injector Service
To uninstall the injector service:
-
Find the batch file for the injector-only uninstall:
uninstallInjectorService.bat. By default, the file is located in:C:\Program Files (x86)\eggPlant Performance Injector\bin\ -
Run the batch file as Administrator.
Change the Default Injector Service Port
By default, injectors listen on port 39000. You can update the injector service configuration to listen on a different port by adding a line of code to the installInjectorService.bat file before you run it.
If you previously installed an injector on the same machine, you must uninstall the Windows service before you modify you modify the .bat file. When you run the .bat file for installation, be sure to use the Run as Administrator option.
-
In the
Startup configurationsection of the.batfile, add the following line of code:set PR_STARTPARAMS=-p;<port_number> -
Replace
<port_number>with the port on which you want the injector to listen. TheStartup configurationsection now looks something like this:REM Startup configuration
set PR_STARTUP=auto
set PR_STARTMODE=jvm
set PR_STARTCLASS=com.testplant.injector.Injector
set PR_STARTMETHOD=startWindowsService
set PR_STARTPARAMS=-p;39001
View the Injector Logs
Injector logs are stored at the following location:
%APPDATA%\eggPlant Performance\logs\Injector
If the injector is run as a service, then the logs are named:
eggplant performance injector service-stdout.YYYY-MM-DD.logeggplant performance injector service-stderr.YYYY-MM-DD.log