Configuring Static Injector Families in Eggplant Performance
In Eggplant Performance, you'll typically configure new injector families using the Create an Injector Family wizard. But you can also set configuration options and change current settings for an injector family within the workspace.
Updating Static Injector Families from the Workspace
When you select an injector family in the Workspace tree, the configuration options are shown in the main body of the Eggplant Performance Studio window. These options are essentially the same as those presented in the wizard. You can view your settings here or apply new values.
- To change the name of the injector family, in the workspace tree, right-click the name and select Rename Injector Family.
- The right-click menu also provides options to add new injectors to the injector family or to delete the injector family.
These functions are also available on the Studio toolbar when you select any item in the Static section.
At the top of the configuration window, you'll find the Description field. Although this field is optional, it can be helpful to include text that describes what the injectors in the family are intended for. It's also a good idea to name each family so that you can easily identify its purpose.
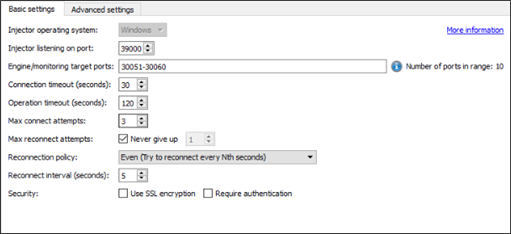
Basic Settings Tab
The primary configuration options are found on the Basic settings tab:
-
Injector operating system: Choose from Windows or Linux. You can only set this option when you create the injector family. You can't change the operating system of an existing injector family.
-
Injector listening on port: The port used to connect to the injector. The default port value is
39000. You don't need to change this value unless multiple injector services are initialized on one machine, or the default port is already in use by another application. -
Engine/monitoring target ports: An injector starts one or more engines in order to execute a test. Each engine must listen on a port so that the controller can communicate with it during a test run.
You can specify ports in a number of ways, using:
-
Connection timeout (seconds): At the start of a test, the controller attempts to connect to the engines started by the injector. The controller waits the amount of time set by this value for an engine to connect back to it before timing out. On slower networks, this value can be set higher.
-
Operation timeout (seconds): The operation timeout is how long Test Controller waits for a response to a message when it's already connected to the injector.
-
Max connect attempts: Set the maximum number of attempts Test Controller can make to create a connection with an injector at the start of a test.
-
Max reconnect attempts: Set the maximum number of attempts Test Controller can make to reconnect to an injector if it is disconnected during a running test. Leave the Never give up checkbox selected if you want Test Controller to continue reconnection attempts until it is successful.
-
Reconnection policy: Choose the method by which reconnection intervals are calculated from the list:
- Even: Try to reconnect every n seconds
- Exponential: Try to reconnect every m x 2n seconds.
-
Reconnect interval (seconds): Set the interval, in seconds, at which reconnection attempts occur.
-
Security: Select the required checkbox(es) to specify whether to use SSL encryption and/or Require authentication (signed messages) for secure injector communications.
The SSL encryption option provides a high level of security, but can hinder data transfer performance. Similarly, selecting the Require authentication checkbox provides increased security because the injector only accepts messages that are signed. This is especially useful if the injector is running in the cloud. However, for the injectors to accept only signed message, the injector must be started with a command line option
-v,which tells it to accept only signed messages.
Advanced Settings Tab
For more complete control over your injector settings, you can select the Advanced settings tab. On this tab, you'll find additional tabs, each with options you can select or change.
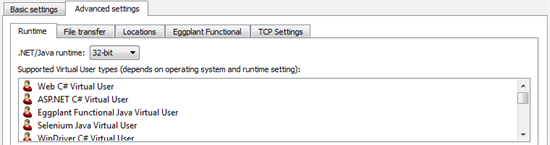
Runtime
The Runtime tab lets you set the .NET/Java runtime. You can select either 32-bit or 64-bit from the list. Supported virtual user (VU) types in the list below change based on your selection as well as the operating system chosen for this injector family.
File Transfer
The File transfer tab provides options for working with files that are transferred to or from injectors.
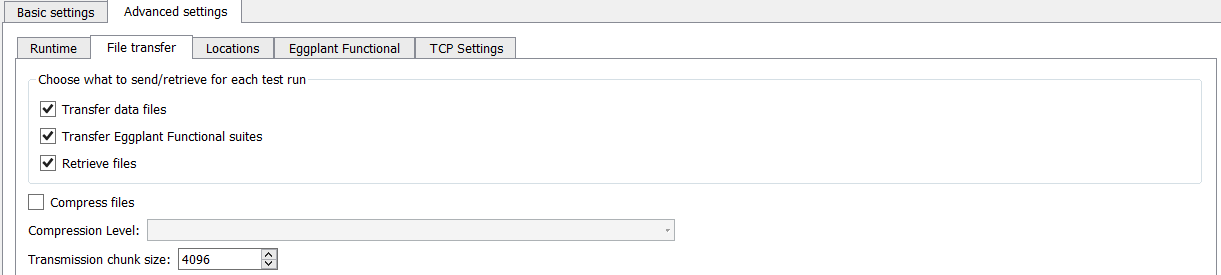
- Transfer data files: Ensures that all data files are transferred to injectors before each test run. By default this option is selected.
- Transfer Eggplant Functional suites: Ensures that all of the required Eggplant Functional suites are transferred to injectors before each test run. By default this option is selected.
- Retrieve files: Ensures that log files, such as VU event logs, web logs, and so forth, are brought back from injectors at the end of a test run. By default this option is selected.
- Compress files: Compresses files before they are sent to or from an injector. This option might be faster for WAN or satellite connections, but for faster LAN connections it's typically unnecessary.
- Temporary folder: Set the folder used for storing compressed files. The system default temp folder is used by default. This option is only enabled when you select the Compress files checkbox.
- Compression level: Choose the compression level from the list. This option is only available if you selected the Compress files checkbox.
- Transmission chunk size: Set the chunk size for data to be transmitted to or from injectors.
Locations
The Locations tab displays and allows you to change the locations of key repositories and resources. When you select an item in the table, a description of that item appears below the table:
The paths listed in this table are expected to exist on the filesystem of the injector machine. They may not match the structure of the filesystem on the machine on which Eggplant Performance Studio is running.
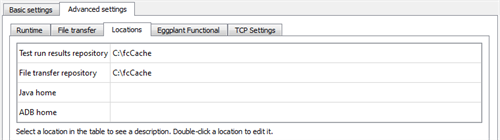
- Test run results repository: Location where run logs are stored temporarily.
- File transfer repository: Location where the workspace, project files, and core engine files are transferred to before the test run begins.
- Java home: Location of the runtime JRE.
Java home is empty by default. You only need to provide a path if you want to use a version other than the version supplied with Eggplant Performance.
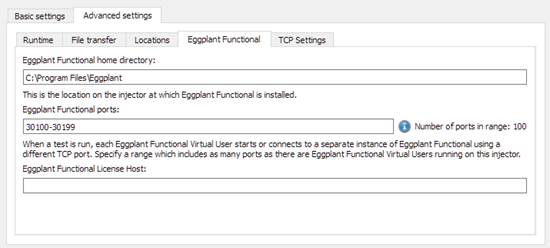
Eggplant Functional
The Eggplant Functional tab is where you enter information about your Eggplant Functional installation if you are using Eggplant Functional VUs.
-
Eggplant Functional home directory: Location of the Eggplant Functional home directory for the injector to use when it launches Eggplant Functional.
noteThis setting is used when the injectors launch Eggplant Functional to run Eggplant Functional VUs. The setting defaults to the standard 64-bit installation location for Eggplant Functional, so you must check that this path matches the location where Eggplant Functional is installed on the injector machine.
noteA different setting is used to launch the Eggplant Functional GUI from Eggplant Performance Studio, which can be changed on the General Tab of Eggplant Performance preferences.
-
Eggplant Functional ports: Range of ports available for Eggplant Functional instances when a test runs. A default range is provided, but you should check that the number of ports is sufficient for the number of VUs running on this injector.
-
Eggplant Functional License Host: Hostname or IP address of an Eggplant Functional floating license server running RLM (Reprise License Manager), if you are using Floating Expiring licenses for Eggplant Functional. For more information about licensing Eggplant Functional, see Licensing Eggplant Functional for Use with Virtual Users.
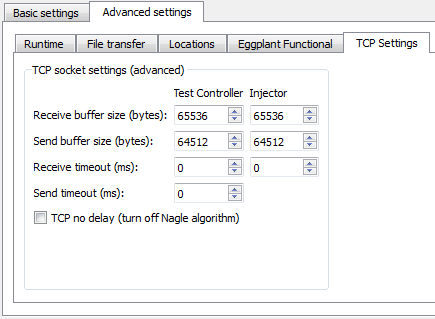
TCP Settings
Settings on this tab let you control the configuration of communication between the controller machine and the injectors. In most cases, the default values work well. However, for some networks, you might find you need to make adjustments to optimize performance.
-
Receive buffer size (bytes): A larger buffer size potentially reduces the number of empty acknowledgments, i.e. TCP packets with no data portion, but might also delay the recognition of connection difficulties.
Consider increasing the buffer size if you are transferring large files, or if you are using a high bandwidth/high latency connection, such as a satellite broadband provider.
-
Send buffer size (bytes): A larger buffer size might delay the recognition of connection difficulties. Consider increasing the buffer size if you are transferring large files, or if you are using a high bandwidth/high latency connection, such as a satellite broadband provider.
-
Receive timeout (ms): Use this option to set the timeout, in milliseconds, for blocking receive calls.
-
Send timeout (ms): Use this option to set the timeout, in milliseconds, for blocking send calls.
-
TCP no delay (turn off Nagle algorithm): Nagle's algorithm is used by default to improve network bandwidth use. If you are testing systems that expect a real-time response, you might want to select this option to disable Nagle's algorithm.
Injectors within this family

In the middle of the injector properties page is the Injectors within this family area of the screen. It displays when you are viewing the Basic or Advanced Settings tabs at the top of the page.
When you view an injector family in the workspace, you'll see that the injectors that belong to that family are displayed at the bottom of the Studio window.
For more information about working with static injectors, see Adding Static Injectors and Managing Static Injectors.