Creating a Test Config
A test configuration is a collection of tests that can be run on demand or be scheduled to run on a regular basis in Eggplant DAI. A test configuration (test config) is essentially a blueprint of tests that can be run one after the other. You can run directed test cases and model-based exploratory tests in a test config. See About Test Cases for more information about test cases.
Go to Controller > Test Config, to create, edit, or view your defined test configs.
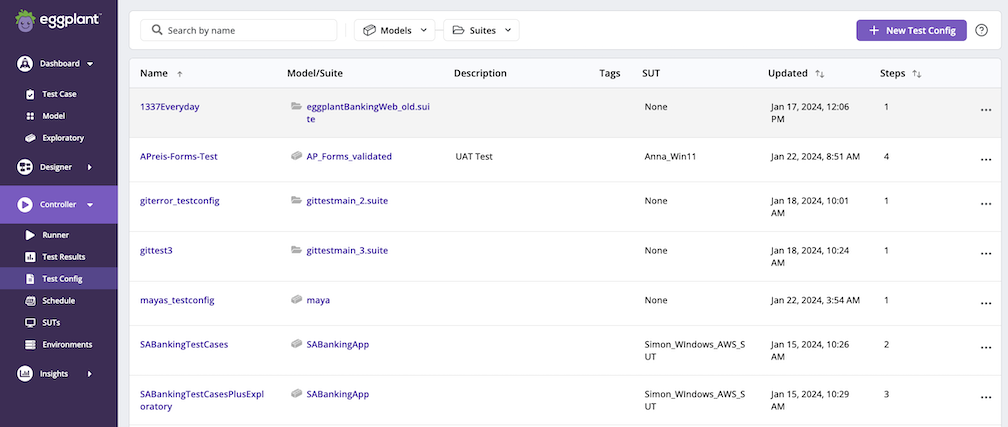
Test Config page
The following columns are displayed to provide at-a-glance details about each test configuration:
- Name: Display name of the test configuration.
- Model/Suite: Name of the model or suite depending on the type of test configuration you choose to run.
- Description: Description of the test configuration. Provide a meaningful description to help distinguish it from other test configurations.
- Tags: Tags defined for the selected test configuration that you're viewing.
- SUT: Associated SUT, or criteria for choosing a SUT for the test configuration.
- Updated: Date and time when the test configuration was last updated.
- Steps: Number of test steps included in the test configuration. A test step is either a test case from the model or a script based test case, or an exploratory test with stop criteria, which could be defined by duration, iterations, or a target coverage percentage.
Click the Actions ![]() menu to Edit, Delete, or Duplicate a test configuration.
menu to Edit, Delete, or Duplicate a test configuration.
Filtering Test Configurations
You can filter test configurations in the following ways:
- By name: Type part of a test configuration name in the Search by name search bar. DAI filters the test configurations you see as you type.
- By model: If you want to see the test configurations associated with a model, click the arrow on the Models button and select a model from the suggested list or start typing a model name in the Search... field. DAI suggests models as you type.
- By suite: If you want to see the list of test configurations associated with a suite, click the arrow on the Suites button and select a suite from the suggested list or start typing a suite name in the Search... field. DAI suggests suites as you type.
Creating Test Configurations
Go to Controller > Test Config to create a test configuration (test config).
Step by Step: Creating a Test Configuration
Creating a test config consists of three steps, with a page for each step. The steps and pages are summarized below, followed by detailed instructions:
- Step 1: General: the tab where you provide the general information about your test config, including a name, description, test type, test config tags, execution settings, and SUT.
- Step 2: Steps/actions: the tab where you configure the exploratory test or test case actions you want your test config to run.
- Step 3: Advanced Settings: the tab where you can configure if you want to automatically rerun failed test steps, stop a run when a step fails, enable a maximum run time, assign a custom script, enable a suite synchronization, and set up notifications to inform designated recipients of the completed test configuration runs.
A progress tracker at the top of the page shows where you are in the creation process as shown in the image below. The highlighted number in purple shows the step you are on in the process. Once you finish entering information on a page and advance to the next one, the progress tracker shows a green check for completed the step.
The pages include Cancel and Back buttons so you can cancel the test config creation or return to a previous page when you want.
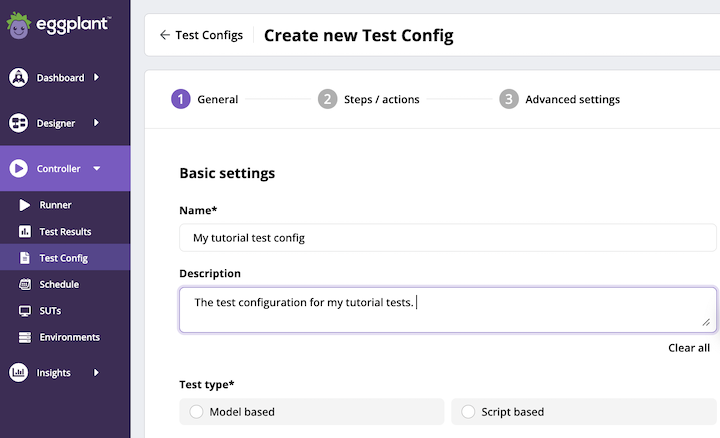
Create new Test Config, Step 1: General, Basic settings
Providing a name and test type enables additional settings.
Step 1: Configure the General information for the Test Configuration
-
Go to Controller > Test Config. The Test Configs page opens.
-
On the right side of the top menu, click + New Test Config. The Create new Test Config page opens with the first step in the process, the General page shown above, where you provide the Basic Settings for your test config.
noteIf you try to create a test config with the name of a test config that exists, or is the name of a Monitor config that exists, you see the error:
409 - Already exists. You need to provide a different name. -
Provide a Name and Description for the test configuration. This is the name and description that show in the list of test configs. Also note the Clear all button you can use to clear the Description field.
-
Select a Test type (Model based or Script based) for the test config. After you specify the test type, more settings become visible. Some of the options you see depend on the test type selected. For both test types, you see the Test configuration tags and Execution settings selectors.
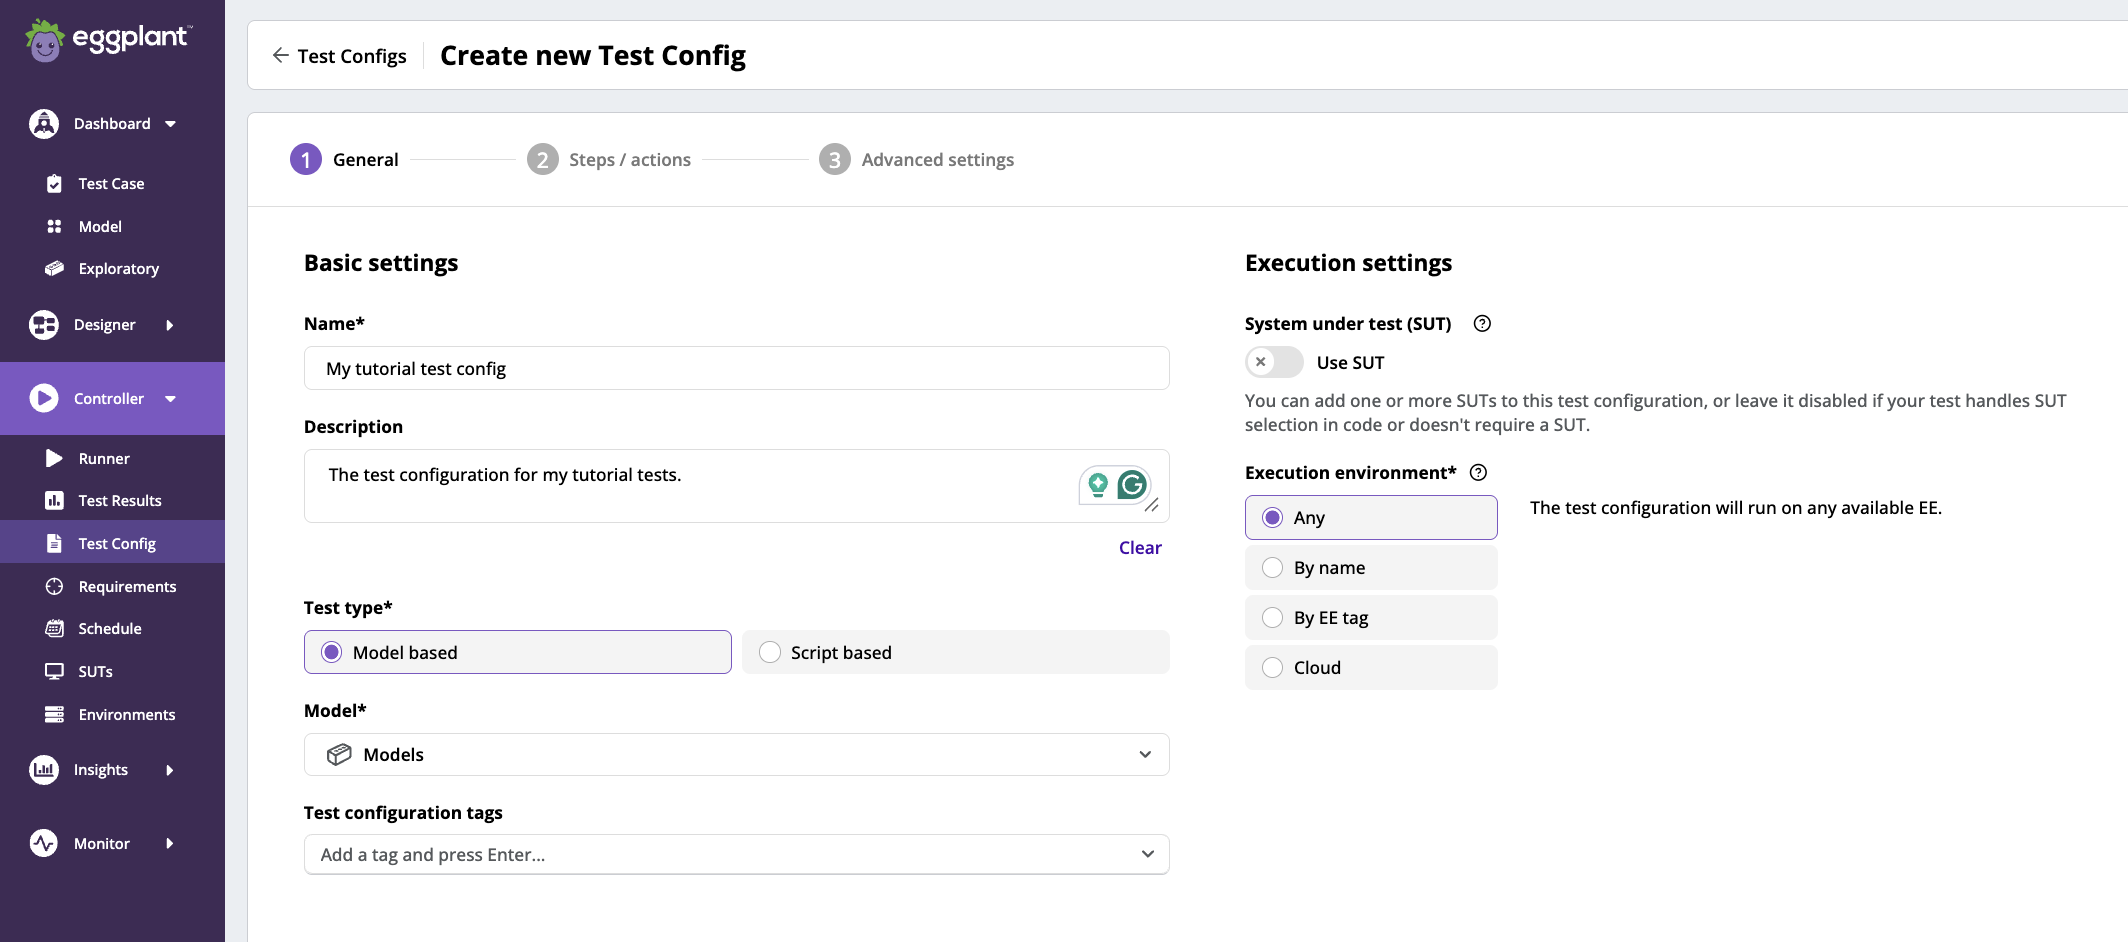
Selecting either Model based or Script based Test type in the Basic settings on the General tab displays the Execution settings
-
If you select the Model based test type, you see the Model selector.
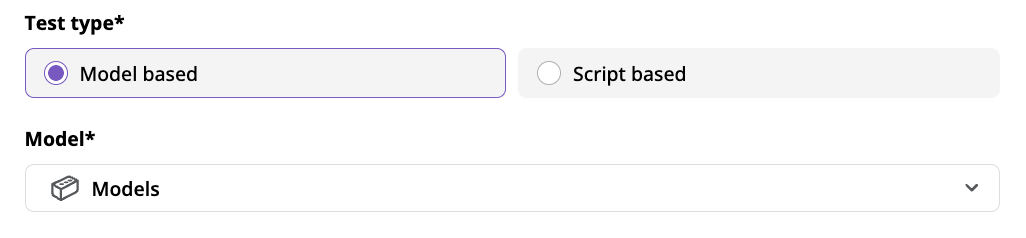
The Model selector in the Basic settings
-
If you select the Script based test type, you see the Suites selector where you can select the suite that contains the scripts/snippets you want your test config to run.
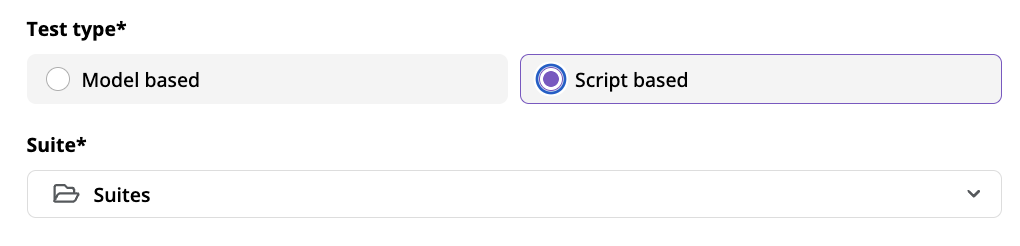
The Suite selector in the Basic settings
-
-
Select the model or suite from the selector as appropriate for your test type.
noteNote that selecting your model or suite enables the Next button at the bottom of the page. You can proceed to the Steps/actions page at this point with the default values for the remaining settings on this page.
-
Add or select Test configuration tags by entering a name for the tag and pressing Enter. Tags provide another way for you to identify and filter by your test config. You can add as many test tags as you need. You can also clear the list of selected tags by pressing the Clear all button.

The Basic Settings Test configuration tag Selector
-
Under Execution Settings, add one or more systems under test (SUTs) to this test config by sliding the Use SUT slider to the right to enable it and clicking + Add SUT. You can also leave it disabled if your test handles SUT selection in your script or does not require a SUT.
The Add SUT panel slides out from the right where you can choose one of your SUTs By name or By SUT tag, or choose the Eggplant hosted cloud SUT.
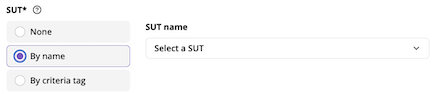
Basic Settings Select Local SUT by name
If you choose to select a SUT By name or By tag, select the SUT or tag from the drop-down below by clicking the drop-down button and either starting to type the SUT name or tag or selecting it from the list. Any SUT that matches all the tags will be selected. If multiple matches are found, one is randomly selected.
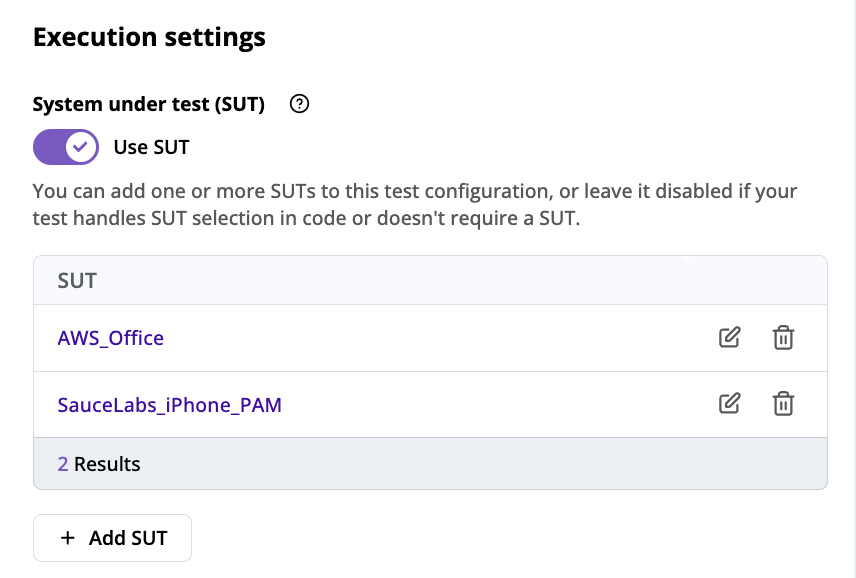
A DAI test config with two SUTs added
-
Also under Execution settings, select the type of Execution environment ("EE") that you want your test config to use: Any, local (By name or By EE tag), or Cloud. If you choose Cloud, DAI will provision the Cloud Execution Environment (including the Agent and Eggplant Functional) for you. For more information, see Connecting to DAI Cloud SUTs. (This option is only available for cloud SUTs.)
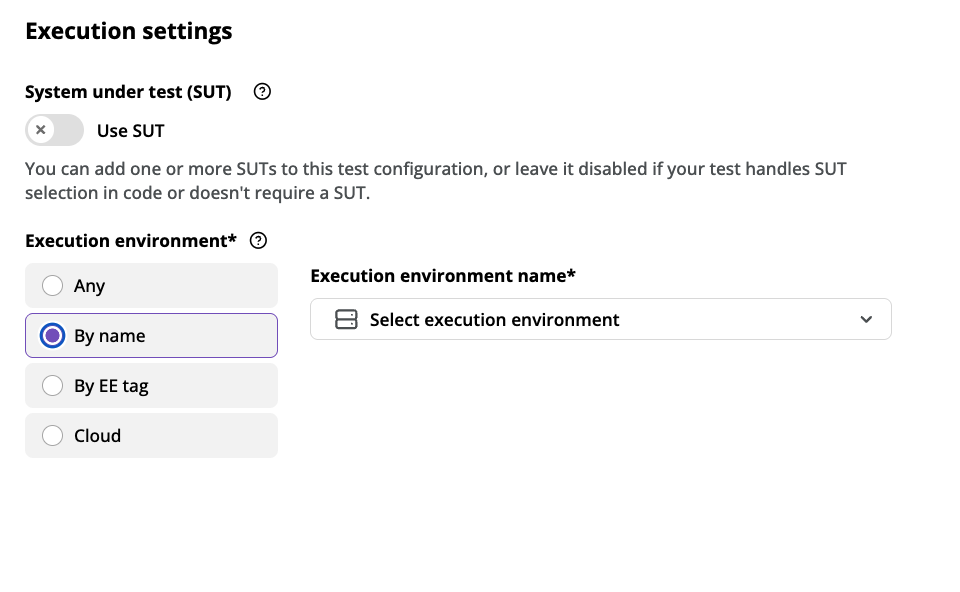
Choose an Execution environment By name (as shown) or By EE tag, or choose a hosted Cloud environment
For Cloud execution environments, choose from the following SUTs:
-
The same options listed above for Local execution environments.
-
Eggplant hosted cloud: Select this to execute tests on Cloud SUTs where Eggplant will provision the Cloud Execution Environment (including the Agent and Eggplant Functional) for you. For more information, see Connecting to DAI Cloud SUTs. (This option is only available for cloud SUTs.)
-
-
When you finish configuring the Basic Settings, click Next in the bottom right corner of the page. You will advance to the second part of the test config creation process: the Step 2: Test steps/actions page.
Step 2: Configure the Steps/actions for the Test Configuration
The options you see on the Steps/actions page depend on the test type you selected. The top of the page shows the test type you selected (Model based or Script based) and either the model or suite as appropriate for the test type. Follow the appropriate steps below for your test type:
- Configuring steps/actions for Model based test types
- Configuring steps/actions for Script based test types
Configuring steps/actions for Model based test types
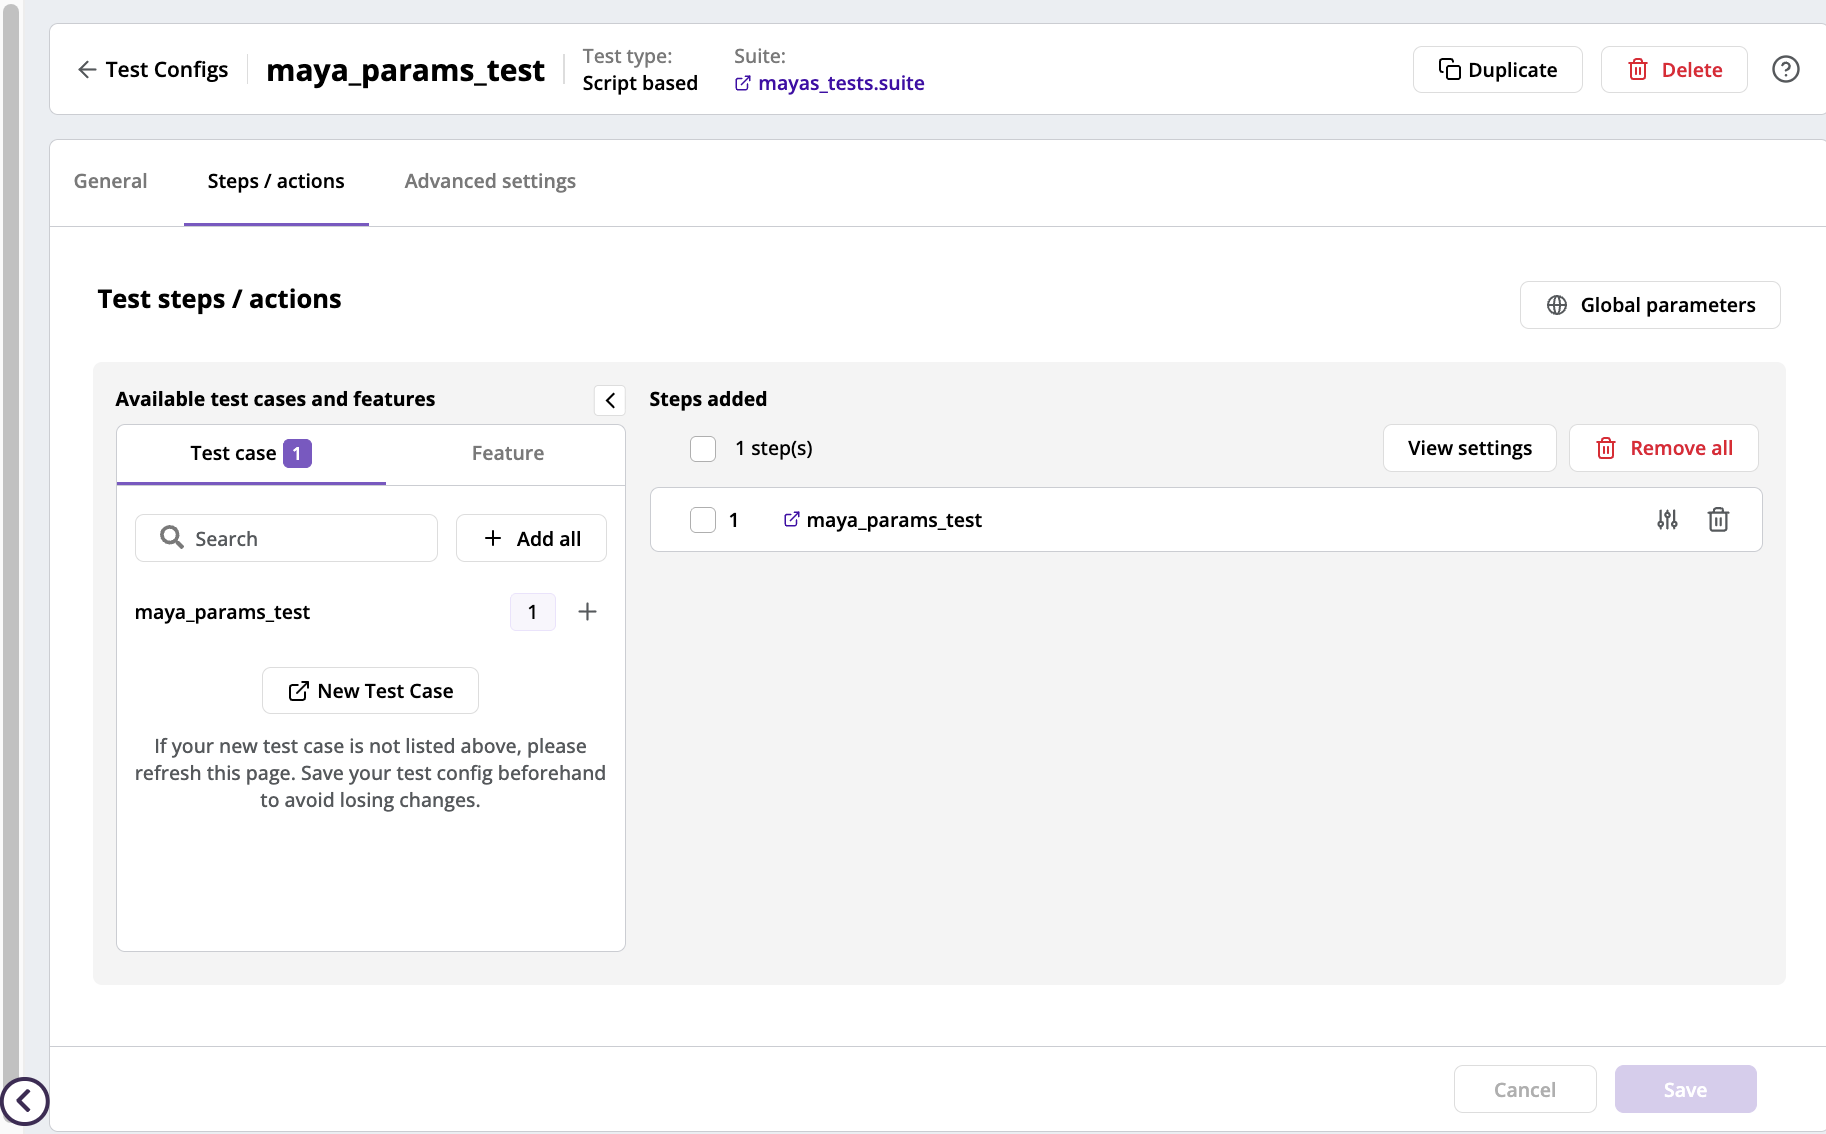
For Model based test types, you see the Available exploratory and test cases list.
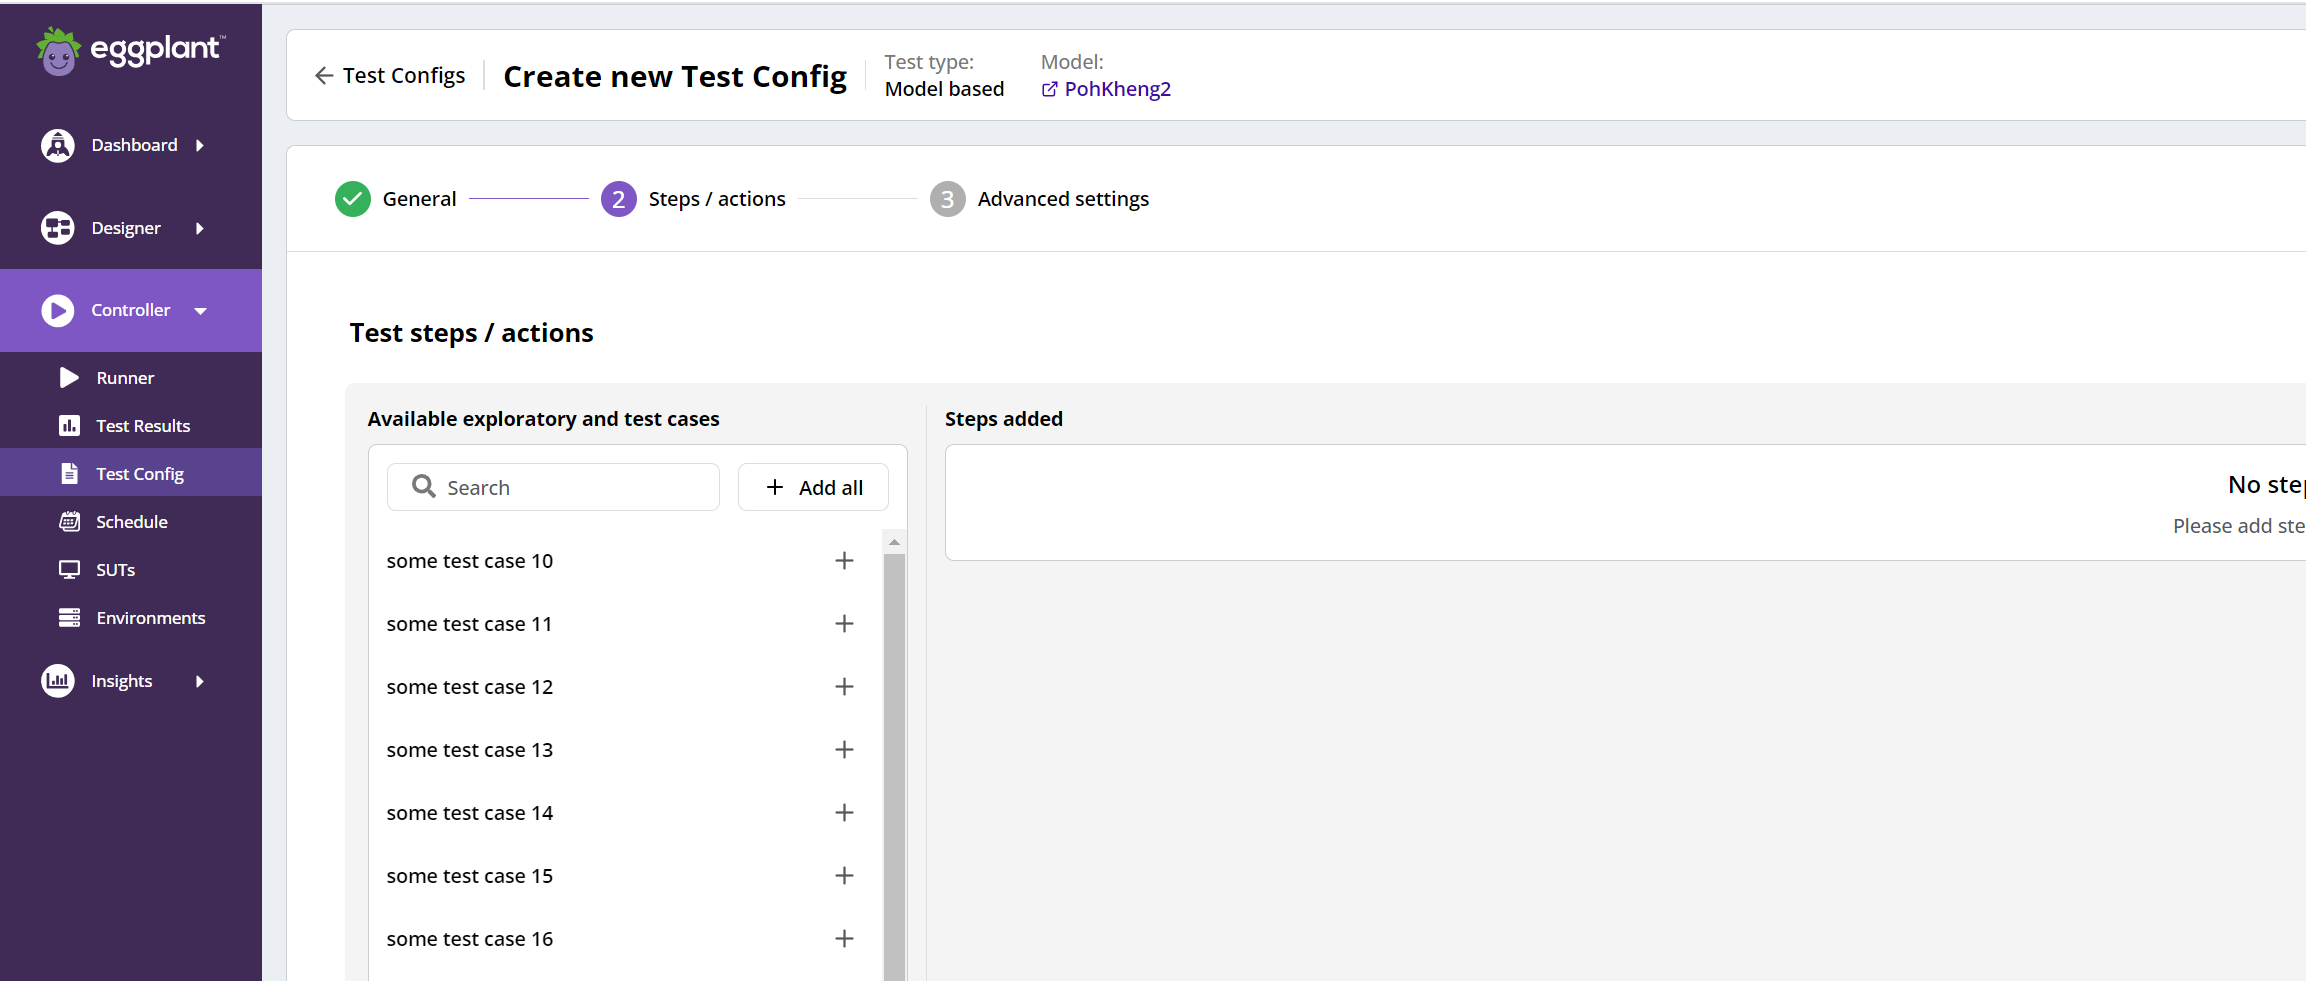
Create new Test Config Step 2: Test steps/actions test case selector
-
Click to select any of the test cases from the Available exploratory and test cases list. If the list is too long, you can filter it by typing test case names. What you see added to the Steps added list on the right side of the page depends on the type of test you select:
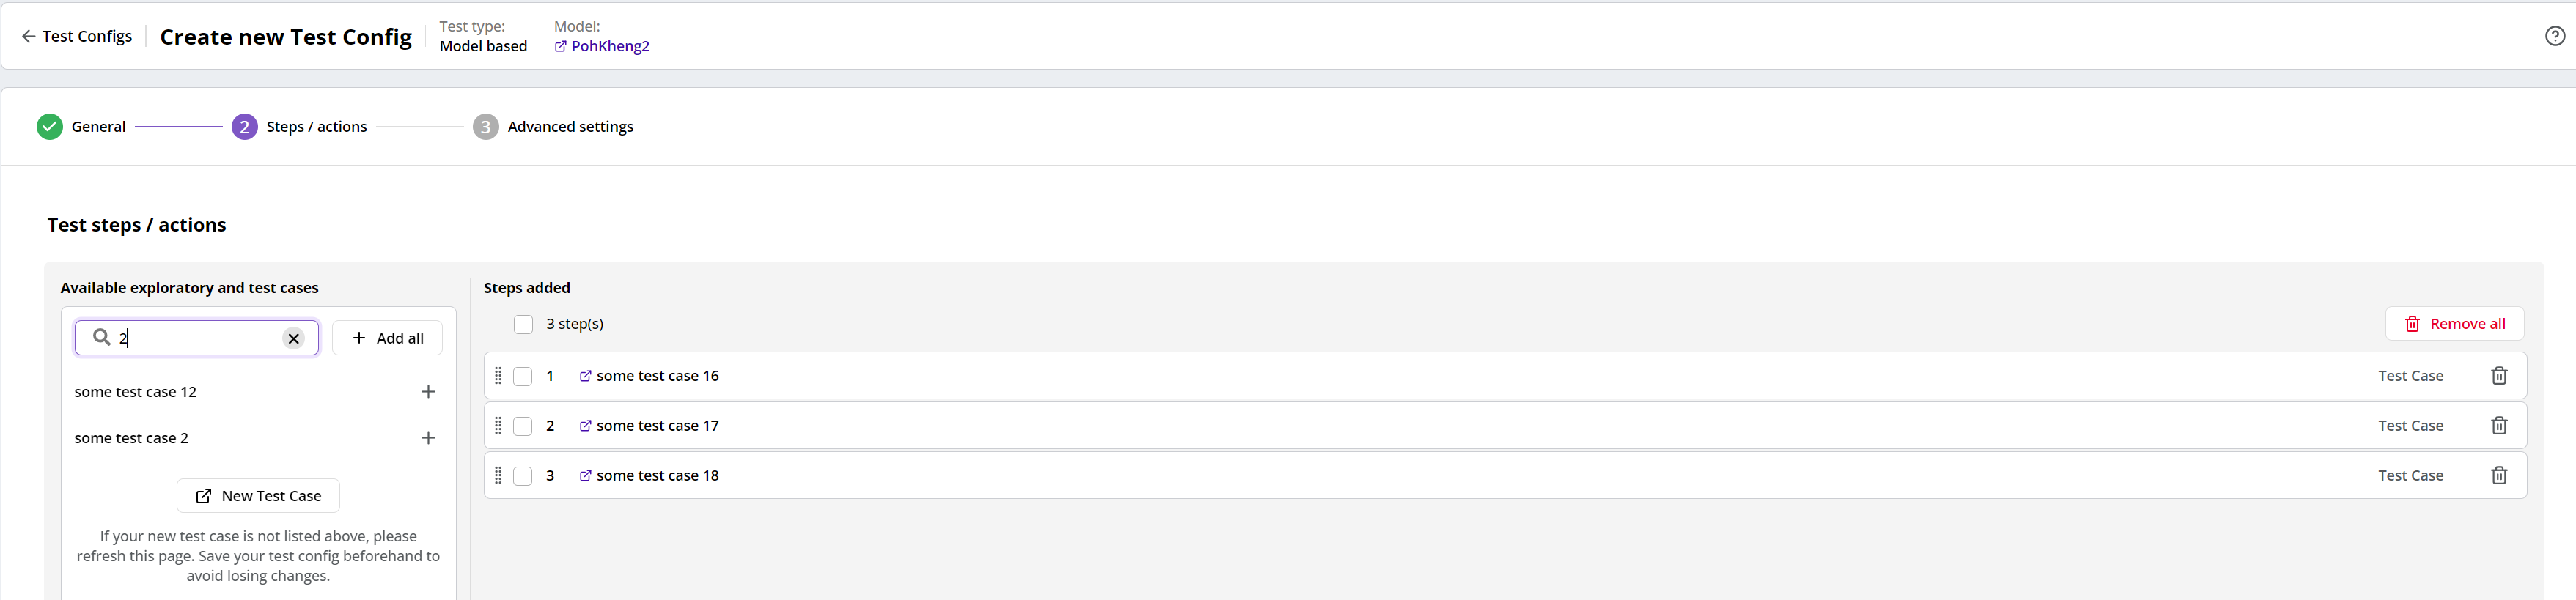
The Steps/actions tab with a filtered list of Available exploratory and test cases and test cases added under Steps added
-
For test cases, you see the test cases added in the Steps added list as shown above.
-
For exploratory tests, you see exploratory test options where you can specify the number of Iterations, Coverage, or Time (hrs) for the test, like the 10 iterations shown below.
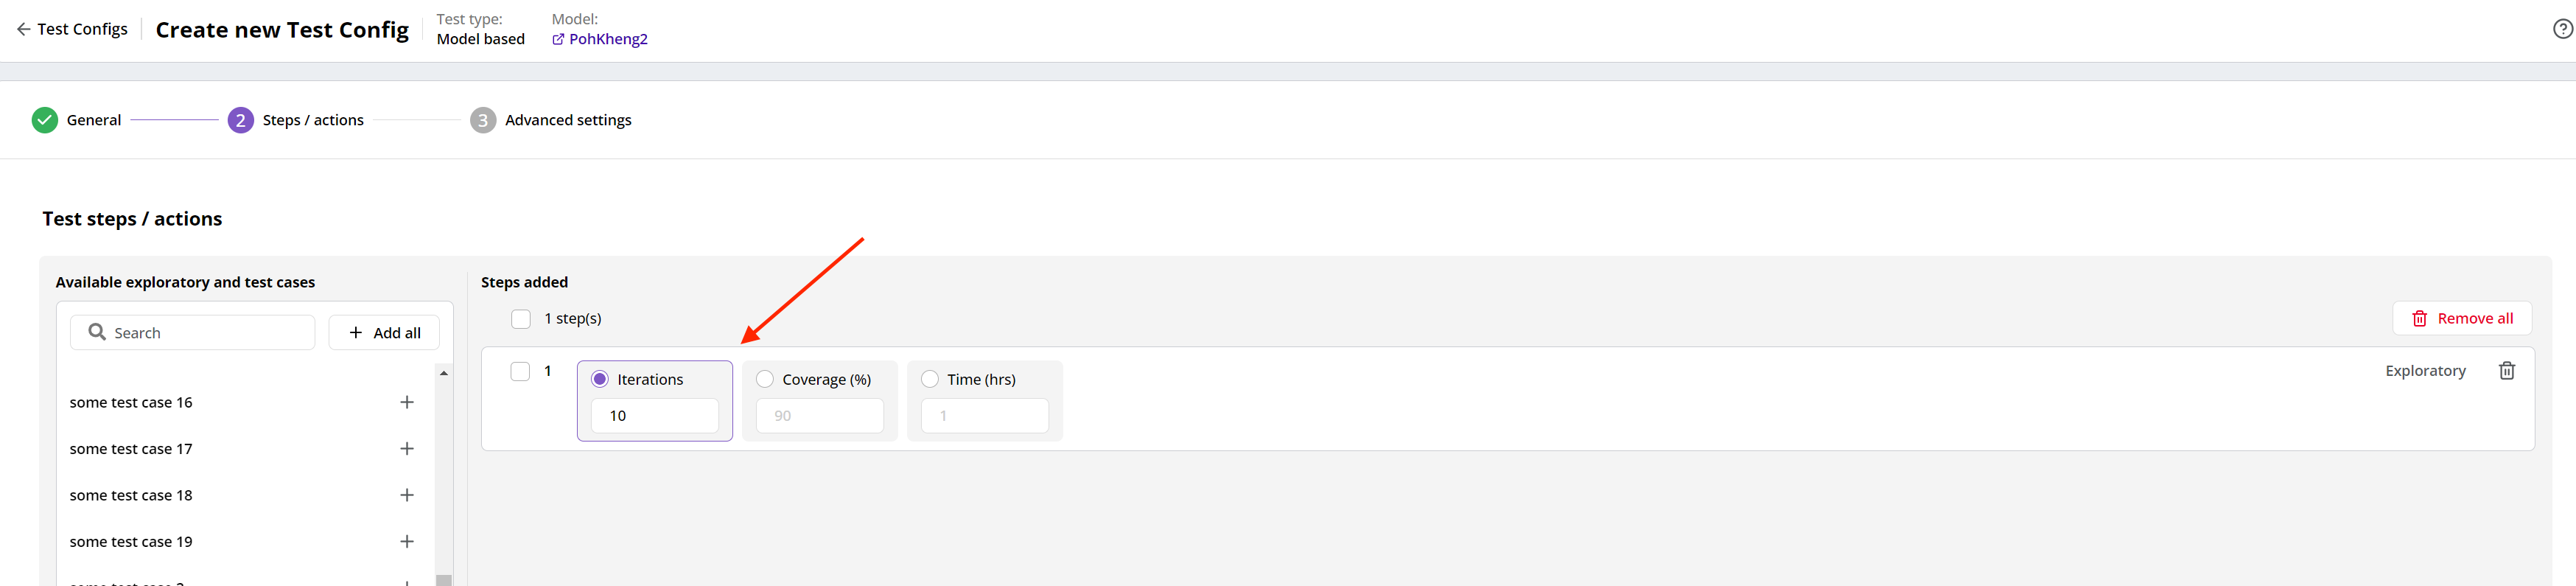
The Test steps/actions tab with an exploratory test step added that is set to run 10 Iterations, which is also its stop criterion
noteFor exploratory steps, a stop criterion is always set by duration, iterations, or target coverage. After the test runs out of steps, Eggplant DAI will examine the execution of each step and indicate whether the test configuration is a success or failure.
-
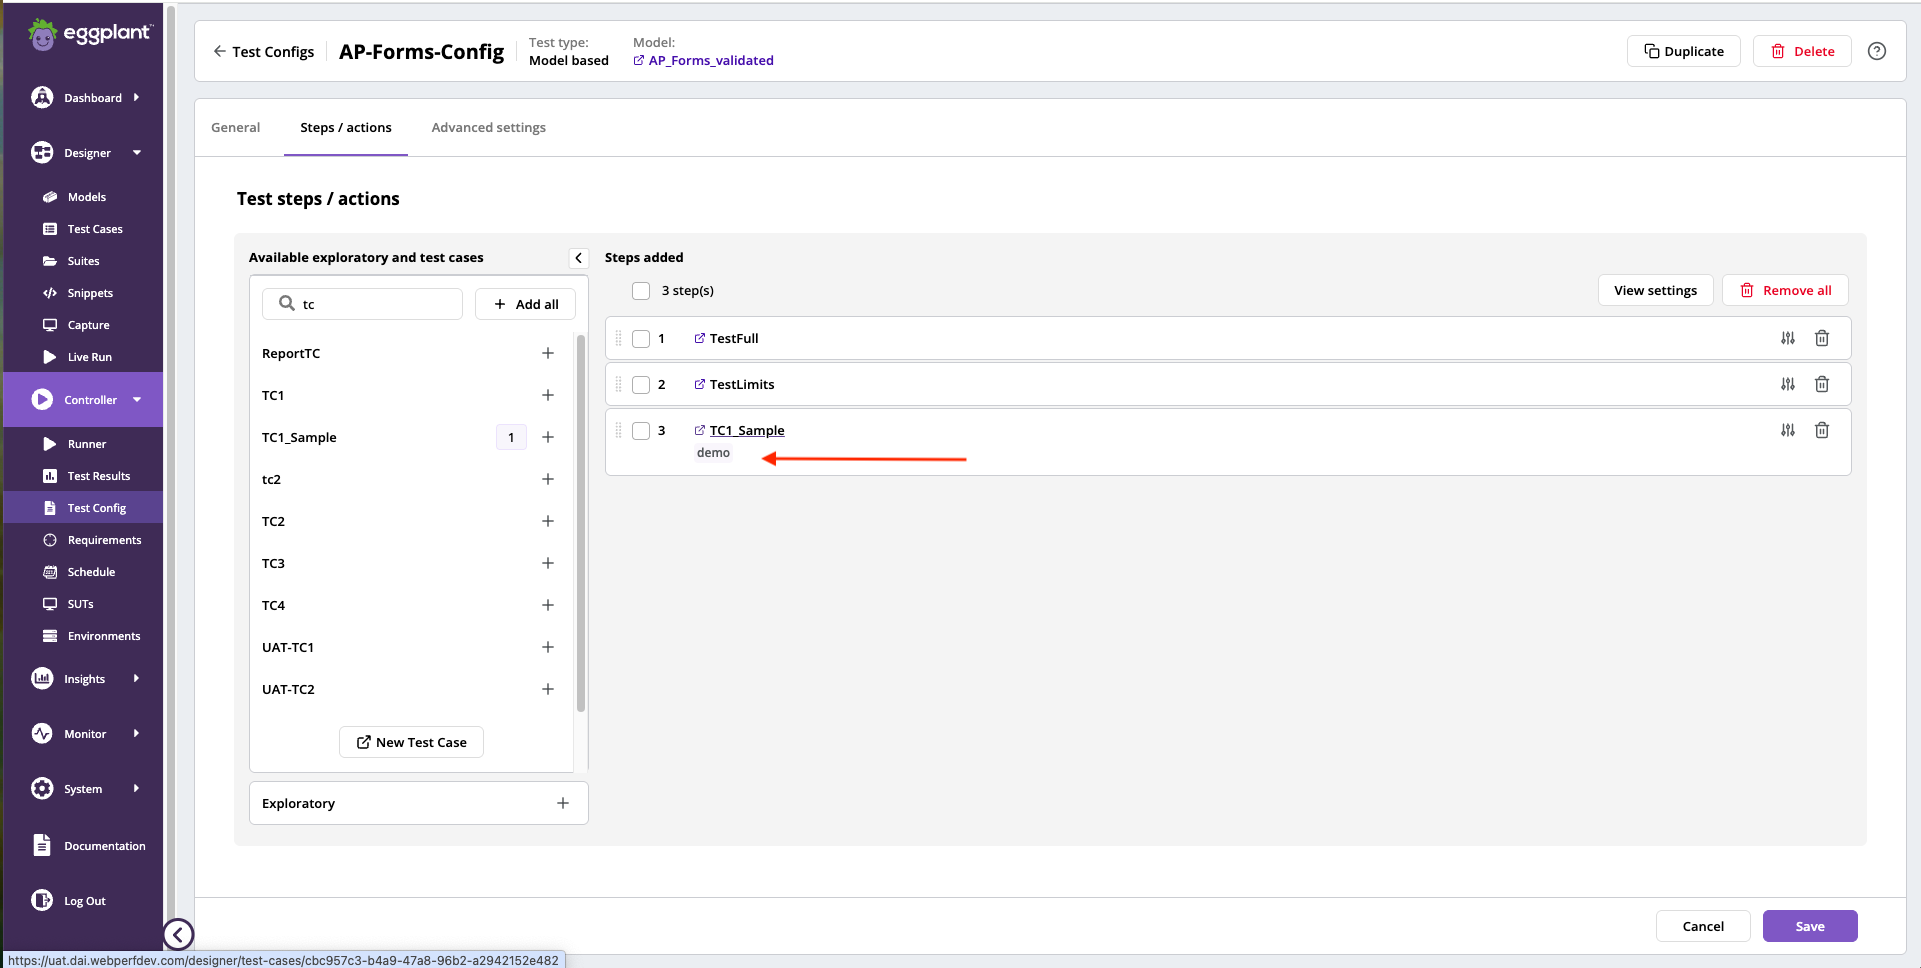
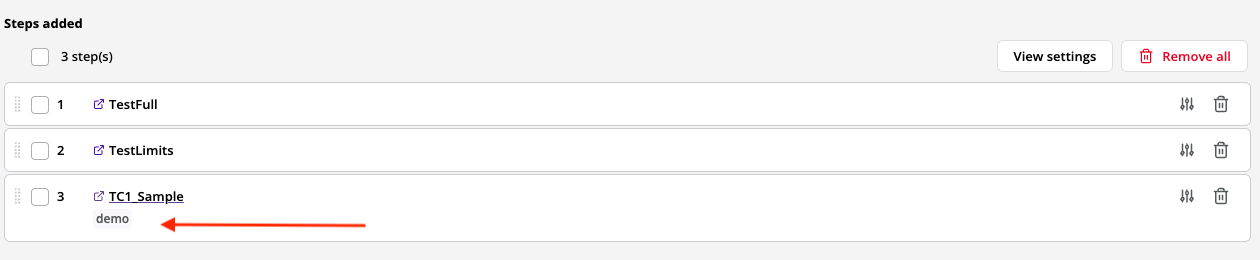
With the Steps added is a View settings button (upper right corner) you can click to hide and show Test case tags and Parameters for the test steps.

-
For test cases with a test case tag assigned, you see the tag under the test case name.
-
For test cases set to be ignored in a test run, you see an ignored tag at the end of the row.

-
There is a View settings button available to allow you to hide and show Test case tags and Parameters.
-
To manage parameters for model-based test configs, including global parameters and custom values, click
 (the Edit parameter(s) button) at the end of a test step row to display the Set parameters for test case slide out panel. See Using Parameters in Model Based Test Configs for details on how to use this panel.
-
-
Repeat step 1 above until you have added all the tests you want your test config to run or click Add All to add all the test cases in Available exploratory and test cases list.
noteClicking Add all while the Available exploratory and test cases list is filtered only adds test cases in the filtered list.
-
While you are editing a test case, if any step is added, removed, or re-arranged, you will see a confirmation message when you click Save to ensure you are aware that the changes will affect the latest status of the step in the test config, resetting it to Untested.
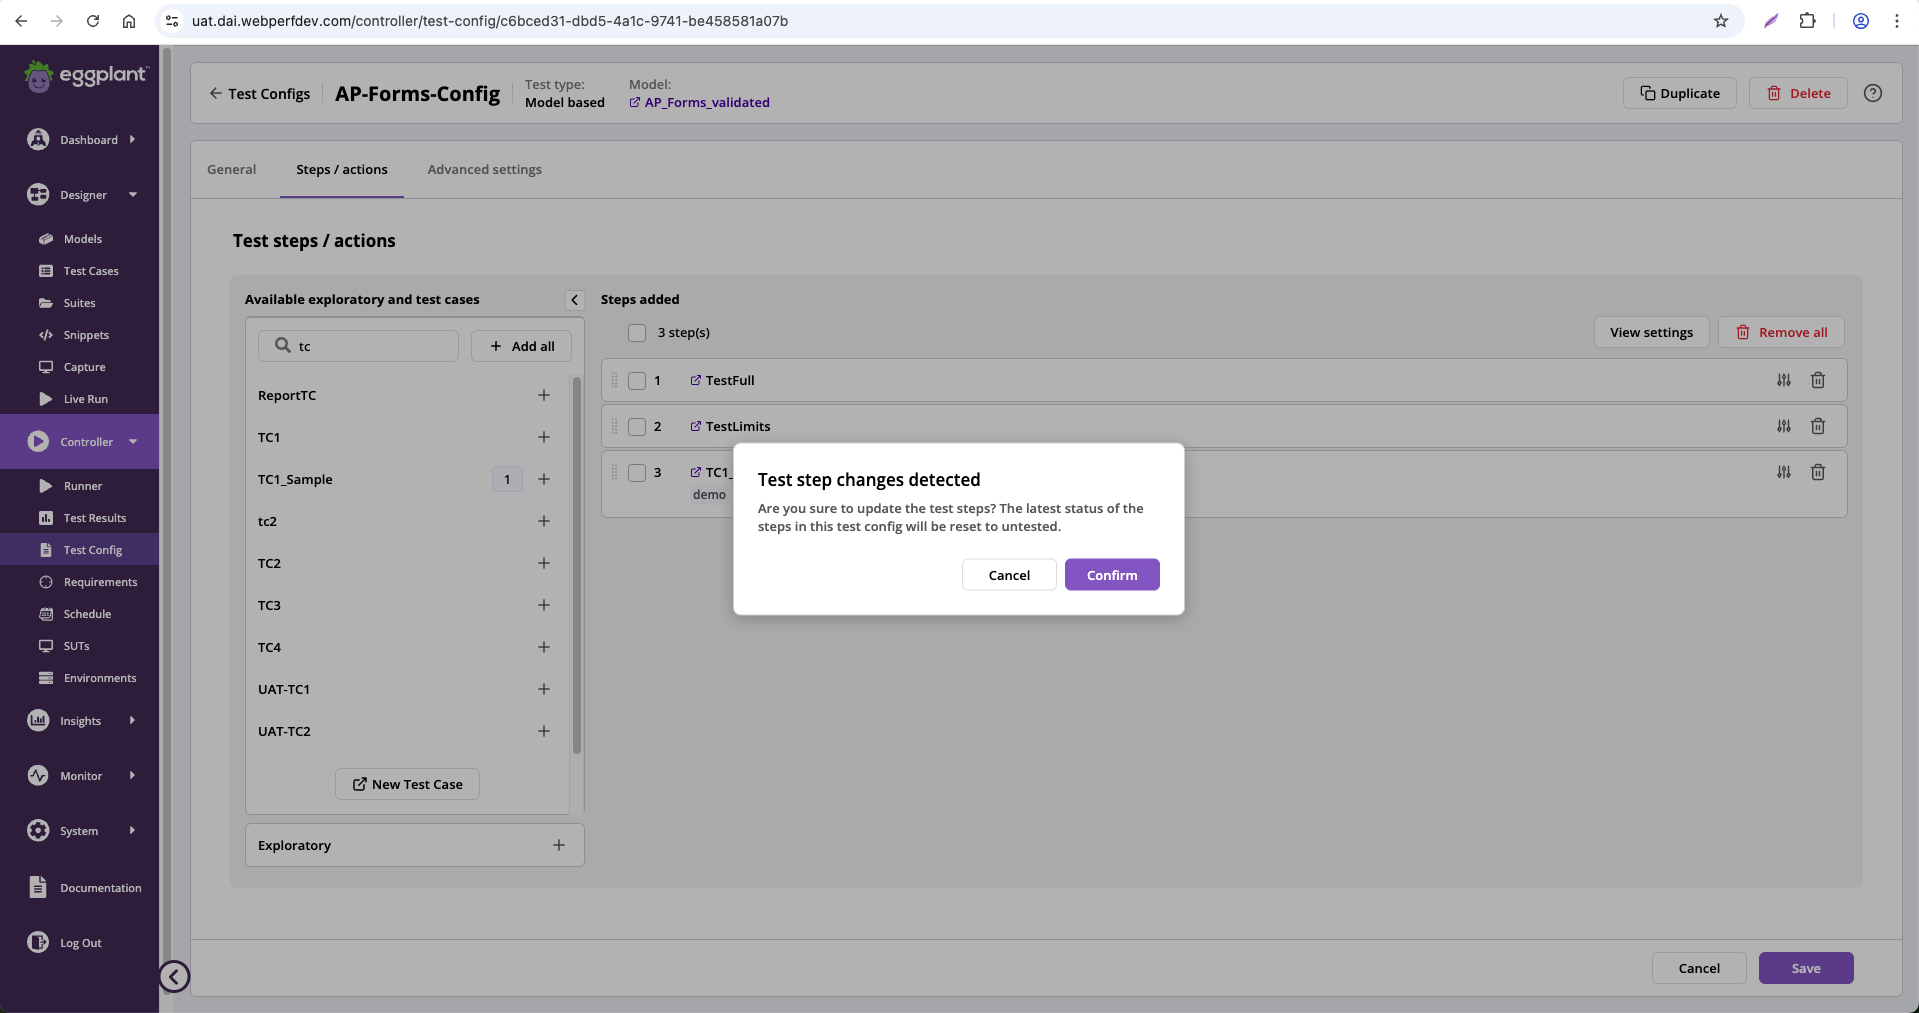
Confirming changes on the Test step / actions tab
-
-
Click Next to advance to the Step 3: Advanced Settings page (or Save if you are editing an existing test config) and follow the instructions for that page.
Configuring steps/actions for Script based test types
For Script based test types, you see the Available test cases and features selector that contains two tabs. The Test case tab lists the available scripted test cases and the Features tab lists the available Gherkin feature files included in the suite used to create the script-based test config. Each list has a Search... bar so you can search for test cases or features by their names.
-
Select a scripted test case or feature from the list or search for it by name in the search bar and then select it. You see the test case or feature added to the Steps added list on the right.
-
With the Steps added is a View settings button (upper right corner) you can click to hide and show Test case tags and Parameters for the test steps.
-
For test cases with a test case tag assigned, you see the tag under the test case name.
-
For test cases set to be ignored in a test run, you see an ignored tag at the end of the row.
To manage parameters for script-based test configs, including global and custom parameters, display the appropriate parameter panel as follows:
Click the Edit parameter(s) button at the end of a test step row to display the Set parameters for test case slide-out panel. See Using Parameters in Script Based Test Configs for details on how to use this panel. 
Or, you can click Global parameters above the Steps added. -
-
Repeat step 1 above until you have added all of the steps you want your test config to run.
-
Click Next to advance to the Step 3: Advanced settings page and continue to the following section for information about configuring it.
We recommend omitting the BeginTestCase and EndTestCase commands in your Gherkin test scripts because they can interfere with the Gherkin results obtained.
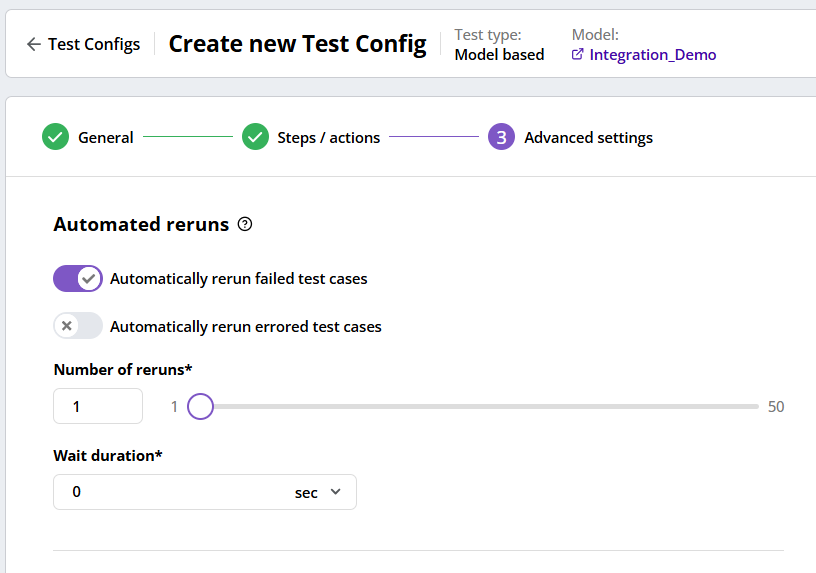
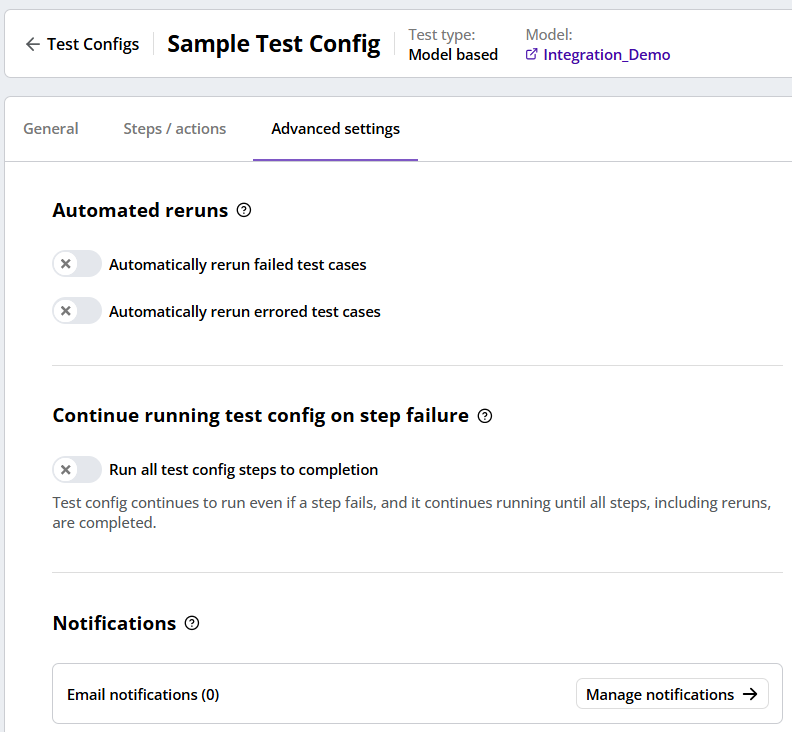
Step 3: Configure Advanced Settings for the Test Configuration
When you reach the Advanced settings page, you have the following options:
-
If you want to create your test config, click the Create test config button (not shown in the following sample page). See Finish Creating a Test Config for more information.
Create new Test Config Step 3: Advanced Settings
-
If you want to enable automatic reruns of failed or errored test steps for your test config, click the corresponding slider next to Automatically rerun failed test steps or Automatically rerun errored test steps. See Enabling Reruns for an explanation of how to configure DAI to rerun your test config.
-
If you want to stop your test config run when a step fails, disable Run all test config steps to completion by clicking the slider next to it. See Stop On Failure for an explanation of how to configure DAI to run all test config steps to completion or stop when a step fails.
-
If you want to enable a maximum run timeout for a test config, you can choose from one of 3 options (System default, Unlimited, or Custom) to set the timeout period. See Timeout Management for an explanation of how to configure the timeout period for your test config.
-
If you want to send email or webhook notifications to inform designated recipients of the completed test configuration runs, click + Add notification to create a notification. See Notifications (Webhook or Email) below for information about how to create the different types of notifications.

The No notifications panel
-
If you want to set a custom script to run when executing this test config, select the desired custom script from the dropdown list. If a default custom script is already set, you do not need to make any changes unless you wish to override it.
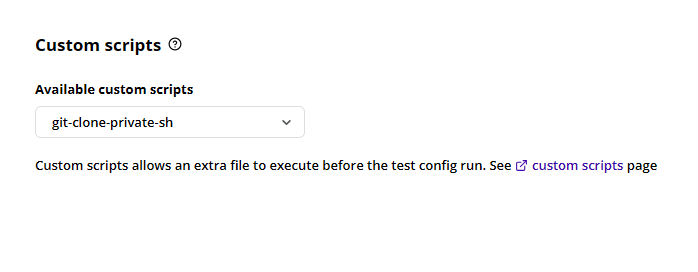
Custom script settings
A message below the dropdown indicates the currently set default custom script. This message will disappear once you make a selection.
This custom script setting is only editable for DAI Administrator users.
-
If you want to always synchronise the latest suites from your script repository (DAI Server or Git Connections), make sure the option for Suite Synchronisation is enabled.
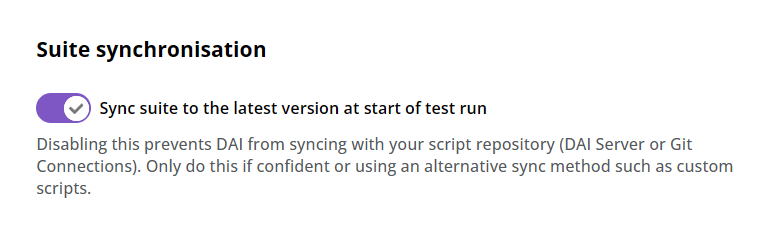
Suite synchronisation settings
This suite synchronisation setting is only editable for DAI Administrator users. Only disable it if you are sure you don't want to sync your suites, or you are using an alternative sync method such as custom scripts.
See Finish Creating a Test Config below to finish creating your test config.
Notifications (Webhook or Email)
DAI supports two types of notifications for test configurations: email or webhook. See the Add an Email Notification or Add a Webhook Notification section below for information about how to use them.
Notifications can be added to or updated in a test configuration at any time after they are enabled globally.
Test Configuration notifications must be enabled globally before you can set up notifications for a specific test configuration within DAI. You need to be an administrator to do this. See Manage DAI Settings for details.
Add an Email Notification
If you want to enable email notifications to report the completed runs for a test config, click the test config's Advanced settings tab to display it. If there are not any existing notifications, you see the No notifications panel shown above.
-
Click Add notification to add your notification settings. The New notification panel slides out from the right, where you can select the notification type.

The New notification panel
-
Select Email as your preferred notification type. The settings for email notifications display on the panel.
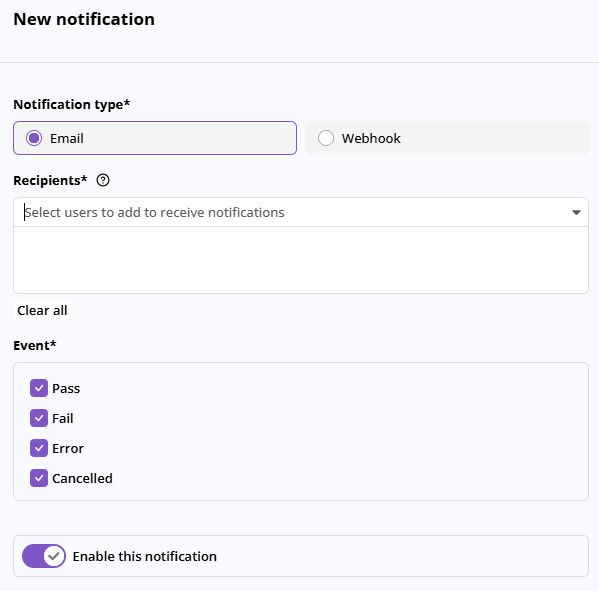
Email notification settings
-
Select the users you want to receive notifications in the Recipients box.
- Rules for Recipients:
- If notifications are enabled, you must pick at least one recipient before you are allowed to save.
- If notifications are disabled, then you can leave the field blank and save.
- Rules for Recipients:
-
Select the event(s) or status(es) that trigger the notifications.
- Rules for Event:
- If notifications are enabled with Enable this notification, notfications for all selected events are sent to the recipients. If you deselect all the event checkboxes, notifications are disabled and Enable this notification is to disabled.
- If notifications are disabled with Enable this notification and all the event checkboxes are deselected, enabling Enable this notification enables notifications, and all checkboxes will be enabled by default.
- Rules for Event:
-
Enable the notification by sliding the Enable this notification slider to the right. (Disable it by sliding to the left.)
-
Click Add to include notifications in the test configuration.

A configured email notification
-
Click Save to save the test configuration along with the email notification.
Add a Webhook Notification
Add a Webhook Notification
Before you can add a webhook notification, you must create a webhook profile. See the Webhook Notifications page for more information.
-
Click + Add notification. The New notification panel will slide out from the right where you can select the notification type.
Add a new notification
-
Select Webhook as your preferred notification type. The panel displays the webhook options. From here, you can select a webhook profile, the triggering event (status), and enable or disable the webhook notification.
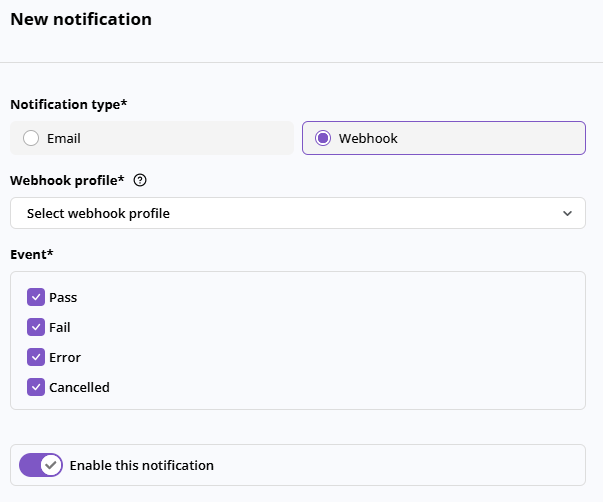
Select webhook notification
-
Select a webhook profile from the drop-down list. You must select a profile before you are allowed to save a webhook-type notification. Rule for Webhook profiles:
- You need to select a Webhook before you are allowed to save.
-
Select the events (or test status) you want to trigger the notification (Pass, Fail, Error, or Cancelled).
Rules for Event:- If notifications are enabled with Enable this notification, and then you deselect all event checkboxes, notifications (and Enable this notification) will be disabled.
- If notifications are disabled with Enable this notification and all the event checkboxes are deselected, enabling Enable this notification enables notifications, and all checkboxes will be enabled by default.
-
Enable the notification by sliding the Enable this notification slider to the right. (Disable it by sliding to the left.)
-
Click Add notification to include the notification in the test configuration.

A configured webhook notification
-
Click Save to save the test configuration along with the webhook notification.
Finish Creating a Test Config
When you finish creating your test config, click the Create test config button in the lower-right corner. DAI saves your new test config and the Test Configs page opens. The new test config will be in the list but you may need to scroll or search for it to see it.
Viewing and Editing the Notification Settings of a Test Configuration
To view or edit the notification settings in a test configuration (test config):
-
Go to Controller > Test Config.
-
Find the test config you want to update or view, select it, and then, from the
 Actions menu, select Edit. From here you can view or update the test config details. For more information about the settings for the different notification types (email or webhook), see Notifications above.
You can also manage the notification settings of a test config from the list under Notifications on the test config's Advanced settings tab by clicking the Actions menu and selecting Edit.
Actions menu, select Edit. From here you can view or update the test config details. For more information about the settings for the different notification types (email or webhook), see Notifications above.
You can also manage the notification settings of a test config from the list under Notifications on the test config's Advanced settings tab by clicking the Actions menu and selecting Edit.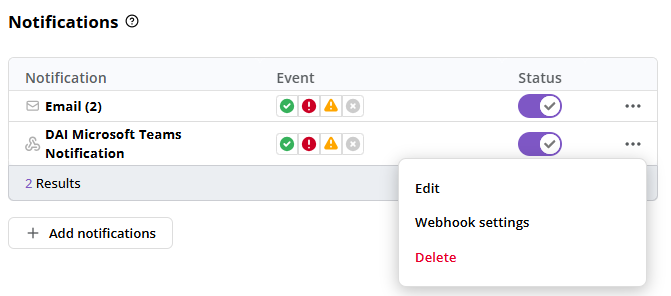
Manage notifications
Managing Parameters in Test Configs
You can use parameters with both model-based and script-based test configs. However, the parameter options and how you configure them differs for model-based and script-based tests. See the appropriate page linked below for information about using parameters in the type of test config you are using:
Enabling Reruns
The rerun feature allows you to save time and effort by automatically rerunning failed or/and errored test steps up to 50 times without executing the entire test configuration. A test step can be a model based test case, a script based test case, or an exploratory test.
Advanced Settings Automated Reruns enabled
To activate the rerun functionality for failed or errored test steps:
-
Enable reruns by sliding the Automatically rerun failed test steps or/and Automatically rerun errored test steps toggle to the right. (A green check indicates the option is enabled.)
-
Configure the rerun parameters with the following controls:
- Number of Runs: Specify the maximum rerun count for failed and errored test steps. You can adjust this value using the text box or slider, with a maximum of 50 reruns.
- Wait Duration: Define the interval between each rerun, optimizing the rerun process. Choose a time interval from the dropdown list, measured in seconds. The default is set to zero, implying no wait interval.
This streamlined process allows you to effectively manage reruns, enhancing your testing workflow.
- The rerun count and wait duration are the shared settings between automatically rerun failed and errored test steps.
- The chosen rerun count and wait duration will be saved even if you deactivate the rerun feature. This way, you can easily re-enable it at a later time without reconfiguring.
- Access rerun statistics by viewing the total reruns completed under the Controller menu on the Runner page. Expand individual test results to find this information.
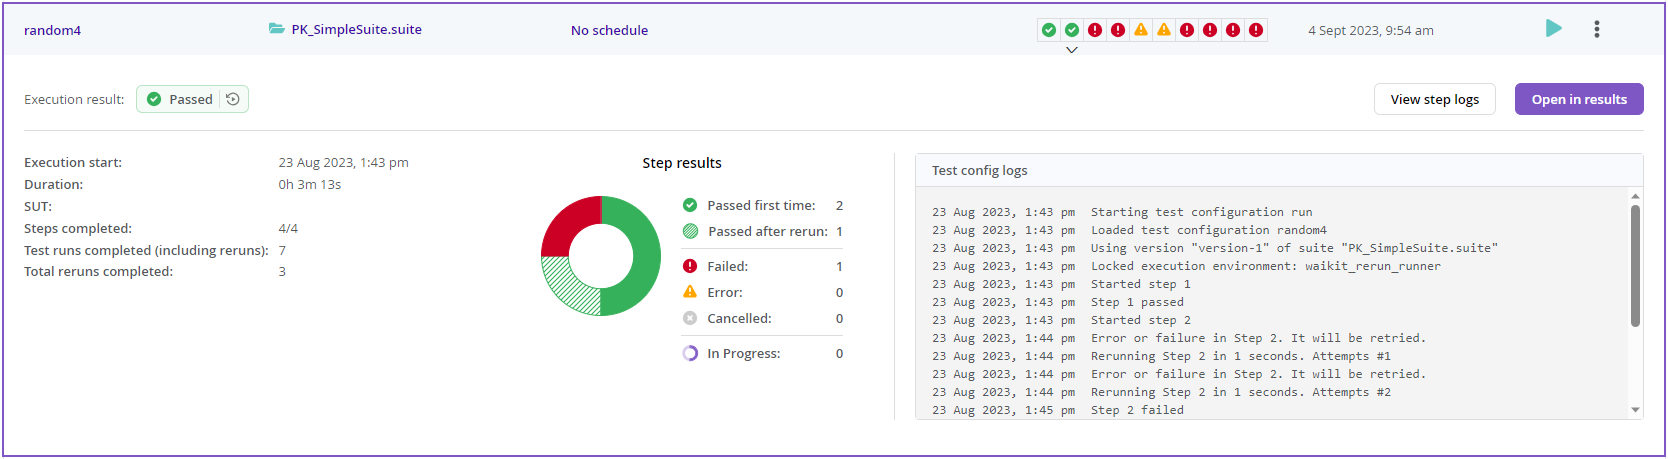
Rerun stats
Stop On Failure
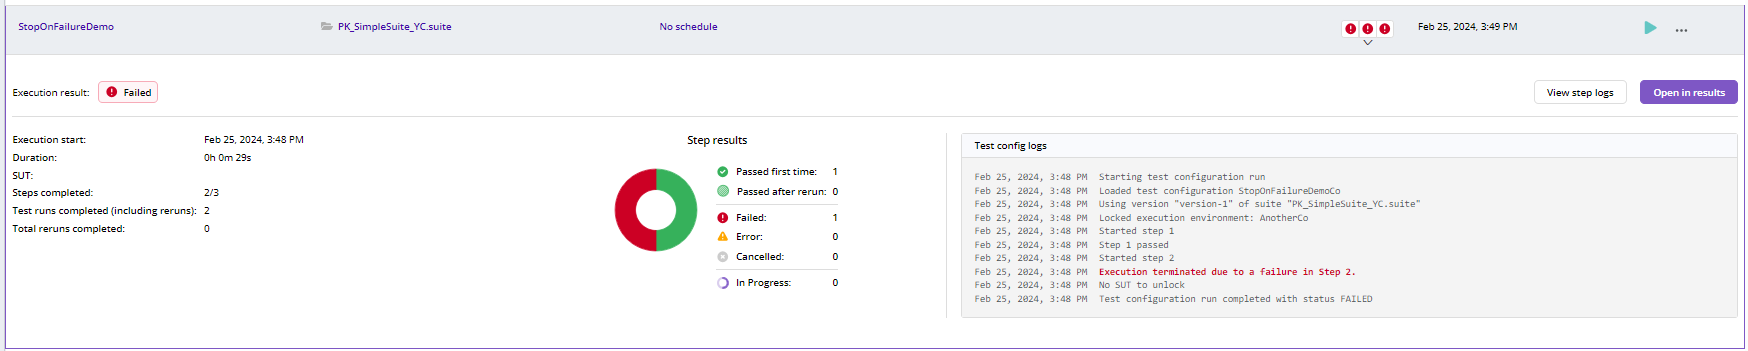
DAI provides the option to stop a test config run when a test step failure occurs. This option allows you to save resources, such as SUTs allocated for the test, and license usage. Rather than continuing to run the remaining steps of a test which may already be compromised, stopping a test config when a failure occurs can eliminate doubt about the cause of any issues subsequently encountered if the test were allowed to continue. Note that a test step can be a model-based test case, a script-based test case, or an exploratory test.
By default, DAI runs test configs to completion. This is controlled by the Run all test config steps to completion option on the test config Advanced Settings tab. To configure DAI to stop test config runs when a failure occurs, you disable this option as shown in the following sample screen.
Advanced Settings Stop On Failure enabled
To configure DAI to stop test config runs when a failed test step or error occurs:
- Disable the Run all test config steps to completion option by sliding its toggle to the left. (Disabling Run all test config steps to completion enables the stopping of test config runs.)
- By default, even when a test step failure occurs, the test config runs to completion.
- You can access the failing step by viewing the test configuration logs under the Controller menu on the Runner page. Expand individual test results to find this information.
Test Config stop on Failure stats
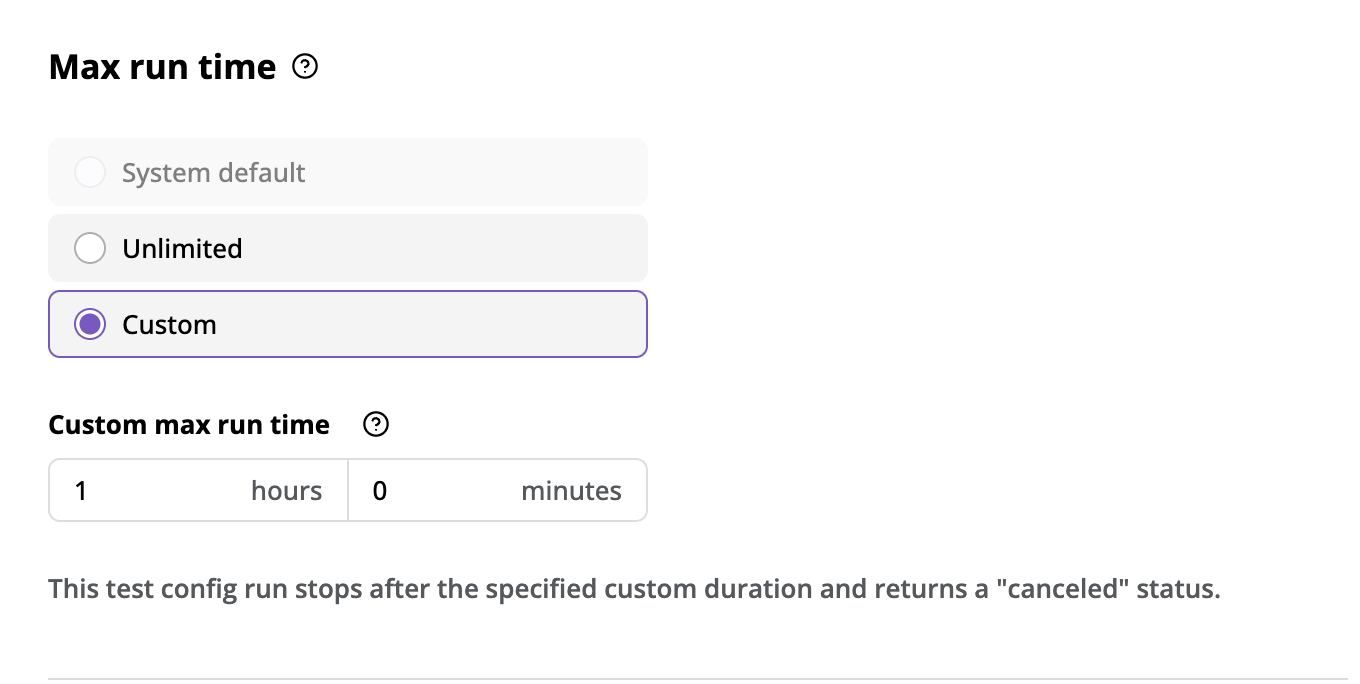
Timeout Management
DAI provides the option to automatically cancel a test config run when it reaches the timeout period. This is the same behavior you see when you manually cancel a test config run in Controller > Runner. Configuring DAI to automatically cancel a test config run can help to release SUTs and prevent any test config runs from getting stuck.
Test Config Max Run Time stats
There are 3 timeout options:
-
System default: This is a system-wide automatic timeout default setting you can configure in the config.yml file. This option is disabled if there is no value configured for it in the config.yml file. See Timeout System Default for more information about how to set the value.
-
Unlimited: This setting has no timeout for a test config, allowing it to run until completion, or until it stops due to a failure or error.
-
Custom: This setting stops test config runs after the specified duration.
To configure the test config timeout:
- Choose one of the options from System default, Unlimited, or Custom by selecting the corresponding radio button.
- If you choose the Custom timeout option, fill in the timeout period in the provided hour(s) and minute(s) fields.
- The maximum value for the hour field input is 168 (because the timeout period cannot exceed one week).
- The maximum value for the minute field is 59.
- The timeout period must be at least 1 minute to proceed.
- When a test config run reaches a configured timeout, DAI cancels it and assigns it a "cancelled" status.
- The maximum run time for hosted execution environemnt is 12 hours.
Timeout System Default
To modify the system default timeout value, the method depends on your deployment environment.
For On-Prem DAI Windows Installations
You modify the system default timeout value in the C:\ProgramData\Eggplant\Digital Automation Intelligence\config.yml file.
    env:
     SYSTEM_RUN_TIMEOUT: 0 <an arbitrary integer specifying the timeout for the runner to stop after the time reached.>
| Environment Variable | Value | Description |
|---|---|---|
SYSTEM_RUN_TIMEOUT | Minimum: 0, Maximum: 10080, Default: 0 | The interval in minutes the test runner runs after it reaches the timeout and cancels the test run. For example, if you specify 80 minutes for the SYSTEM_RUN_TIMEOUT variable, the System Default will show 1 Hour and 20 Minutes. |
For Helm Container Deployments
Please contact your Customer Success Manager or our Customer Support.
Running a Test Configuration
You can run a test configuration from Controller > Runner by clicking ![]() against the test you want to run.
against the test you want to run.
Go to Controller > Runner to configure test schedules with specific frequencies to be run at regular intervals. You can only have one schedule per test configuration.
Remember to always associate suites to a model before running tests.
When you abort a test run that is part of a test configuration schedule, all runs that are part of that configuration schedule are aborted.
Eggplant Functional Stop and Restart Settings for Test Configuration Runs
When running a test configuration, you can configure the length of time to run Eggplant Functional (EPF) before restarting or the grace periods for poll-time stopping and restarting with the following environment variables:
| Environment Variables | Default | Description |
|---|---|---|
RESTART_EPF_AFTER_SECONDS | 1800 | The period from when EPF launches until the next EPF restart. This variable takes effect after the current step finishes and before moving to the next. It only applies to test configurations run with the DAI Run Agent. During live runs, EPF runs continuously without restarting. Default: 30 minutes. |
EPF_QUIT_POLL_TIME_SECONDS | 20 | The grace period for EPF to quit during the restart process. |
EPF_RESTART_POLL_TIME_SECONDS | 120 | The grace period for EPF to start up after having quit. EPF_RESTART_POLL_TIME_SECONDS does not include EPF_QUIT_POLL_TIME_SECONDS. |
Removing a Test Configuration
To remove an existing test configuration:
- Go to Controller > Test Config.
- Find the test configuration that you want to delete, then from the Actions menu, select Delete.
- From here you can view or update the test configuration details.
Duplicating an Existing Test Configuration
To duplicate an existing test configuration:
- Go to Controller > Test Config.
- Find the test configuration that you want to duplicate, then from the Actions menu, select Duplicate.
- From here, you will be required to enter a new name for the Test Config.
- Click Create once a valid name is entered.
- From here, you will be able to edit your newly-duplicated Test Config.
- Make sure to avoid entering the same name as the Test Config that is to be duplicated.
- The new name must follow these rules:
- 1 to 100 characters (maximum length)
- Special characters are acceptable except for the following:
, \\ ; : " ' { }.