Using the Eggplant DAI Runner
The Eggplant DAI Runner page is where you can run pre-configured tests (called test Configurations or test configs), as well as view tests in progress and results, which are reported in easy-to-read, color-coded dots. You can also schedule test runs on the Runner page.
To access the Runner page, choose Controller > Runner on the menu on the left side of DAI.
Starting with DAI 26.2, you will have to select a space before you can see these menu options.
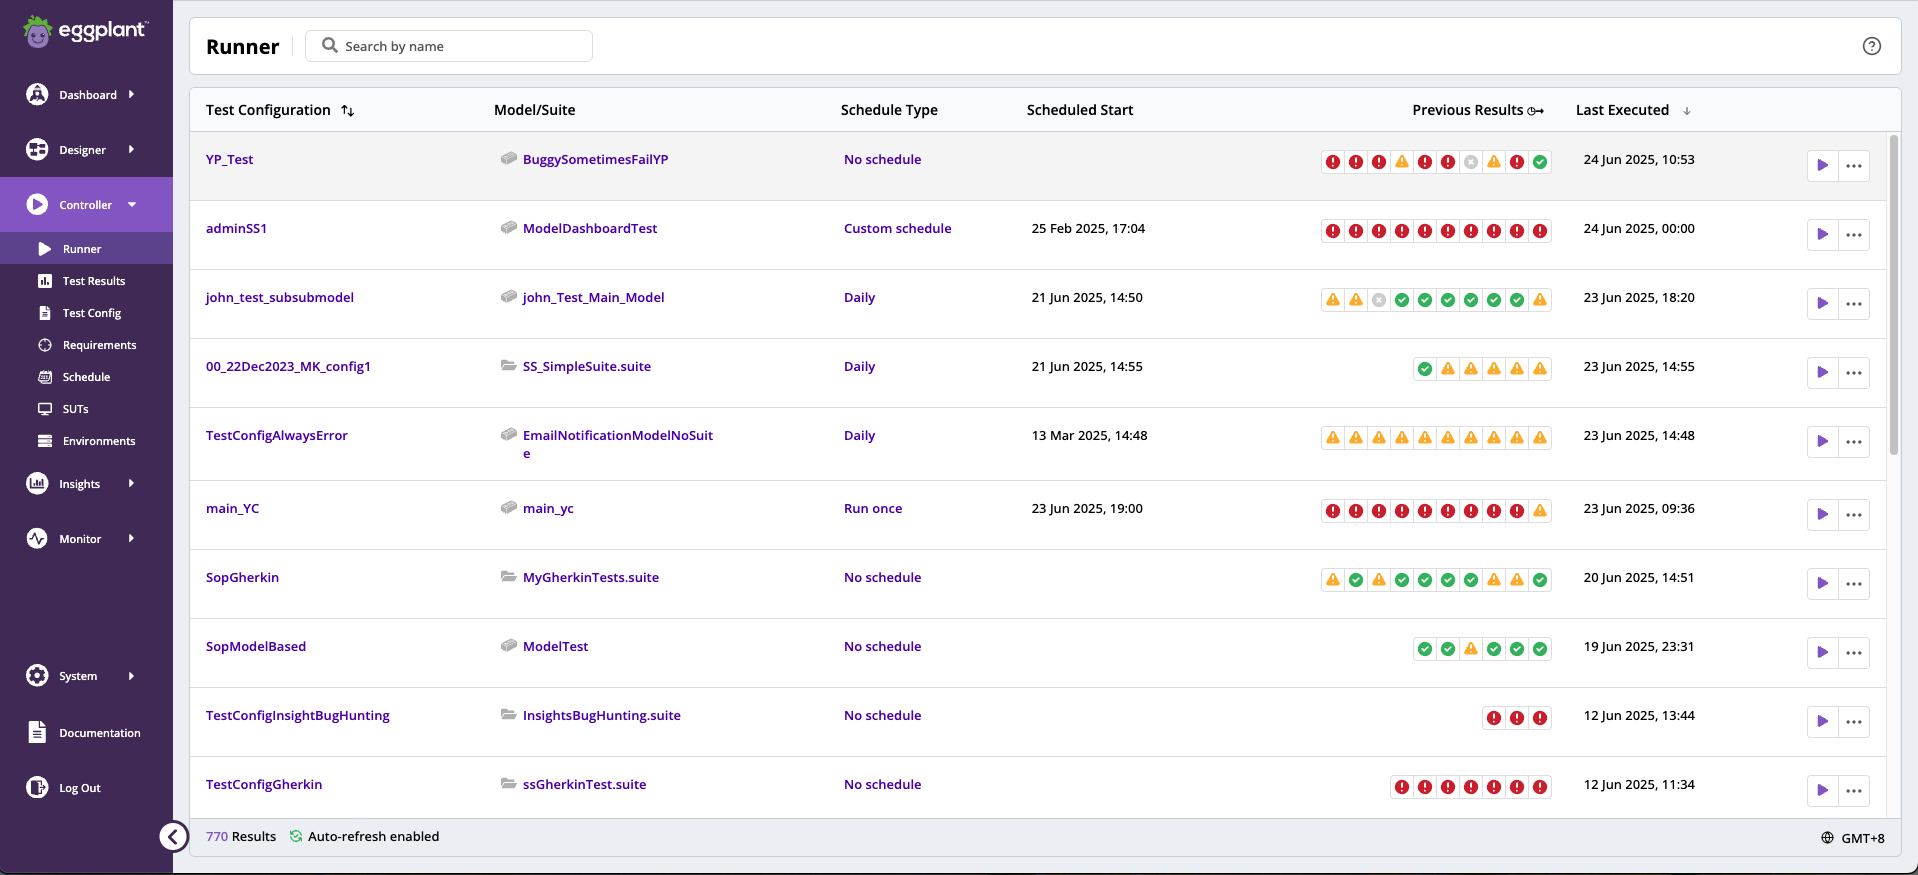
The Runner page in DAI, where you can run tests, see tests in progress, and view results
Running Tests

To run a test config, choose Controller > Runner to display the Runner page, select the test config you want, and click the Run button at the end of its row. The Runner page shows your test results as well. Repeat this step if you need to run more tests.
You can also configure schedules to run test configs at regular intervals on the Runner page. However, you can only have one schedule per test config.
See Running a Test Config for information about how DAI synchronizes test suites and handles variables during a test config run.
Note that when executed through a parent model, submodels will use the same suite as the parent model.

To stop a test configuration instance that's already in progress, click the button in the run list for the run you want and click the stop run button. A confirmation box will be rendered, click on Stop run to stop the run.
When you abort a test run that is part of a test config schedule, all runs that are part of that test config schedule are aborted.
If a test run is initiated (either at a scheduled time or by clicking the Run button) while another test run for the same test config is in progress, then the newly-started test run immediately completes with an error.
The Runner page displays the following information about your test configs:
-
Test Configuration: The names of your test configs. This column can be sorted alphabetically.
-
Model/Suite: A link to the Eggplant DAI model or suite used for the selected test config, each indicated by their respective icons to the left - where a building block
 represents a model and a folder
  represents suites.
 -
Schedule Type: The type of schedule for the test config. Displays No Schedule if none exists for a given test configuration. See Scheduling Options below for a list of schedule types.
-
Scheduled Start: The date and time that a scheduled test run will start for a given configuration. This field is blank if no schedule exists for that test config.
-
Previous Results: Shows the results of the ten most recent test runs (if applicable) represented via color-coded dots (described below). Hovering on an individual dot shows the status and date/time of the runs. Click to expand to see a snapshot of the results of that run.
 Indicates that the test was successful.
 Indicates that the test has failed.
 Indicates that the test configuration is in progress.
 Indicates that the test resulted in error.
 Indicates that the test run was aborted.
See Viewing Execution Results for more information.
- Last Executed: The date and time of the most recent run. Displays In Progress if a test run is ongoing. This column can be sorted chronologically.
New filtered run
The New filtered run feature allows you to execute specific steps within a test configuration (test config) instead of running the entire test. You can watch an example of how to use the New filtered run panel in DAI here.
To use this feature, click the ![]() Action menu for a test config you want to run a subset of test steps from, and select New filtered run. A slider panel opens where you can select the steps to include or exclude in a run.
Action menu for a test config you want to run a subset of test steps from, and select New filtered run. A slider panel opens where you can select the steps to include or exclude in a run.
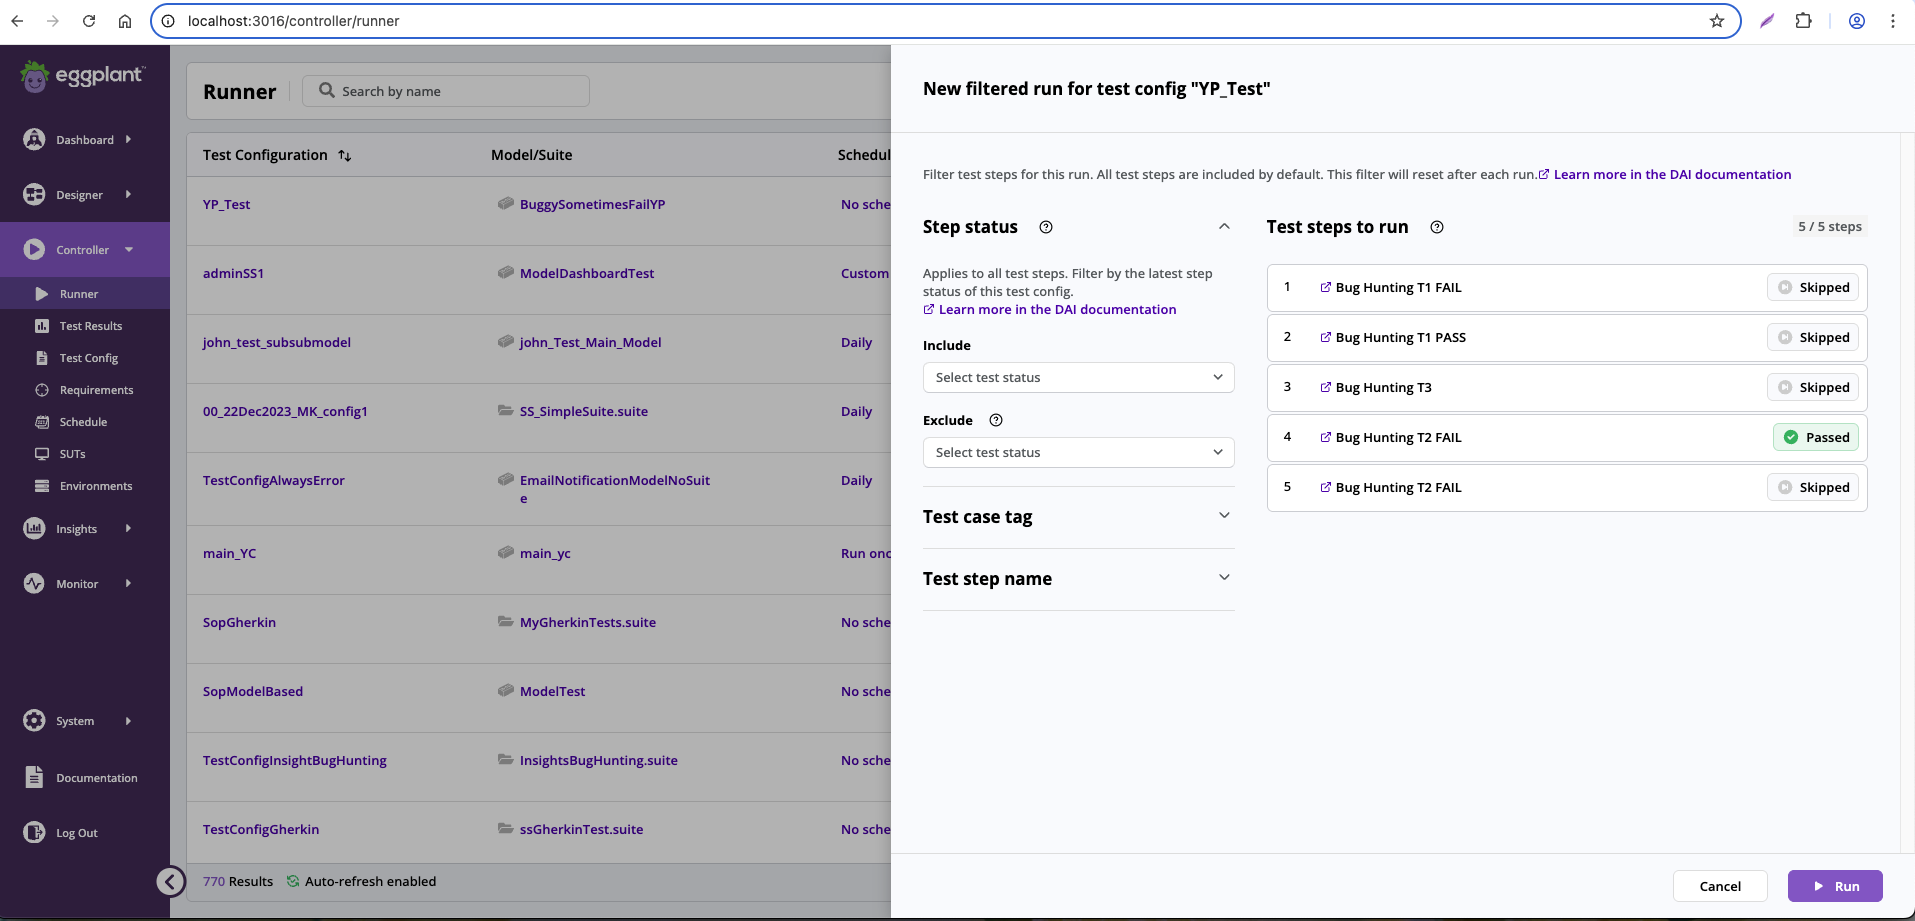
The New filtered run slider panel for a test config
Filter Options
The New filtered run panel enables you to filter the test steps you want to include or exclude in your test config run. The filter options available depend on the type of test config you selected:
-
Model-based test configs have 3 filter options.
-
Script-based test configs have 4 filter options.
The filter options include:
- Step status
- Test case tag
- Test step name
- Scenario tag (only available for script-based test configs)
The steps you select automatically display in the Test steps to run section on the right side of the New filtered run panel, along with the latest step status for each step displayed. The step status refers to the last time that step was run from within this test config. Individual test cases or steps of a test config may be marked as Untested if some steps were moved, added, or removed from the test config since the last run. A specific test case or test config step will be marked as Skipped if it is excluded by filtering during a test run.
The last run status of each step is determined by looking at the last run of the step within the current test configuration, not the last run of the test case. For example, if a test case passed the last time the current test configuration was executed, but has since failed when run as part of another test config (or as a Live Run), then we consider the last run status to still be Passed within the context of the current test config.
Please be aware that any test step statuses from before version 25.2.0 show a Untested status until they are run again. This is due to significant differences in the structure of test configuration information between versions.
Run the Selected Test Steps
When you finish selecting steps, click Run to run the selected test steps.
Quick Run
The Quick run button enables you to quickly rerun steps. You can see this button by clicking any of the result dots under Previous Results for a test config.
The Runner Quick Run options for quickly rerunning failed or errored or both steps
The following quick run options are available:
-
Failed Steps → Runs selected steps with the Failed status pre-selected.
-
Errored Steps → Runs selected steps with the Error status pre-selected.
-
Failed & Errored Steps → Runs selected steps with both Failed and Error statuses pre-selected.
Parallel Execution of Same Test Config
You can click the ![]() icon, New filtered run, or Quick run (for completed runs) multiple times to launch parallel executions of the same test configuration.
icon, New filtered run, or Quick run (for completed runs) multiple times to launch parallel executions of the same test configuration.
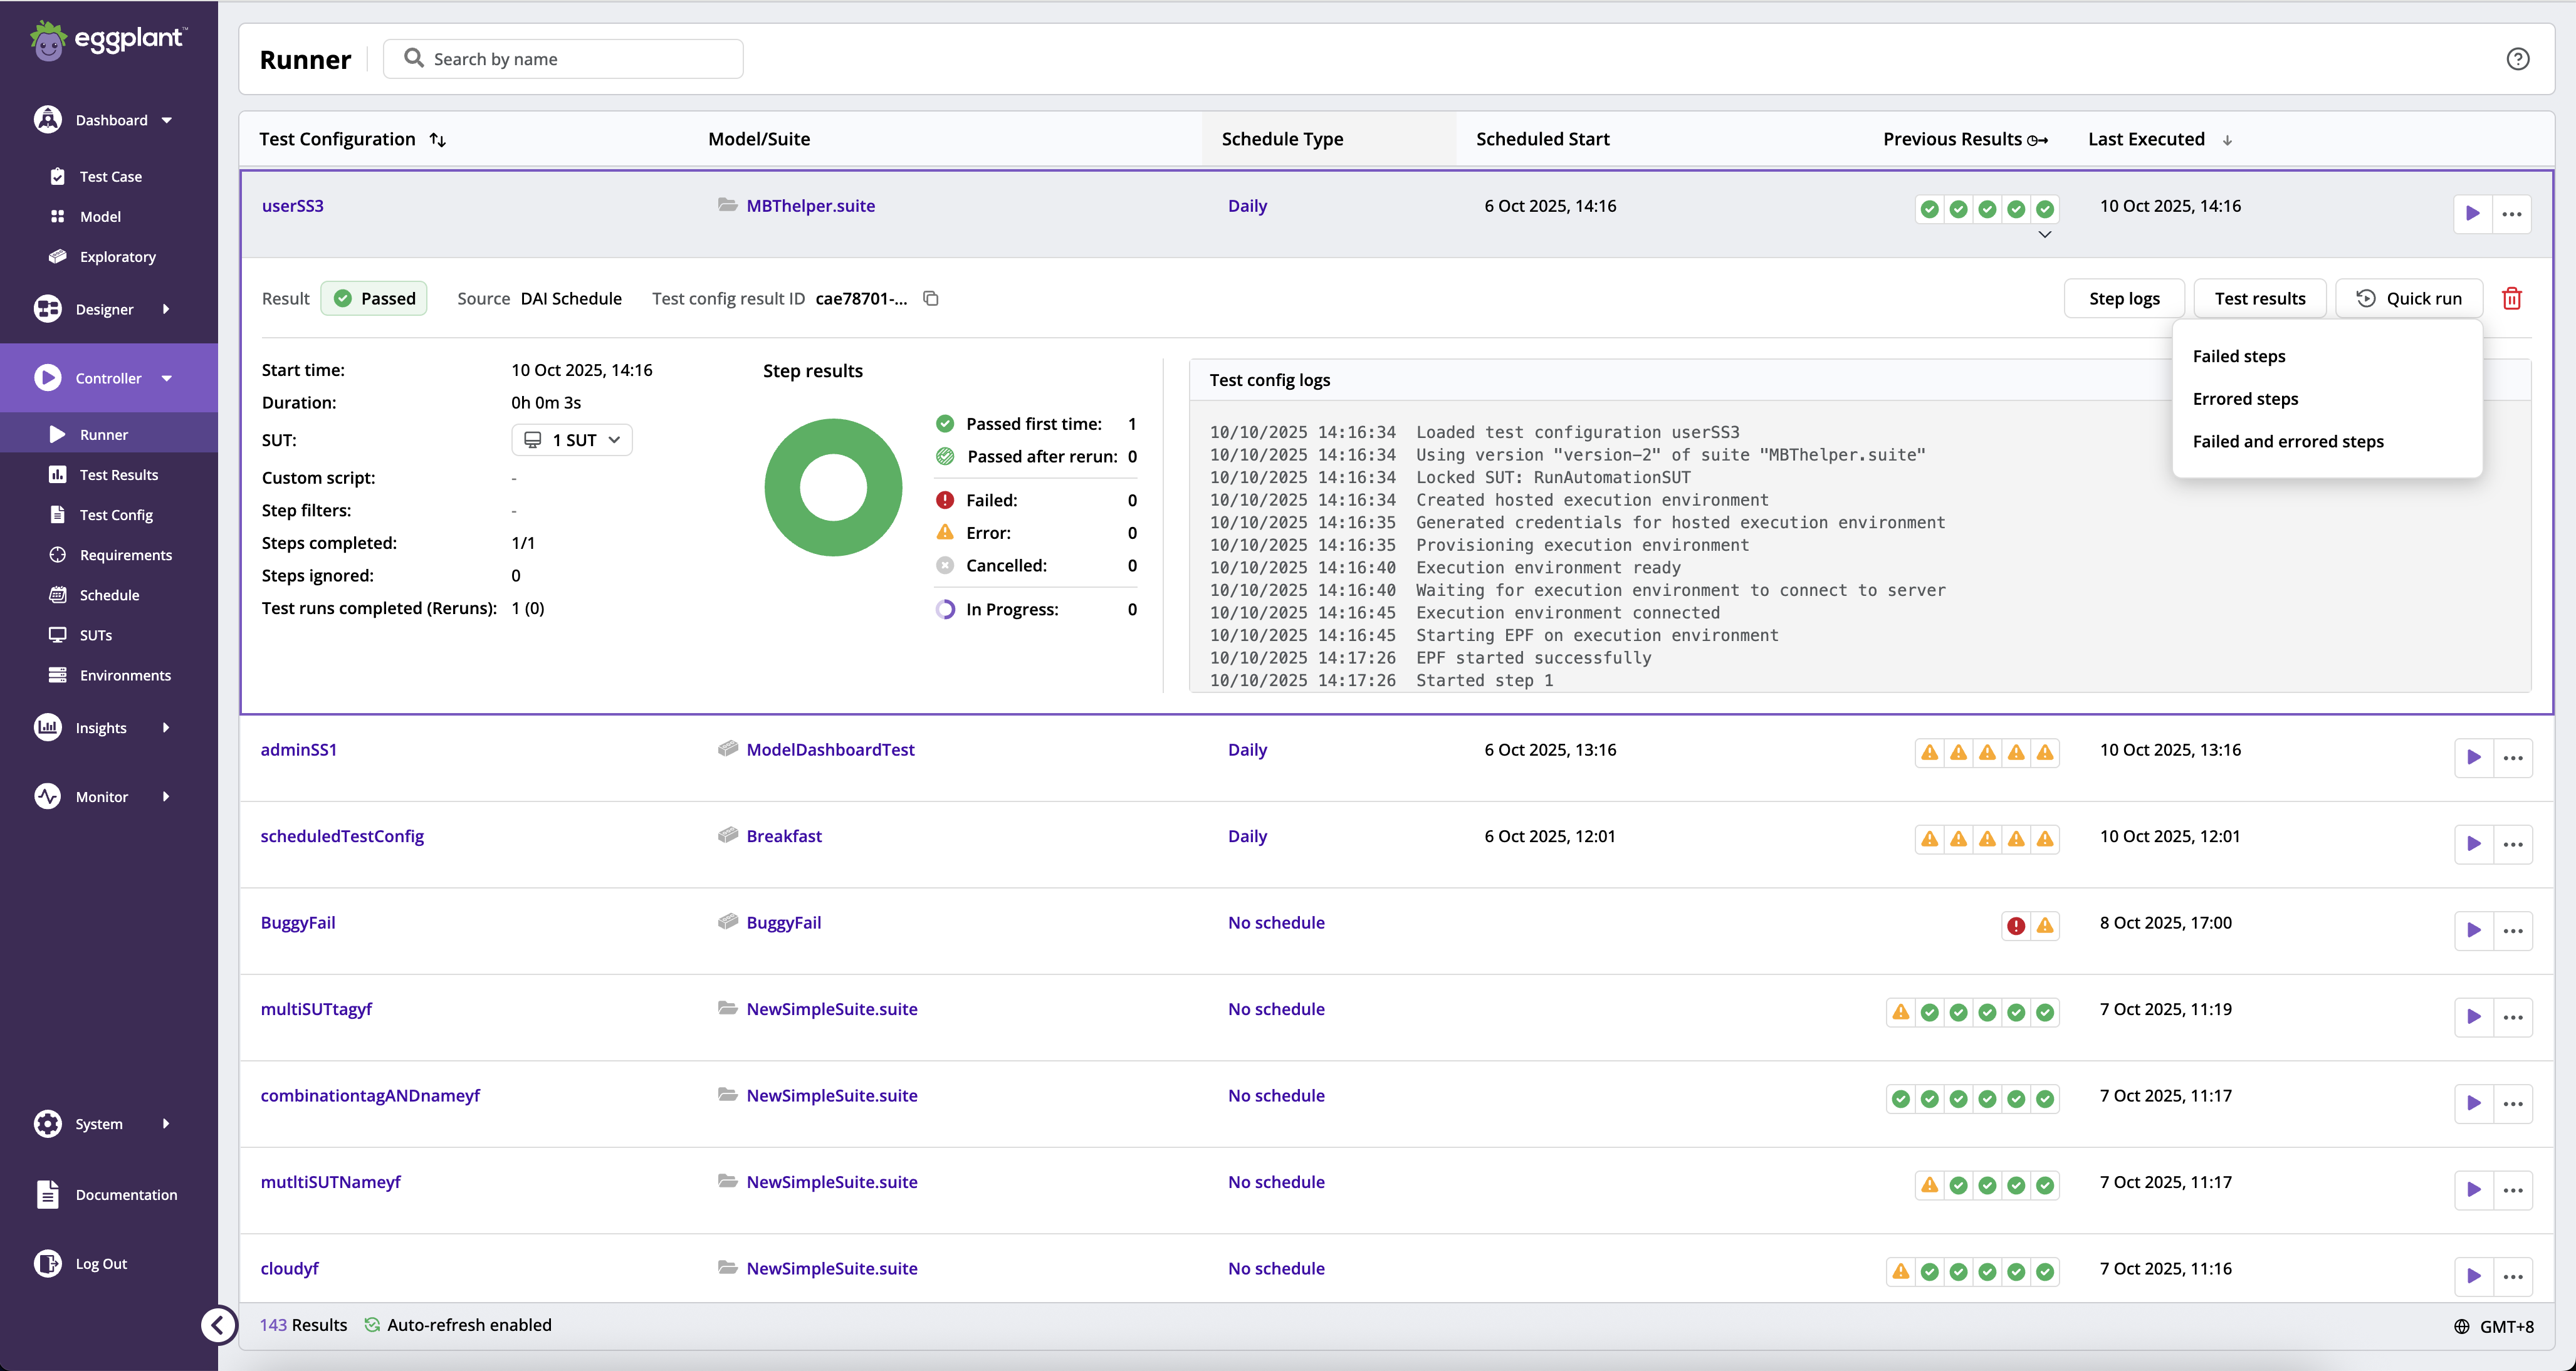
Viewing Execution Results
Accessing Detailed Test Execution Results
In the Previous Results column, you can gain insights into your test config execution by clicking on the individual run result icons. These icons represent various outcomes such as ![]() Pass,
Pass,
![]() Fail,
Fail,
![]() In progress,
In progress,
![]() Error or
Error or
![]() Canceled.
Clicking on them will expand a detailed summary of the test execution.
Canceled.
Clicking on them will expand a detailed summary of the test execution.
Test execution summary view
Within this summary, you'll find following information:
- Result: This indicates whether the test was successful or encountered issues.
- Source: This indicates the source of the test that is triggering which includes DAI Manual, DAI Schedule or CLI.
- Test config result ID: This indicates the task instance id of the run. You can click the copy icon to copy the value.
- Start time: This indicates when the run started.
- Duration: This indicates how long does the run takes to complete.
- Max run time: The time period after which to cancel a test config run.
- SUT: This indicates which SUT is the run running against.
- Custom script: The custom script that assigned to this test config.
- Step filters: This indicates the filtered being appled to this test config run.
- Steps completed: The number of steps successfully executed.
- Steps ignored: The number of steps ignored in the test configuration.
- Test runs completed (Reruns): The overall test runs completed, including both initial runs and any reruns with the total number of reruns performed across all steps in bracket.
Donut chart
A donut chart provides a visual representation of your test configuration's results. The chart showcases the following:
- Passed first time: The number of test cases that passed on their initial attempt.
- Passed after rerun: Test cases that initially failed but ultimately passed after a rerun.
- Failed: Test cases that did not meet the success criteria.
- Errored: Test cases that encountered errors during execution.
- Cancelled: Test cases that were incomplete.
- In progress: Test cases that are currently running.
Please note that in cases involving multiple reruns, the donut chart will display only the final result of the rerun. To learn more about the re-run feature visit the following page: Test configuration
Test Configuration Logs
For a more in-depth understanding of the testing process and detailed test case execution results, you can refer to the Test Configuration Logs. These logs provide a record of the testing and relevant details. If a filtered run is used, you can see which filters were passed in and if any tests were skipped because they didn’t match your filters. You can also see if any parameter overrides were taken using the Eggplant Runner CLI.
Clicking the Pass, Fail, In Progress dots shows the summary of the test execution
Click Open in results to drill down into the results of the selected test execution. This opens the Results page showing all the individual test runs for the selected test execution, but you can switch to the default All Runs view by clicking View all results link at the top of the display. Note that the Open in results button is available for all test results except for the runs that went into Error state.
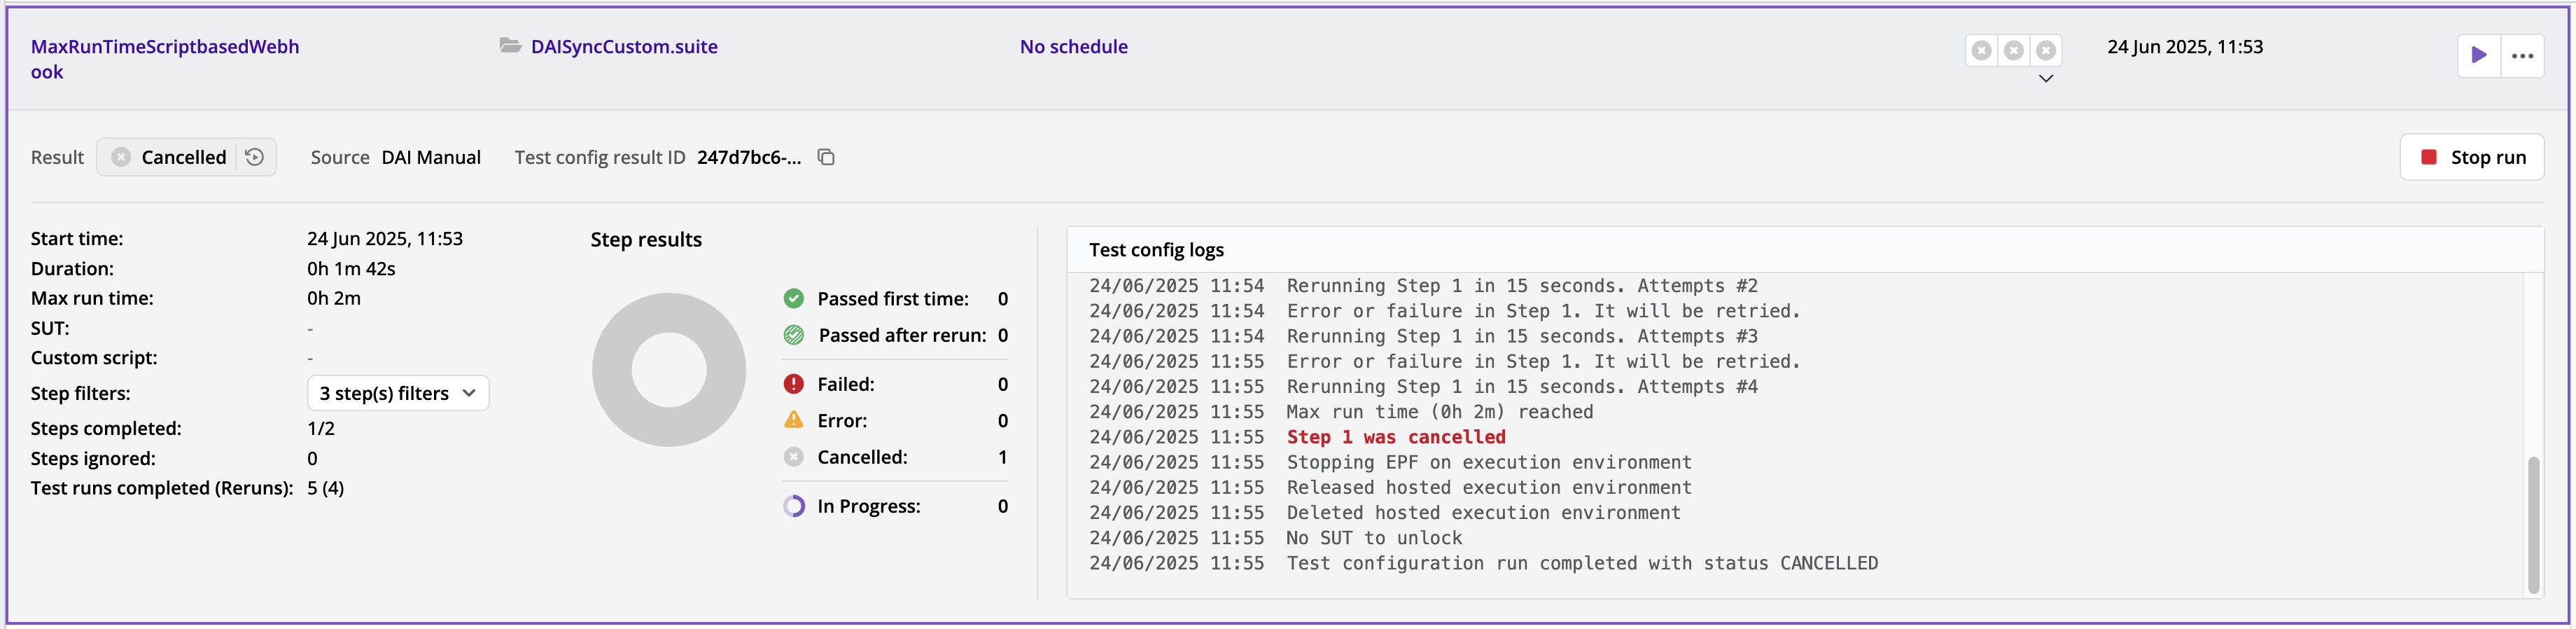
Clicking the ![]() Error execution dot shows the reason for the error in the expanded view:
Error execution dot shows the reason for the error in the expanded view:

Click the Error execution dot to view the expanded summary
Deleting a Test Run from the Runner
In the Previous Results column, click the individual color-coded dots representing ![]() Success,
Success,![]() Failure,
Failure, ![]() In Progress,
In Progress, ![]() Error,
Error, ![]() Cancelled to view the summary of that test execution in an expanded view.
Cancelled to view the summary of that test execution in an expanded view.
In the expanded view, click Open in Results to further drill down into the results of the selected test execution. This opens the Test Results page showing all the individual test runs for the selected test execution.
At the top right corner of the screen is a red button labeled as Delete Run. Clicking on it will render a confirmation box. Click on Confirm to proceed with the deletion.
The instance of the selected test execution as well as all of its results will then be deleted.
Once deletion is completed, the screen will redirect back to Runner page.
Scheduling Test Runs
Scheduling adds great flexibility to your test runs, enabling you to set your tests to run at specific intervals with the frequency you require.
If a test execution is initiated (either at a scheduled time or by clicking the Run button) while another test execution for the same test configuration is in progress, then the newly-started test execution immediately completes with an error.
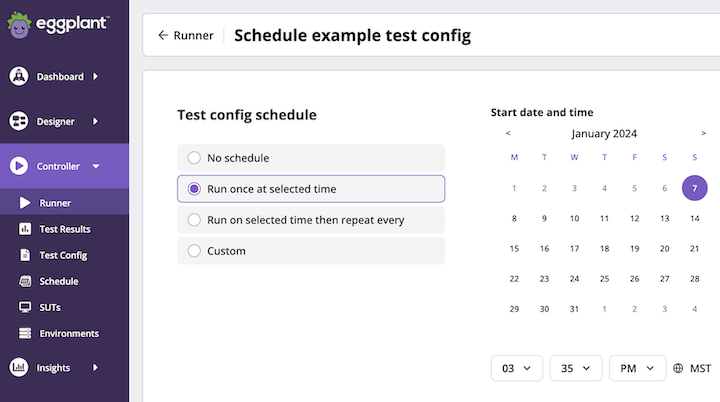
Test Schedule Type Run Once
Scheduling Options
Use the Test config schedule page shown above to set schedules for your test config runs. You can display the Test config schedule page using one of the following two methods:
- Display the Runner page (Controller > Runner), locate the test configuration you want to create a schedule for, and click its specified Schedule Type. (The default schedule type is No schedule.)
- Display the Runner page, locate the test configuration you want to create a schedule for, click its
 Actions menu, and select Run schedule.
DAI provides the following schedule types:
| Schedule Type | Description |
|---|---|
| No Schedule (default) | Runs are not scheduled for this test config. You do not see the calendar date or time selectors on the Test config schedule page for this option. |
| Run once at selected time | Runs a test once at the selected date and time. Selecting this option displays the calendar date and time selectors shown above. |
| Run on selected then repeat every | Runs a test at the selected date, time, and frequency. This option displays the calendar and time selectors, and a Repeat every field with a drop-down list shown below where you can select Days (default), Minutes, Hours, or Weeks. Selecting this option runs the test for the first time at the selected date and time, and then repeatedly according to the frequency you specify.  |
| Custom | Runs a test at a specified date and time, and provides the option to use Cron syntax in the Custom time interval field shown below. Selecting this option runs the test for the first time at the selected date and time, and then repeatedly according to the Cron syntax schedule you specify. DAI Cron syntax recognizes Monday as the first day of the week instead of Sunday as shown below in Custom Cron Schedule Examples. 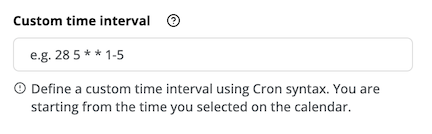 |
Custom Cron Schedule Examples
# schedule executing at midnight from Monday to Friday \{#schedule-executing-at-midnight-from-monday-to-friday}
0 0 * * 0-4

# schedule executing every weekday at 5:30PM \{#schedule-executing-every-weekday-at-530pm}
30 17 * * 0-4
For information about using Cron syntax, click the help (?) button next to the Custom time interval field. You can also see this article.
If you are not familiar with using Cron syntax but would like to learn more, please contact our Customer Support.
Step-by-Step: Scheduling Tests
-
Display the Test config schedule page using one of the following two methods:
- Display the Runner page (Controller > Runner), locate the test configuration you want to create a schedule for, and click its specified Schedule Type. (The default schedule type is No schedule.)
- Display the Runner page, locate the test configuration you want to create a schedule for, click its Actions menu
..., and select Edit.
-
Select the radio button for the scheduling option you want:
- Run once at selected time
- Run on selected time and repeat every
- Custom
The Test config schedule page displays the scheduling option you selected and the Start date and time calendar date and time selectors.
- If you choose Run on selected and the repeat every, you also see the Repeat every field and interval selector shown above in Scheduling Options.
- If you choose Custom, you also see the Custom time interval field where you can enter Cron syntax as shown above in Scheduling Options.
-
Choose the date and time you want the test config to execute or execute for the first time, and specify the time interval or Cron syntax if appropriate for your selection.
-
Click Save to save your schedule or Cancel to discard it.
Viewing All Runs
You can view all runs within a test configuration, including any executions that didn't go through, runs that are in progress, and typical runs with usual pass or fail status. Viewing all runs within a test configuration is particularly useful to locate the details to determine the likely cause of a failed run.
Viewing Run History
From the Actions menu ![]() on the test config you want to see the history of, select View all runs. The results open in a separate interface displaying the following information with the most recent runs:
on the test config you want to see the history of, select View all runs. The results open in a separate interface displaying the following information with the most recent runs:
- Result: The status of the test runs in color-coded capsule format. The options are as follows:
- Success
- Failed
- In Progress
- Error
- Canceled
- Start time: The date and time that the test configuration run started.
- Source: The source that triggered the test configuration run, which may be DAI Manual, DAI Schedule, or Eggplant Runner.
- Test config result ID: The instance ID of the run. You can click the Copy button
 to copy the ID.
 - Open in Results: Click Open in Results to further drill down into the results of the selected test execution. This opens the Results page showing all the individual test runs for the selected test execution, but you can switch to the default All Test Runs view by clicking View all results.
- Expand row button: Click to view a snapshot of the results of the selected execution.
Click the Runner navigation link to switch back to the Runner page.
Due to browser security, you cannot click the Copy button to copy the Test config result ID in an on-prem DAI instance Windows Installer Environment.
Deleting Test Runs from Run History
You can delete a test run from the history using the red ![]() Delete button on the far-right side of each test run row. When you click Delete, you see a confirmation dialog box where you can click Confirm to delete or choose Cancel.
Delete button on the far-right side of each test run row. When you click Delete, you see a confirmation dialog box where you can click Confirm to delete or choose Cancel.
The instance of the selected test run as well as all of its results will then be deleted.
After the test run is deleted, the page refreshes and the test is removed from the history list.
The Delete button is disabled when a test configuration is running.
Quick run from Run History
You can quickly rerun a test from the test run history using the Quick run button, which is next to the Delete button in each test run row.
The following quick run options are available:
-
Failed Tests: Runs selected steps with the Failed status pre-selected.
-
Errored Tests: Runs selected steps with the Error status pre-selected.
-
Failed & Errored Tests: Runs selected steps with both Failed and Error statuses pre-selected.
The Quick run button is disabled when a test configuration is running.
Stopping a test configuration instance from Run History
To stop a test configuration instance that's already in progress, click the Stop button in the run list for the run you want and click Stop Run to stop it.
When you stop a test run that is part of a test config schedule, all runs that are part of that test config schedule are stopped.
Set Retry Limits and Intervals for Connections to SUTs and Execution Environments
You can configure the DAI Runner to automatically retry failed test connections to a SUT or Execution Environment with the following environment variables:
-
RETRY_SLEEP_INTERVAL_SECONDS -
RETRY_TIMEOUT_SECONDS
The DAI Server configuration file includes these variables by default. See Retries the connection for SUT and Execution Environments for explanations of these variables and instructions for modifying your DAI Server configuration file.