Completing the Create an Injector Family Wizard
When you're satisfied with the configuration options for your new injector family, click Create to create the new injector family.
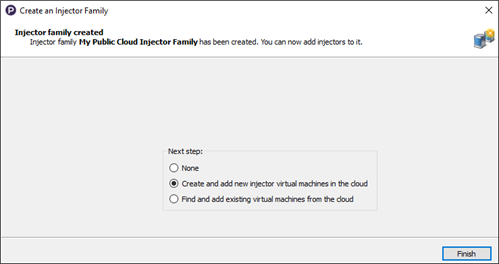
The next screen confirms that your injector family has been successfully created. It also gives you the option to create or add injectors to the new family.
-
Static injector families: You'll see a single checkbox for Add injector(s) after the wizard finishes, which is selected by default. With this option selected, the Add Injector(s) to Family dialog box opens after you click Finish.
To learn about adding injectors to a static injector family, see Adding Static Injectors.
-
Public cloud injector families: Additional options are available:
-
None: Select this option if you don't want to create or add public cloud injectors to the family at this time.
-
Create and add new injector virtual machines: Select this option if you're ready to create new virtual instances in your public cloud provider (Amazon EC2 or Microsoft Azure). After you click Finish, the Create cloud injectors dialog box opens.
For information about creating new Public Cloud injectors, see Creating Injector Virtual Machines.
-
Find and add existing virtual machines from the cloud: Select this option if you have appropriate injector instances in your public cloud provider that you want to use; after you click Finish, the Add Existing Cloud Virtual Machines dialog box opens.
See Adding Existing Injector Virtual Machines for more information.
-
Click Finish when you're ready to proceed.