Credentials
To create a Public Cloud injector family in Eggplant Performance Studio, you must enter access credentials for a cloud provider, which are stored encrypted. Eggplant Performance needs to use these credentials to access your cloud provider, to perform tasks such as automatically starting/stopping injector virtual machines, or reading status information to be presented in the Eggplant Performance UI.
Public Cloud credentials cannot be created without first setting a workspace protection password. Bear in mind that using Public Cloud environments incurs costs from the cloud provider(s). If you select the Remember password option, anyone with access to this computer will be able to create, start, and stop cloud instances on the associated cloud account.
For more information, see Workspace Password Protection.
Adding Public Cloud Credentials
To add Public Cloud credentials:
-
From the workspace tree, select Injector Families > Public Cloud > Credentials.
-
On the right side of the window, click the Add credentials button (the plus sign, +). The Add Cloud Credentials dialog box opens.
-
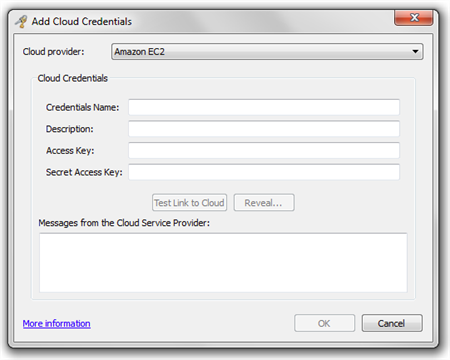
Enter your Cloud credentials:
- Cloud provider: Choose from Amazon EC2 or Microsoft Azure. Both services require a subscription from the vendor.
- Credentials Name: Enter a name to identify the credentials.
- Description: Enter an optional description for these credentials.
The next two options are different depending on whether you're using EC2 or Azure. These are your access credentials for the chosen service. Work with your service provider to make sure that you enter the correct information.
- For Amazon EC2: Access Key & Secret Access Key
- For Microsoft Azure: Subscription ID & Certificate Path (see the information on Microsoft Azure Certificates)
-
After you've entered your access credentials, the two buttons beneath this section become active:
- Test Link to Cloud: Click this button to test the access information on the current form. As the test is running, status information appears in the message box below the buttons, and a final message lets you know whether a valid connection was made.
- Reveal: Click this button to show the actual characters of your access credentials, which can be useful if you need to troubleshoot an invalid connection. After you click Reveal, the button changes to Hide so that you can conceal the information again.
-
When you're satisfied that your credentials are entered correctly, click OK to proceed. Your new stored credentials appear in the list at the top of the Public Cloud Credentials screen in Studio.
When you select an item in the list, the information for that stored credential appears below in the Cloud Credentials section. The access credentials are concealed by default; however, you can click the Reveal button to show the actual characters. Use the Test Link to Cloud button to verify your connection.
Editing Public Cloud Credentials
The information displayed in the Cloud Credentials section of Studio isn't editable. To edit an existing credential:
- In the Public Could Credentials screen in Studio, find the Cloud Credentials section and from the list select the credentials that you are interested in.
- Click Edit to the right of the list. The Edit Cloud Credentials dialog box opens. The Edit Cloud Credentials dialog box is essentially the same as the Add Cloud Credentials dialog box described in the previous section. You can't change the cloud provider of an for existing credentials, but all other settings are editable.
Deleting Public Cloud Credentials
To delete an existing credential:
- Follow the instructions in step 1 of Editing Public Cloud Credentials.
- Click the Remove credentials to the right of the list. Removing a stored credential requires confirmation.