Virtual Machine Images
To create a Public Cloud injector family in Eggplant Performance Studio, you must attach at least one virtual machine (VM) image. A VM image is essentially a template for the virtual instances that you'll use to create injectors.
You'll add them in the workspace tree under Injector Families > Public Cloud > Virtual Machine Images.
Creating a VM Image
Before you can attach a VM image, you need to create and configure the appropriate VM image or images on your cloud provider. The specific steps to achieve this will vary depending on your cloud provider but the basic procedure is outlined below:
- Create a VM instance (or select an existing VM) on your cloud provider.
- Download the injector installer
.msifrom the Eggplant website and copy it onto the VM. - Run the installer
.msion the VM. - Start the injector as a service by using
installInjectorService.bat. - Configure the VM Firewall.
For more information about installing injectors, see Injector Installation.
Adding VM Images
When you have created a VM image on your cloud provider, you can add it to Studio:
-
In the Workspace tree, select Virtual Machine Images.
-
Click the Add button on the right side of the main Studio window, which opens the Add Virtual Machine Image dialog box:
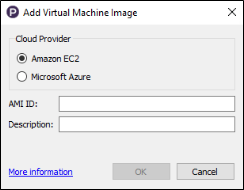
-
Enter the following details for your VM image for your Cloud Provider. First, select either Amazon EC2 or Microsoft Azure, and then:
- For Amazon EC2: Enter the AMI ID (Amazon Machine Image ID) for the virtual instance you want to attach.
- For Microsoft Azure: Enter the Image name for the virtual instance you want to attach.
You'll need to work with your cloud provider to find the correct vendor-specific information.
-
In the Description box, add any useful notes about the VM image.
-
Click OK to add the VM image.
Deleting a VM Image
To delete a VM image:
- In the Workspace tree, from the Virtual Machine Images list, select the VM image that you want to delete.
- Click the Delete button. You can also right-click the item and select Remove Virtual Machine image. Deleting an image requires confirmation.
Editing a VM Image
To edit a VM image:
- In the Workspace tree, from the Virtual Machine Images list, select the VM image that you want to update.
- Click the Edit button. You can also right-click the item and select Edit Virtual Machine image. You can't change the cloud provider of an existing VM image, but you can edit the AMI ID/Image name and the description.