Using the Eggplant DAI Designer
The Eggplant DAI Designer lets you perform a variety of tasks, from viewing existing models and associated suites, to creating new models by capturing various aspects of the UI while still interacting with the screen of a system under test (SUT).
In Capture, you can add the interactive behaviors of screen elements (buttons, tabs, checkboxes, text boxes) as actions within a state while connected to a SUT.
The Designer gives you access to:
- Models: Manage existing models and create new ones.
- Test Cases: Manage existing directed test cases and create new ones.
- Suites: View the collection of Eggplant Functional suites that have been uploaded via Manage Suites in the DAI Design Agent window (labelled as Internal Storage) or added to DAI via Git integration (labelled as Git).
- Snippets: Edit scripts associated with the active model without needing to open Eggplant Functional (EPF).
- Capture: Create models from scratch in Designer without prior experience of creating models in the Model workspace.
Capture a New Model
Follow the steps below to create a new model using Designer > Capture. If you prefer, you can still build models from scratch in the Model workspace.
To build your model:
-
Go to Designer > Capture.
-
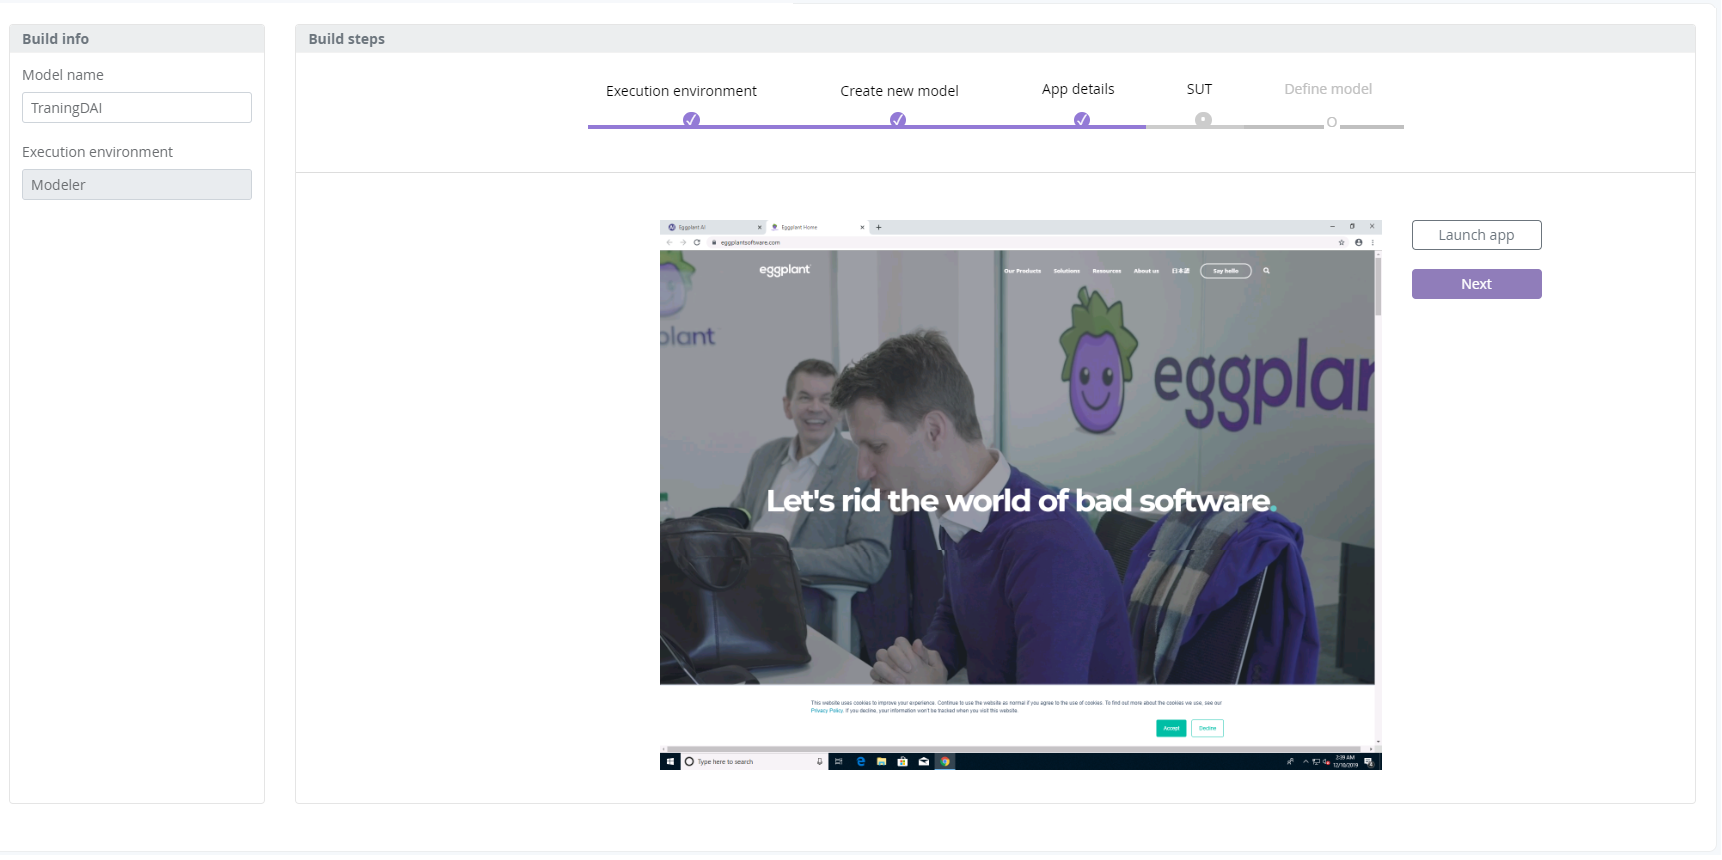
Enter the Model name and click Next. The Select Execution Environment page displays all the agents in the system. In addition, it displays the newly created Model name. If required, you can rename the model at this point by clicking the model name.
noteThe model name must not contain spaces, and the only permitted special characters are underscore (_), tilde (~), and hyphen (-).
-
Select the Execution Environment to choose the connection that the model should run on. Click Next if you want to specify the details for starting and closing your app correctly. Alternatively, skip to step 6 to create a model from the current screen in the SUT by clicking Skip.
-
(Optional) From the App details page, select the Platform that you want to test your app on. For testing a mobile app, select Android or iOS. Otherwise, select Windows. If you select Windows, you must also specify additional information:
-
App type: Specify the method to launch the app using the following options:
- Browser: Select the browser type: Chrome, Firefox, Edge.
- URL: Provide the URL to access the application. For example, to open the Eggplant website, enter
https://www.eggplantsoftware.comhere. - Executable: Specify the executable file name, folder, resource, or path. For example, to open Notepad, type
notepad.exehere.
A spinner icon appears as the agent connects to your SUT. After the DAI Design Agent or DAI Run Agent has establishes a successful connection with the SUT, the following two things happen:
-
The SUT image appears, showing what you would see on the SUT display:
Displays the SUT view
noteA warning message appears on the SUT view page if you do not have an execution environment configured, or if you are unable to make a connection to your SUT. Make sure your SUT is connected, then click Refresh on the SUT view page to continue.
-
The Run window appears, displaying the connection information of the SUT you're connected to:
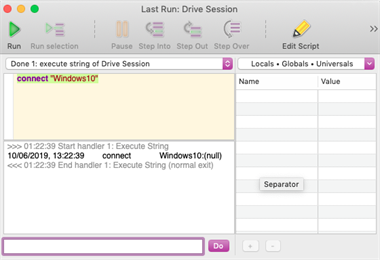
The Run window showing the script execution on the SUT
If you entered App details in step 5 and clicked Next, a Start action is added to the Initial state, linking the relevant script file to the action. In addition, a snippet is linked to the default Cleanup state to automatically close applications. You can view your app being opened in the SUT view by clicking Launch app on the App details page. For example, if your script includes launching of an app, such as the calculator, the SUT view will show the app launching using the SenseTalk script that was generated in the previous step.
-
-
Click Next and then in Designer, with the SUT view displayed, select the control type on the left and then drag it to draw a box around the required element on the screen. Each of the following UI control options is associated with a color and a shortcut key number:
-
Button
-
Text box
-
Drop-down list
-
Radio button
-
Checkbox
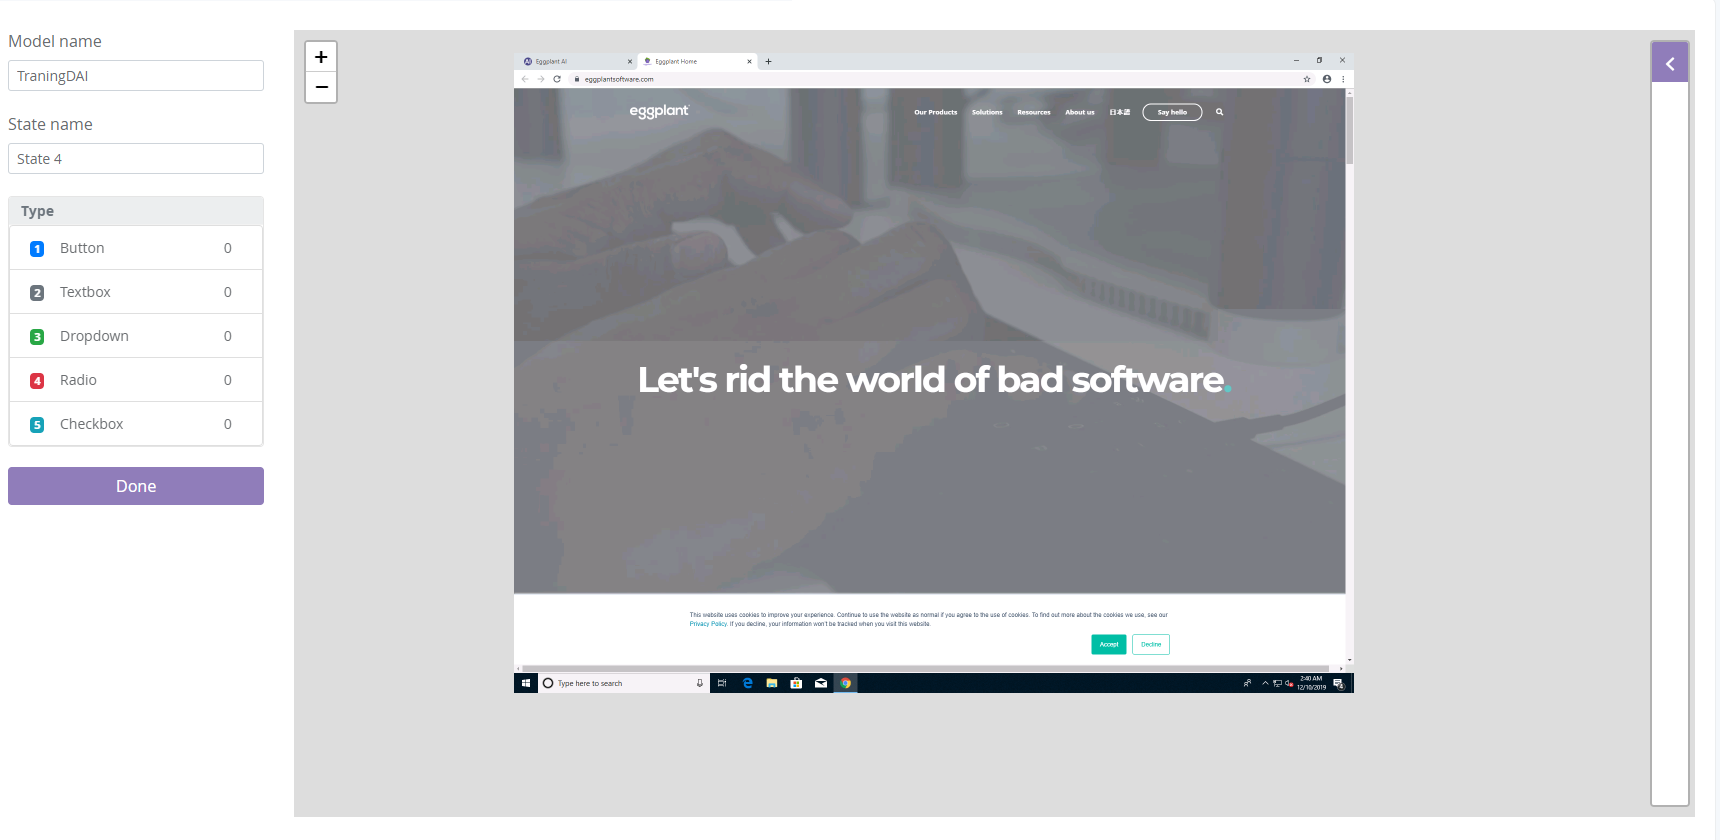
Use the SUT view to create actions
Note that every UI element you capture in Designer becomes an action for the selected state in your model. A SenseTalk script is automatically generated for the highlighted UI element on the SUT screen and saved to the valid suite folder as you draw around the selected element. Any changes to the element location will then update the script accordingly.
Tips- Click the State name to change it to something more descriptive for your model.
- You can use the keyboard shortcut keys displayed against each of the screen element types to speed up the flow of drawing boxes, instead of using the mouse to click a control for each element.
-
-
Enter the following information for the selected action on the Properties pane that appears on the right:
noteYou enter the action information as you capture a screen element. To delete the selected screen element, select it in Designer and manually delete it.
- Action name: A default name for the action is added, which is suffixed with a number that changes incrementally as a new action gets added. You can change the default name to something more descriptive based on your model.
- Description: Provides useful information about this action.
- Control type: (Read-only) Displays the selected control type.
- Default Value: (Optional) Defines a default value for the text and drop-down menu control types. Note that this field does not appear for other control types. For example, when entering the Action properties for a Dropdown control type, you set the hot spot and then enter the default value to specify the value that the script should select.
- Set Hot Spot: Click this button to mark a hot spot of the control type on the SUT view. A red crosshairs icon appears in the exact location where you clicked, which is what the script will use while executing this action. A typical use for this is when you select the Radio button control type: You draw around the label, and set the hot spot against your preferred option. This adds the offset coordinates to the script of the selected action. To move the hot spot to a new location, click Set Hot Spot again.
- Snippets: (Read-only) Displays the script name that is created for the current action. The script name follows a naming convention, which is,
model name-state name -action name-timestamp.scriptfor unique identification.
-
Click New State to execute the current script for the selected action and create the next state. This also creates a connection between the previous action and the new state.
-
Repeat steps 6-8 until you've created all states and actions needed in your model, then click Done. The newly created model opens in the Model workspace.
You might want to specify an exit state for the model by associating a valid action with the predefined Exit state in the Connections from action menu. You can also add previous actions, global actions, and sequent actions at this point in the same way as before.
-
When you are ready, click Run to test your model.
See Working with Models in Eggplant DAI for more information on how to test and adjust your model in the Model workspace.
View Suite Details
Suites lets you view all available suites and their version so that you can track a suite's history. Suite versions are saved when you upload model assets, such as scripts or images in the associated suite folder.
Follow these steps to drill down into details for a specific suite:
- Go to Designer > Suites. All the suites that are available to you in Eggplant DAI are displayed as tiles in alphabetical order. Each tile shows the latest version as well as the last updated date and time.
- Find the suite that you're interested in, and from the Actions menu
 , click View Details. The following suite details are displayed:
- Name: The name of your suite.
- Associated Models: The model associated with the selected suite, if applicable. That is, if you have associated any images or scripts from the selected suite into a model, then that model will be displayed.
- Version History: All the versions that are available for the selected suite. By default, every suite has at least one version.
Select < Suites from the top menu to return to Designer > Suites.
To delete a suite, from the Actions menu, click Delete. A confirmation message appears prompting you to confirm the delete action.
View Suite Files
To view the files that are in your suite, first open the suite details page from the Actions menu ![]() (step 2, above), then click the Files tab. In Files view, the list of files in your suite appears in the left pane. When you select a file from the list, that file appears in the right pane. The right pane is read-only.
(step 2, above), then click the Files tab. In Files view, the list of files in your suite appears in the left pane. When you select a file from the list, that file appears in the right pane. The right pane is read-only.
Using the Script Editor
The Script Editor lets you edit the existing Eggplant Functional snippets that are linked to your model. The primary benefit of the Script Editor is that you can edit SenseTalk scripts within Eggplant DAI without having to switch to Eggplant Functional.
Edit a script in the Script Editor
Go to Designer > Snippets. The Script Editor displays all the script files and CSV files available for the associated Eggplant Functional suite in a tree view format.
Prerequisites
- Connect to an Eggplant Functional suite by starting a DAI Design Agent. See Connecting an Eggplant Functional Suite for more information.
- Download any suites you wish to edit in Eggplant DAI.
Follow these steps to edit an existing snippet in your model:
-
From the Execution Environment list, select the execution environment that you entered when you configured the agent.
-
From the Suite list, select the Eggplant Functional suite that contains the connected SenseTalk snippets. A list of suites is only displayed when you've associated at least one suite for your model stored in Eggplant DAI.
-
Select a script file. The SenseTalk script is displayed in the script editor. A list of scripts is only displayed when at least one snippet is in your suite folder.
-
Make the required changes to the script and click Save. The changes are saved to the Eggplant Functional suite that your model is connected to.
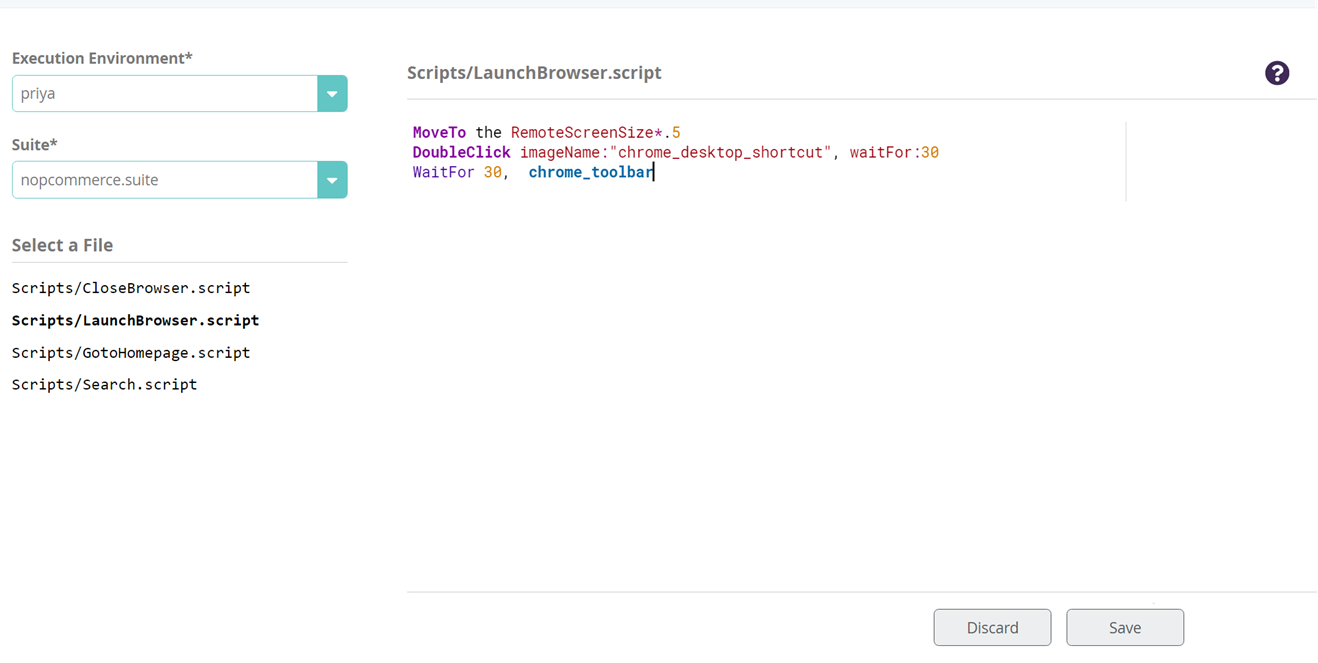
Script Editor displaying the available snippets for editing
To undo changes made to the selected script, click Discard.
When you have finished editing your suite, make sure to upload your changes to Eggplant DAI via the DAI Design Agent using Manage Suites. This is so you can ensure your local changes are up to date for sharing and scheduled test executions.
If you don't upload your changes that you've made in the Script Editor via DAI Design Agent window > Manage Suites in the suite that's been modified, then your changes will be overwritten when you run a test configuration of a model linked to this suite.